What's new
What's new

Workshop Widgets you have printed?

Pete F

Titanium
Joined
Jul 30, 2008
Location
Sydney, Australia
Hopefully this can be made a sticky, as I'm keen to see what others have come up with in terms of using a 3D printer, of any description, to aid work flow in their workshop. Apart from producing prototypes, I'm keen to see some more mundane objects that just aren't worth fussing over, but can be quickly modelled up and sent to the printer to be picked up later for use.
 
I thought I would post a few examples of a extremely boring components to throw up here, hopefully to get the ball rolling and see what others use their printers for. Note to the people who want to hang crap on seemingly everything, these are NOT examples of good prints, quite the opposite in some cases. Instead just "stuff I've made" that I just quickly went to the workshop and could see handy to photograph.

The first was an indicator holder so I didn't need to fuss about getting a mag base. It's a friction fit in the toolpost so I just drop it on and indicate a part as required. It was printed in ABS but the shape made it shrink, I could do it again with more care if I cared. I don't so won't. It works fine as it is.

Indicator holder.jpg

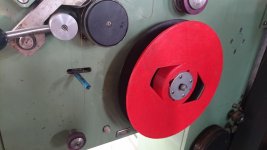
I needed a 5 degree platter as a fixture to hone the edges of scraper blades. I wasn't going to dick about with the mill as I have better things to do with my time. Sent it to the printer and this is what I got.

5 degree Fixture.jpg

This is a radius gauge I quickly drew up so I didn't risk trashing my good radius gauges on trivial work around the T&C grinder. The centre is a 1" square if I ever feel like counting dots. Unlikely but who knows. I thought I'd send some down to a friend who may be able to use them or give them out to scraping students, so threw his name on it. The orange ones are PLA.

Scraper Gauge.jpg

The final one is obviously a T-slot cleaner, I can't recall what that one was printed in, but probably PLA. Does what it says on the packet.

T-slot cleaner.jpg

Again, these are not supposed to be examples of great prints. Instead just mundane hacks that I could get the printer to do while I was busy with something else, 3 of them I'd do again if they were going to somebody else or it mattered. Also some were from fairly early days, and with time both my own, and the printer's abilities, continue to improve, so chances are most of the printing now is better. But it didn't matter and I just ran with them as they popped off the printer bed.

I'll try to put up some more as I think about it or see them around the workshop, and hope others will do so too. Just useful "stuff". Goodness knows it makes a change from endless "vases" or bowl that is all I ever seem to see put up about 3D printers.
 
Here are a couple of chuck spiders I printed to replace one I'd made previously in aluminium but didn't give me full range of travel. I find just a 5 mm and 15 mm thickness seems to be sufficient. The counterbores are for 10 mm magnets, I just haven't glued them in as yet. In practice they aren't needed, and the spider sits in the chuck jaws just fine. I faced a piece of aluminium and screwed the spiders to the faceplate, then faced them off to keep the 0.01 mm brigade happy. I use these often and they're real handy. This is something I will eventually remake in a metal, but these do for now. I'd printed previous ones in ABS, but found it difficult to control accuracy as it wanted to warp a lot (especially the 15 mm version). The ones pictured are in PLA, possibly a better choice of material for this anyway as it's more rigid.

Chuck Spider 1.jpg

Chuck Spider 2.jpg
 
These prints were made for some work I'm currently doing with some W20 tooling, and wanted to dummy up some parts in plastic first to make sure everything was kosher before wasting good quality steel on a folly. The W20 dummy collet is unfortunately not functional as I can't model the Schaulblin thread in the CAD software I use (it's an oddball thread). IIRC correctly I just threw an M20 x 2 thread on their for looks. Ignore the 30 degree taper, that's been dicked around with as I was working out angles and work flow on the lathe, and to make sure I had the angle correct. I will just print off another when it's needed. This was printed in ABS. The real deal will be shrunk onto a Wohlhaupter arbour I've turned down from the original MT3 to accept this holder. I figure once shrunk on it will be quite rigid.

W20 collet.jpg

This is an MT4 to W20 adaptor, again just to make sure everything was hunky dory before setting up for grinding. As it turned out it was a good thing as I'd completely forgotten the correct drawtube length, so it was too long. Nothing a hacksaw couldn't fix in a few seconds and that is now all ready to go when I get a chance. i have no idea what that was printed from, probably ABS.

MT4 to W20 adaptor.jpg
 
I don't have pictures, but at a previous employer I made a Swiffer pad attachment for the CMM. We had a dust problem and I couldn't always babysit the CMM to wipe the dust off of the granite-to-bearing surfaces. So, I modeled and printed a small version of the "prongs" that hold the pads for the Swiffer Dusters and Velcro'd it on either side of the air bearings.

I also printed a few basic work holdings for parts on the CMM.
 
Here's a picture of a louver forming tool I modeled in 3 minutes and hit the print button on- for a one-off job. Next to it in the picture is our first test piece to see how it did. This was a 'home' project and I didn't have the time to mill punch and die blocks, and originally wanted to see how quickly the plastic exploded when put in a press. Good for a chuckle, I thought.

This little chunk of ABS formed several dozen louvers in 0.030" mild steel at 2 tons pressure on our Amada, and is displaying no deformation or wear. It certainly opened my eyes to what I can be using it for, for one-off prototype tooling, beyond just making pretty concepts for us.

original.jpg
 
Here's a picture of a louver forming tool I modeled in 3 minutes and hit the print button on- for a one-off job. Next to it in the picture is our first test piece to see how it did. This was a 'home' project and I didn't have the time to mill punch and die blocks, and originally wanted to see how quickly the plastic exploded when put in a press. Good for a chuckle, I thought.

This little chunk of ABS formed several dozen louvers in 0.030" mild steel at 2 tons pressure on our Amada, and is displaying no deformation or wear. It certainly opened my eyes to what I can be using it for, for one-off prototype tooling, beyond just making pretty concepts for us.

That is a very big surprise. I don't think I would have even bothered to consider the mechanical properties and did some napkin math on it - I think if I were asked, I'd have just said "That's fucking stupid, it won't last 2 hits" and moved on to something else. I'm glad you are more open minded and curious :)
 
To clarify, this tool was forming plates that already had pre cut slits in them for the louver location. It was not also shearing the material like a normal louver tool. So, form tool only. We even accidentally put 3 tons of pressure on it while setting it up the first time, and it didn't break. This was printed at 50% infill on the out of the box 'low quality' setting in Makerbot Desktop.
 
That is a very big surprise. I don't think I would have even bothered to consider the mechanical properties and did some napkin math on it - I think if I were asked, I'd have just said "That's fucking stupid, it won't last 2 hits" and moved on to something else. I'm glad you are more open minded and curious :)

I agree, I wouldn't have thought that possible, but there you go. It goes to show that it pays to have an open mind and try things.


I must admit I've done a few jobs where I wouldn't have thought the plastic would have a hope in hell of holding up to the job, but it did fine.

Thanks for putting up that example, once again it's opening up possibilities for applications that I certainly wouldn't have thought of trying. Nice job!
 
To clarify, this tool was forming plates that already had pre cut slits in them for the louver location. It was not also shearing the material like a normal louver tool. So, form tool only. We even accidentally put 3 tons of pressure on it while setting it up the first time, and it didn't break. This was printed at 50% infill on the out of the box 'low quality' setting in Makerbot Desktop.

How do you think this type of print would stand to flow forming with a rivet gun? I've had a number of safety style covers that I've wanted to form this way, but have always been put off by the time involved in making the form. Based on your post I wonder if it's worth trying to form in a female form that's been printed?
 
I would think that if you had a large female form with gentle slope, this might actually turn out pretty well...which is not what I would have said a few months ago! The larger the base you can make, the better for spreading out the load. Good luck!
 
Amazing

To clarify, this tool was forming plates that already had pre cut slits in them for the louver location. It was not also shearing the material like a normal louver tool. So, form tool only. We even accidentally put 3 tons of pressure on it while setting it up the first time, and it didn't break.
I am impressed.
OK, no shearing, which removes 99% of the physical strength problem, and the elasticty of the plastic looks after the rest, but even so, that is an application I would not have dreamed of.

Hum ... seen those UHMWPE liners they put inside mining trucks? Interesting stuff, plastics.

Cheers
 
No pictures because I can't find the post, but someone on the Machinist facebook page posted some 3D printed allen key holders with a magnetic back. Looked pretty handy to me.
 
The above are some of the true uses for 3D printing. When I worked for a medical implant manufacturer, we were very much into 5S and lean manufacturing. We must have designed a few hundred items to print and have in cells. Custom tool holders for machines which held calipers, allen wrenches, micrometers, boxes of inserts, etc..., since these items were the ONLY items allowed inside the cells. We made gauge holders, special indicator setups for custom inspection routines, part holders that went inside optical comparators for holding special parts for use with transparencies.. The list went on. I even designed a special 5C collet that had spring loaded jaws that would open enough to swallow the head of a bone screw so a robot could load the machine and do work on the tip. Proof of concept, it even ran a few hundred parts. Then we made them from steel. What your mind can envision, you can have 3D printed. I have a dual head Makerbot at home now and I use it for my model building and wood working hobby. Custom jigs and accessories for my table saw and router. I will see if I can post some pics later. This thread should become a sticky.

Paul
 
Here are a couple of chuck spiders I printed to replace one I'd made previously in aluminium but didn't give me full range of travel. I find just a 5 mm and 15 mm thickness seems to be sufficient. The counterbores are for 10 mm magnets, I just haven't glued them in as yet. In practice they aren't needed, and the spider sits in the chuck jaws just fine. I faced a piece of aluminium and screwed the spiders to the faceplate, then faced them off to keep the 0.01 mm brigade happy. I use these often and they're real handy. This is something I will eventually remake in a metal, but these do for now. I'd printed previous ones in ABS, but found it difficult to control accuracy as it wanted to warp a lot (especially the 15 mm version). The ones pictured are in PLA, possibly a better choice of material for this anyway as it's more rigid.

View attachment 146729

View attachment 146730

This is a brilliant idea. There is a company making a printer very well suited for this application. Check out MarkForged.
 
I am not too sure if these qualify as "widgets"

My wire cutter's reel that takes up the used wire eventually gave in. It was badly damaged when I got the machine but I just patched and glued where I could to keep it going. Yesterday it came apart properly so I though while my printer is sitting idle let me print one. I strengthened the centre bit and did not worry about screwing the two sides together but just pinned them rather for easier dis-assembly when removing the used wire. While I was at it I thought I may as well print the top contact and wire cover that was also damaged. All out of ABS.
 

Attachments

  • 1.jpg
    1.jpg
    92.5 KB · Views: 251
  • 3.jpg
    3.jpg
    88.5 KB · Views: 197
  • DSC_0273.jpg
    DSC_0273.jpg
    84.2 KB · Views: 196
  • DSC_0277.jpg
    DSC_0277.jpg
    86.9 KB · Views: 225


Back
Top