What's new
What's new

Another old radial drill press with some questions

handsome devil

Hot Rolled
Joined
May 4, 2005
Location
Bonduel, Wi
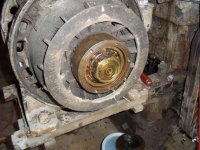
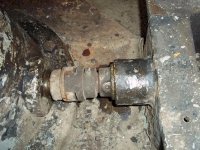
Hi all. Ended up selling Excessior camelback drill press to make room for another large drill I don't need. Pretty much inherited this radial drill press. It had been reworked many years ago and then spent almost 15 years outside under a tarp. Surprisingly it is not in bad shape the last owner tried to keep it from serious decay. After moving to Oregon from Wi he had to move it or we had to move it. He was gone. So it was sitting outside a trucking company warehouse with a not very stable future. Its future may not be real stable now, but it won't be scrapped and is now under my roof. It is fairly heavy and was a bugger for me to move. My gantry crane handled the unloading ok but I managed to be stupid and broke a gear on top the column. I am pretty sure I can repair it. Had an offer to have a new one made by a friend but think the repair will be good enough. I did not have enough height and the chain from my hoist caught the gear and it was over very quickly. Guess this thing weighs about #8000. Once I got it turned sideways on my trailer then I was able to lower using two hoists at the same time. My 6 ton did most the work and my smaller one helped level and keep things level. I am very pissed at myself for breaking the gear though. That could of been avoided. I was nervous about how this lift was going to go and wasn't thinking clearly enough to avoid the stupid. Now I can spend my time fixing my mistake. Good news after a 175 mile trip it was the only fly in the ointment. No more damage and no deaths or injuries. I ran a smaller one many years ago and think it an awesome machine. Now I need to find something that needs drilling. I have drills up to 2.5" or so. Just no work for it.

Not sure who built this. No tags other than Ryerson Machinery, Chicago, Ill and Joseph T Ryerson cast into the base of the column. Guess the build date to be in the 1920s? Will try and post pictures here but most of them were indoors and are not the greatest. Should of taken pictures with it on my trailer, now it is off to the side so I can get small machinery in and out of my shop this winter. Will be changing oil outside I guess.
From my searches I find Ryerson Machinery, Chicago Ill was a dealer not a mfg? But no other ID and his name Joseph T Ryerson is cast into the base. So not sure who the exact builder was? Any ideas? The drive is a GE 5 hp induction motor with a Drive-All gear box on top of a heavy duty base. This to me does not appear to be factory original but has been in place for a very long time and the GE motor is an oldie.

I have a fairly large Cincinnati camel back that is going to be leaving shortly also to make room. I hate to part with this but even I can't believe I will get around to rewiring it and use it when this thing is in the shop collecting dust too. I need the room. I may post pictures if I learn how too, and offer it here before I take it to auction. Think it is a #4 Morse taper. While I could keep both I won't. I have to be strong and let something go. Last minute update. I took me litterly hours to post these two lousy pictures. There has to be an easier way to post than I am doing. I could not find a up to date post on how to do pictures. Used to use photo bucket but now I am back on my own with posting pictures. Regards, John.View attachment 213347000_0006 - Copy.jpg000_0015.jpg000_0002.jpg000_0012 - Copy.jpg
 
Last edited:
That looks to be at least 100yrs old. I'm pretty sure Ryerson was a drill name, but they may have contracted another builder like Dreses, Fosdick, Cininnati or similar to build it for them, similar to Craftsman now. More pics will certainly help. Also take a look at the old Fosdick in another recent post here. Some similarities and some differences.

As for the pics, you just go to advanced at the bottom of this post window, which takes you to an advanced posting page. From there, you can see where you can add attachments. You have to upload the picm which may take a while. After that, just drag and drop it in the box and hit done. Submit your post and it should be there.
 
Still working on getting pics to go where I want them so I added new ones to first post and added three here, two which were earlier on top. I feel like I am brand new to the computer game. Sooner or later I will get the hang of this picture thing. Regards, John.000_0014.jpg000_0001 - Copy.jpg000_0004.jpg
 
I have seen a couple other Ryerson radials. Always assumed they were manufactured by someone else for Ryerson, but don't know for sure. Nice looking drill!

Andy
 
Here is another example of a Joseph T Ryerson machine. We used this to cut key-way into a new main driving axle to install the eccentrics. A most wonderful machine. This portable key-way cutting machine was one of the coolest things I have run into as far as railroad repair tools. Along with the Armstrong boring machine. I too thought it has some features not to far off of the Fosdick in the neighboring thread. Regards, John.000_0025.jpg
 
Spent most of this unseasonably warm afternoon cleaning, oiling and finding oil holes and "zerk" fittings. Remarkably nothing is froze up and the only rust is light surface rust. I know these were probably oil lubricated bearings and bushings. There are a few lead screw bearings that have grease fittings and take grease like one would expect. Have come up to a place where I am not for sure how to progress. The main drive shafts and gears are inside the column base and have remnants of oil cups or grease fittings to lube those bearings on outside of the base casting. The holes were full of mud and dirt. Cleaned them out added oil and will blow out with air tomorrow. Hoping the dirt comes out with the oil. Will flush as well. In reaching around inside the base I can find no other grease fittings yet the area around the bearing has a lot of old excess grease. So the obvious is that it was getting greased and not oiled. Do I try and remove the old broken fittings and replace with grease fittings or oil cups? Have no idea if these bearings were replaced with grease bearings or if a maintenance mechanic just some how got grease down there. Not sure if I am explaining this well or not? Being that the lubrication is from outside and the excess grease and bearing housings are on the inside of the column base it is hard to see much and I have to lay on the floor while trying to see what goes on in there. Any thoughts?

Had to remove a gear on top the column to get to the broken gear and remove that one. The two pcs of that broken gear look like super glue could put it back together the break is so clean. Am going to use nickel rod, heat and clamps I think this shall be a pretty easy fix. The casting is of quality and should weld up nicely. I have welded some very poor grade cast iron castings that have exhausted me by the time I was done. I hate cast iron but have had pretty good luck with it regardless. What I have found is the better quality cast iron the easier it is to weld. Thoughts on the bearing lubercation would be appreciated. Thanks, John.
 
A machine that old should not have grease fittings anywhere on it. It should all be total loss oil cups or ports. Neither my 1918 L&S lathe nor my 1920s Fosdick radial drill have a single grease fitting on them. Grease fittings are added by guys who are sick of having to oil the machine daily and having it drool oil everywhere. It eliminates both of those things, for sure, because after the grease fittings are installed, the parts are greased once and then never again. They don't leak oil because the grease dries out and there is no oil in the bearing to leak out anymore. Better check all those plain bearings and other parts. I had to take the dried grease out of the old Dreses radial drill I restored with a hammer and chisel. The driveshaft for the drill head that ran down the arm had wallowed the bushing out 3/16" over. Didn't leak oil though.
 
Thanks for the input Mike C. I am not done examining the bearings on the base, but they are hard to "check out" as you can't really poke your head inside that hole to see what is going on. I thought about using a mirror to get a better veiw. Tons of old grease in there but not sure how they got the grease in there as the hole and remnants of fittings on outside look more like old oil cups. There are a couple housings that I would think should have oil holes but have not found a way to oil or grease them. Found on the lead screw that raises and lowers the arm has no oil hole but a groove cut into the casting that directs oil into the lead screw socket or bearing area. Almost all areas have some way to be lubercated. I found two .5 holes {no threads} in a square slot that runs down the column. One was open and one was hidden by old grease. I had to take a elect drill to get it out. Not sure if these were supposed to be oil holes or were for something else like alignment during mfg? I poured oil into them anyway. I do no sweat oil drooling down the side of a machine. In my case excess oil is probably a good thing at this time.

I remembering the oil hole v/s applied grease fittings on old machine tools and knew this would come up when I mentioned it. When I get ready to test run it I will be all over looking around and oiling figuring when things start moving it will take oil better then now when static. I have a friend coming out after deer season to walk me through taking that motor apart for cleaning and checking the brushes and bearings. I need to learn to do this so his helping me will be very appreciated. I know it isn't hard or complicated, but I hate when I find out the hard way that I cause myself more work and money. Is there a safe way to "screen" in these open frame motors to help keep small mammals, lady bugs, large spiders and huge amounts of Cottonwood dust bunnies from getting into the works? I have to take another motor apart and clean it up as well. You can see so much crud inside of the motor. My shop is almost a hostile environment so I need to build a screen house around these open motors. Anyway thanks for the input.

Regards, John.
 
" I have a friend coming out after deer season to walk me through taking that motor apart for cleaning and checking the brushes and bearings."

Single phase or three phase? if it's three phase, you don't need anybody to help with it. It's got four parts... two end bells, the housing and a rotor. Mark the housing and end bells so you get them back on in the same orientation and on the same ends, that's the only thing to worry about. Chances are that motor is perfectly fine. The one on my L&S is no newer that 1940 and it still runs like a brand new one. I hosed it out with an air operated pressure washer gun from HF and a gallon jug of mineral spirits. Hosed it down and then let it dry for three days. That was the advice given to me for how to safely wash out the windings by a friend that was a power plant engineer. Said that's how they cleaned out the generator windings.
 
The drill press is 3 phase the other motor is single phase but a monster on a fairly stout shaper. It is arcing way to much before it gets up to speed and settles down. I know it does not probably need to be rebuilt but a different friend who was head of elect maint. at a large proctor and gamble mill had told me this. I do not remember exactly what he told me I had to do besides check the brushes. Will cross that bridge when I get there. I have been told I can do this either way with the 3 phase motor. It had gone through a flood in 2008 and was run since then. Agree it will and would probably be fine doing it the way you suggest. I would like to do the extra work and having my friend explain or try to explain any questions I might have. One of the businesses he had was repairing pumps most were irrigation and his experience was with 5 hp and up 3 phase motors. So I am not worried about him steering me wrong. He loves these old motors and is excited to come over and see it. It is easy to access right now. Having removed all the guards and loosened the belts off it shouldn't be much of a time consuming project. Hope brushes are good enough as I am on a tight budget and this thing will not be running that often or hard. If I had more experience with these old 3 phase motors maybe I wouldn't be as concerned about them looking like the underside of my refrigerator. Regards, John.
 
This is a very odd motor if it is a 5hp three phase with brushes. Usually, repulsion/induction motors are used on single phase to make them run more like a three phase motor. I work in a pump shop repairing literally hundreds, if not thousands of three phase motors per year from fractional to over 700hp and I have never seen a three phase motor with brushes. If it's throwing sparks, it's toast, if it is a typical squirrel cage motor.
 
I do not think the motor is odd. It is me being confused about what motor has brushes and what needed to be checked.

My single phase Step Toe motor is repulsion/induction and was told that it may need to have brushes checked {I think as this was over 10 years ago} and some cleaning to other parts? This motor throws sparks until up to speed and it all settles in.

When my friend said this about checking the brushes I may have confused him as we were talking about a few things at a thanksgiving table full of people, food and wine. Being that I am not a motor person I no doubt created the confusion and repeated my own confusion. At this time I have not tried to run the 5 hp 3 phase motor. If 3 phase motors do not have brushes then my concerns for them are unwarranted. I am trying to learn here and this is why I would like an experienced motor guy walk me through a cleaning process and I can try to learn more about motors. If this motor is in good shape great, if the motor is looking grim I will find out and he can explain why. With some luck and divine intervention maybe I will grasp something from this cleaning and reassembly and learn. Sorry for confusing things but I am trying to learn and my understanding of electical is limited to say the least obviously. Regards, John.
 
OK, gotcha. Well, again, if it is a typical three phase "squirrel cage" motor, it is the simplest thing on the earth and there is nothing you can do to hurt it if you use any modicum of common sense. There is only the shaft, which is pressed into the rotor, which is made of iron laminations poured with aluminum. Unless it blows and shorts out a bunch of those laminations (core loss), it is virtually indestructible. Nothing you can do to it besides polishing it up and checking the bearing fits.

The end bells bolt on, usually with separate bolts that run into the motor housing. They are simply covers for the windings and bearing brackets for the shaft bearings. Again all you can do is check the bearing fits and bush them up if one or both is wallowed out. If bearing fits check out, clean them up and paint the inside with Glyptal, if it makes you feel better.

The motor housing hold and protects the stator. The stator is the laminated iron assembly that the windings are held in. The windings are coils of varnished copper wire that actually create the magnetic forces to pull the rotor around inside the motor and create power. Only caution here is to not nick the varnish or damage the wires (of course). That said, I have watched the rewinders in our shop use a rubber mallet to "shape" the wound coils so that they will fit in a housing, if they were contacting when installed. You can't scratch the varnish of with your fingernail or anything. It takes pretty serious effort to damage that. Also can't damage the varnish with lacquer thinner. It's tough stuff. You don't take the stator out of the housing, just clean it up and leave it alone.

Last and only real possible issue is the motor leads coming out of the windings. In old motors, these were often cotton insulated and are crumbling. If that's the case, you need to have it re-leaded before it shorts to the case and burns up your windings. Motor shop or yur friend can probably do this for nearly nothing. If the insulation on the leads is not totally coming part, put it back together and run it another 50 years.
 
Thanks Mike for you input again. I worked for Kurz and Root in Appleton Wi back in about 1980 or so when they got their last big military contract. Unfortunately at that time I had no real interest in motors, generators or how they worked. I knew the different depts and because I was a driver and material handler I had access to everywhere. I watched them wind, dunk into varnish and make the rotors {?} from coil steel to punch press, to welder to winding. Saw them make housings and machine them on an old Bullard VTL they bought for this contract. The plant was a ramshackle mess of old buildings, old equipment and a very small contingent of older employees that stayed on when the contracts ran out. They were the people that understood what was going on. The rest of us were hired basically off the street and taught to do one job or another and that is what most the work force did. It was a crappy place to work but after Vietnam the industrial job market dried up about that time in our area. Was happy to work there at the time. Because of the military contracts they got some credit for hiring veterans. Pay stunk but again was happy to have a job at the time. Only wish I would of taken more interest in what they built. Normally I do no matter where I work. But that was a one year stint and we all knew it so I blew off the chance to learn more. They focused more on generators than motors but it was all related to what I would like to grasp now. Thanks again, John.
 
Well despite my fear of what I was going to find went into the motor last night and today. I finished removing guards and belts. Motor would not spin and was tight. This really scared me. Talked it over and an EE friend said it was probably rust between the stater and the rotor. Sorry if I am using wrong terminology. Well took off the end covers and the bearings were different than I have seen not that I saw that many. They had a separate bearing housing or race with a cover that was attached by friction fit and bolts to the end covers along with retaining ring that was outside of the end housing. Bearings seem ok and one looked fine, the other is probably ok but will decide later if going to replace or not. The bearing race/housing are held on shaft by large 2 3/8" nuts and had to be pulled off with puller. Couldn't get this picture do load? The rotor was froze solid to stater and we tapped it out with BFH. Having never done this before I am not sure what is truly scary and what is going to be ok. There was an amount of rust/scale on the steel. Scraped it off until I saw no more crust showing on the steel parts. I did not get overly aggressive and did not scrape any of the windings. Before I go further I will test with Ohm meter for shorts in the winding. I do not have a meter or know how to do this anyway. I have to go into town on unrelated business and local motor shop said they would test it for me. I think they want me to buy a new motor. They do not understand this will more than likely see very little use. I wiped down with mineral spirits and blew a lot of air to get dirt and moisture out. There is some staining on the windings that does not come off with fingernail? I hope that is just a stain and not a sign from above that I will need a new motor. In case there is someone else besides me who is learning here I hope someone appreciates my learning with this motor. For you too may have to do this some day.
000_0008.jpg000_0014-1.jpg000_0007.jpg000_0015-1.jpg
Can't seem to upload from my Kodak software to a place where I can upload a few more pics that give a better veiw than my attempted descriptions. Am sure it is the operator.
 

Attachments

  • 000_0002-2.jpg
    000_0002-2.jpg
    96.2 KB · Views: 173
Last edited:
If the bearings look good just reuse. You say it will not see much use. When cleaning the stator by all means protect the windings and their varnish.
Only two things should cause this motor to be scrapped. 1. an open in the bars of the rotor, not really repairable. 2. damage to the stator windings. That is repairable but I'm sure your motor shop can sell you 2 cheap POS Chinese motors for the cost of the rewind.
 
Thanks tdmidget. Here are a few more pics of what the bearing race/housing looked like when the end covers are removed. The housing fits snug into the covers and the end cap seals the bearing as well as attached to the covers. The rotor and stater were looking like the dry side of the rotor in picture initially. The pictures of what I think were oil cups at one time are on the drive into the base of the column from the motor/gear box end of power train. These holes did deliver oil out the end of the bearing/housing. Either extreme end is not taking oil despite being dug and blown out. Will keep on those oil holes once this thing is running and see if this doesn't free up the oil flow. I can turn it over by hand but am only turned the inner shafts to the drive gear on top of column. At this time the larger gears on top are not in place so there is now real load at this time.
 

Attachments

  • 000_0003.jpg
    000_0003.jpg
    98.2 KB · Views: 170
  • 000_0005.jpg
    000_0005.jpg
    98.6 KB · Views: 147
  • 000_0002-1.jpg
    000_0002-1.jpg
    87.1 KB · Views: 152
Last edited:
Chuck up the rotor, if you have a big enough lathe and polish the rust off with emory tape. I'd use a half round file or dowel wrapped with emory to polish the stator bars. Windings look great. New bearings or not is your call. For $50 or so, I'd put new ones in it and be done for another 50 years.

Just beware not to get into the wires when cleaning up the stator bars. There should be some insulation between the bars, not just bare wire, so you would have to be pretty bone headed to damage the windings.

I at times resemble that remark! I saw the insulation you mention Mike and I left it alone. I think I will clean the rotor a little more but am about done with both the rotor and stater. I cleaned up one end of parts this afternoon including the bearing and housing. Took the bearing completely out and cleaned it all looks well and did not see any contamination or feel any. Finally used my arbor press for something other than hanging extension chords on. The old dried grease on the outside of the casing and other parts was way worse to clean up.

Had windings checked and it came out ok. Some moisture still in there but not to bad I will get it drier before I reassemble in a couple days. Would like to wrap this up soon as it is still in the low 40s during the day so this beats working outside when below freezing. Got motor remounted and wired back up. So just a matter of more cleaning, repacking those bearing and putting it back together. I will put bearings and housing on rotor while apart. Once that is done it is pretty much one two three. I hope! I may put that rotor in the lathe. Got it, might as well use it for something. My smaller lathe runs but I seldom use it. Probably do both of us some good! Regards, John.


Back
Top