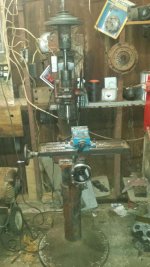
I bought this mill this last weekend and was wondering if anyone could tell me anything about it as far as model. the tag doesn't have the model number on it, at least from what I can tell. The only number I see is what appears to be a serial number. Any help is appreciated. Thanks
How to install the app on iOS
Follow along with the video below to see how to install our site as a web app on your home screen.
Note: This feature may not be available in some browsers.
Largest Manufacturing Technology Community on the Web
Stay Connected:
You are using an out of date browser. It may not display this or other websites correctly.
You should upgrade or use an alternative browser.
You should upgrade or use an alternative browser.
Any info on this W.B. Knight mill
- Thread starter bstives85
- Start date
- Replies 14
- Views 7,656


IrbyJones
Stainless
- Joined
- Jun 9, 2005
- Location
- Poquoson, Va
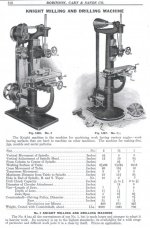
There have been several discussions here on these W. B. Knight machines. A search will find them. It looks like a No. 1 model. Here are the early specs on the No. 1. Later on a 1-1/2 model was made which had a larger table, but I think it had a rectangular base.


Irby
Irby
So I have messed around with this a little bit and the tool holder keeps falling out of the spindle. Its the one that came with it, and the only one I have. It's just a 2 inch tapered holder and can accept tooling with a half inch shaft. The only tool that I have for it is a 7/16 double end mill. Is the taper on my holder just that worn down or is there some way to tighten the tool in the spindle?
IrbyJones
Stainless
- Joined
- Jun 9, 2005
- Location
- Poquoson, Va
If the tapered holder you have is made correctly, it should stay put, but you have to jam it into the spindle really hard, and make sure the tang on the end of the tool engages a slot up in the spindle. That mill uses tapered tooling with a tang on the end that goes into a slot in the spindle (see the diagram I posted) to prevent the tool from turning in the spindle. Here's a pic of that kind of tooling (a little out of focus) -

If you lower the spindle (really called a quill) enough you will see a slot in the side through which you can see the top of the tooling tang if you rotate the spindle around. To remove the tool, you drive a "drill drift" into the slot above the tool and it pops the tool out. The tool comes flying out fast, so you have to have a hand on it to save your toes! A "drill drift" is described in this thread:
http://www.practicalmachinist.com/vb/general/drill-press-arbor-removal-wedge-239309/
Irby
rustyironism
Cast Iron
- Joined
- Aug 31, 2012
- Location
- Lower Thumb, Michigan
The model 1 1/2 (serial 286) that I have uses a Brown and Sharp
(B & S) #9 taper in the quill.
No draw bar, just a tanged taper, like Irby described.
Be sure you are not trying a Morse taper, if it is not a Morse taper in the quill.
The blank spot on your tag is where mine is stamped 1 1/2.
Look at the specs Irby provided for the # 1. Calls for a #7 B & S taper.
Mike
The tang on mine has been ground on so I am assuming its not the right one. the number has been ground off so I cant tell what it was, probably "modified" to fit I suppose. I have used this style tooling on old radial drills and never had this problem so I'm going to have to find a new holder and try it I suppose.
Robert Lang
Stainless
- Joined
- Apr 3, 2007
- Location
- Minneapolis, MN
On ebay right now. 7 B&S.
Two American made and one import.
The import seller has others.
7 Brown Sharpe Taper Shank x 3 8" End Mill Holder Milling Machine Weldon USA | eBay
7 Brown and Sharpe 3 8" End Mill Holder Tool Holder Tang Type w B | eBay
Brown Sharpe Taper Shank 7 1 2" End Mill Holder Style A with Tang End | eBay
Rob
LowryIndustries
Plastic
- Joined
- Jan 26, 2011
- Location
- Salt Lake City, Utah


 I have one of these as well. I use it all the time and it just works.
Here is a video I made a while back for someone. This video has a lot of info you may find useful.
Jig Borer Questions Answered - YouTube
Jig Borer running - YouTube
My machine is a little different than most. It says it's a No. 1 but it has the bed, quill, and base of a 1 1/2.
It also has an MT3 fitting, not a B&S. I ordered both the B&S #7 and #9. The #7 was too small and the #9 too large. The MT3 it came with fits right. I can tell mine came this way from the factory (special order?) because the spindle is the larger No. 1 1/2 size, yet the taper bore is smaller than the B&S #9 and the bore is machined specifically for the MT3 including the right spacing for the tang and the bore length is correct to seat the MT3 properly. And no, there is no bushing or adapter of any sort.
This is not a true milling machine, it is a jig borer. It's job is to bore holes, and do a little bit of finish work. The advertising on this machine was a bit "enthusiastic" about it's milling abilities. Don't be surprised if your tool holder falls out while trying to mill. Drawbars were invented for a reason!
Nonetheless my machine is a work machine, I use it nearly every day. When used for what it was designed for, you can't go wrong.
LowryIndustries
Plastic
- Joined
- Jan 26, 2011
- Location
- Salt Lake City, Utah
And here is some additional info you may find useful.
If yours is a B&S taper (Probably) here are a couple good places to go.
Here is the part number for the B&S #7 to Jacobs #33 arbor and where to order.
Part# 862-082
And where to order.
Grand Tool Supply.
800-922-0512
Press 2 for sales,
Ask for Issac.
Returns and address for Grand Tool Supply
650 Huyler Street
South Hackensack
NJ 07606
ATT: Returns - Issac
B&S #9 taper to Jacobs #33 is part# 862-084
Also,
About Victor Machinery
Attachments


stephen thomas
Diamond
- Joined
- Jun 3, 2001
What I did a few decades ago when using a DP to mill, is take a correct arbor (in my case, MT2 solid socket milling holder) and heat the tang to soften it. Then drill and tap it on an angle, so that a socket head capscrew with a taper turned on the head and end, would thread into it.
The arbor tang was also ground (freehand) so it would fit in the spindle socket in any orientation, to rotate it so the screw threads lined up with the knock-out slot. The solid collet was put in the spindle, threaded hole aligned with the slot, and then given a good "thump" to seat it. Then the taper head socket screw was inserted and tightened to continue pulling up on the shank. Never had a problem.
Obviously, given the small amount of play to work with, the slightly angled threaded hole has to be carefully placed, and the screw chosen and tapered appropriately. Note also, that for the taper to work, the threaded hole in the tang points "downwards" from the end the screw is introduced to. You kind of have to remember this when setting up; that the threads point "up" from one side and "down" from the other. But it is very slight. (I guess it also depends on checking that the bottom of the slot in the spindle was square across, as mine was)
For a machine like that, I'd probably install an ER collet chuck and just leave it in. Can mill or drill with it. Then maybe keep a couple sizes Jacobs drill chucks with straight shanks to put in for quick, less precise drilling jobs.
smt
IrbyJones
Stainless
- Joined
- Jun 9, 2005
- Location
- Poquoson, Va
I remember a discussion about a HBM that used tapered tooling and the way there was some sort of mechanism to lock the tooling in place. Something up in the top of the spindle taper where the tang is, I think. Maybe someone will point to that thread, or is familiar with the method I am talking about. Don't recall how much extra room, etc. it required, but maybe the idea could be used here if it doesn't require much machining of the spindle and quill. Food for thought...
Irby
On edit:
I found at least one thread about the tooling lock I was thinking of:
http://www.practicalmachinist.com/v...-boring-mills-221588/?highlight=hbm+tool+lock
It starts at post #4 and runs through #12. Here's the photo of the method, which uses two slots in the spindle and a slot in the tool stem. The slot nearest the end of the spindle is for a "locating cotter pin" (a tapered piece of metal) which was made to pull the tool into the spindle. The second slot in the spindle is for the conventional "drill drift".

This would be too complicated to add to the spindle, quill, and all tooling!!!
Irby
On edit:
I found at least one thread about the tooling lock I was thinking of:
http://www.practicalmachinist.com/v...-boring-mills-221588/?highlight=hbm+tool+lock
It starts at post #4 and runs through #12. Here's the photo of the method, which uses two slots in the spindle and a slot in the tool stem. The slot nearest the end of the spindle is for a "locating cotter pin" (a tapered piece of metal) which was made to pull the tool into the spindle. The second slot in the spindle is for the conventional "drill drift".
This would be too complicated to add to the spindle, quill, and all tooling!!!
Last edited:
LowryIndustries
Plastic
- Joined
- Jan 26, 2011
- Location
- Salt Lake City, Utah
That's a great idea. worth looking into!
LowryIndustries
Plastic
- Joined
- Jan 26, 2011
- Location
- Salt Lake City, Utah
That's a great idea. Worth looking into!
wood2steel
Cast Iron
- Joined
- May 17, 2013
- Location
- georgia
You have a machine that is very close to my knight 1 1/2. Will be glad to share some before and after photos of the restoration. Interestingly; mine has a # 30 flash change spindle rather than the Morse taper designs
LowryIndustries
Plastic
- Joined
- Jan 26, 2011
- Location
- Salt Lake City, Utah
Yes, I would very much like to see your before and after! I don't plan on restoring mine but I may have to go into the quill at some time to take out more of the slack and if you get there ahead of me then your experience would be fantastic. I use mine all the time and it's great to be doing real work on something so old. A real feeling of history!
Similar threads
- Replies
- 7
- Views
- 747
- Replies
- 13
- Views
- 1K
- Replies
- 21
- Views
- 2K
- Replies
- 1
- Views
- 722