What's new
What's new

Cincinnati Lathe 16x48 help

chubbyjp77

Plastic
Joined
Jul 18, 2016
I posted to an old thread earlier and figured I should start one the right way. At least all the info will be at the same place.

I bought a Cincinnati Lathe and tool 16x48 geared head lathe recently. The number stamped on the bed is 3053. I got it cheap ($500) locally and figured it would be a decent place to start. It has proven quite hard to find info on it so far. So any ideas on manuals or anything would be great.

I finally have the lathe connected to my RPC and it runs but I can't quite figure out the hand wheels on the carriage. I understand the QC gear box and the knob that selects the shaft or lead screw along with the half nuts and directional control but the hand wheels have me a bit baffled. They rotate when the direction lever is engaged but i can't get them to drive the carriage or cross feed. Does anyone know how the work? The lathe sat for awhile so the more info I have the better I know what needs attention.

I have an oil change and thorough cleaning lined up in the near future but don't want to waste oil on something that needs torn apart later. I'm going to remove the top for inspection and cleaning of the headstock and I'm going to clean the external gears and relube them. Any suggestions on lubricant for these areas? The headstock, QC box, and apron should be fine with Mobil DTE Medium which I bought a 5 gallon pail of but the gears and chain I'm uncertain of.

Any help on the use, age, model, and proper lubricants for this machine would be a great help. It's seems to be a well built machine and I think it deserves some attention to try and keep functional for years to come. Thanks in advance for any ideas and help.
 
I'll post a few pictures once I figure out how. I've had a smartphone for years and still have a hard time.
 
Sounds like the normal old apron clutch "star wheels" - though some were just knurled knobs

They work cast iron cone clutches - right - tight engaged, and left - loose disengaged

The trouble with this plan is they get STUCK - and it sounds like yours are STUCK disengaged

Whack on them with a brass drift or dead blow hammer in the right - tight direction and see if you can get them working


I can't quite figure out the hand wheels on the carriage. I understand the QC gear box and the knob that selects the shaft or lead screw along with the half nuts and directional control but the hand wheels have me a bit baffled. They rotate when the direction lever is engaged but i can't get them to drive the carriage or cross feed. Does anyone know how the work?
 

Attachments

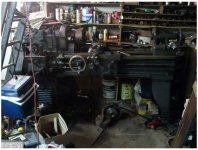
  • old cinc lathe.jpg
    old cinc lathe.jpg
    76.8 KB · Views: 592
Thank you. I'll give it a go and let you know what other gremlins I find in the process. Thanks for putting the picture up too. The lathe was still sitting where it was in that picture when I bought it. It has a slightly more organized home now but only because I have more room.
 
Sounds like the normal old apron clutch "star wheels" - though some were just knurled knobs

They work cast iron cone clutches - right - tight engaged, and left - loose disengaged

The trouble with this plan is they get STUCK - and it sounds like yours are STUCK disengaged

Whack on them with a brass drift or dead blow hammer in the right - tight direction and see if you can get them working

If that fails it could be like my Sheldon R-15, the previous owner let the apron go dry of oil & it ate the feed worm pinion teeth off. I had to replace the worm & pinion.
 
I used to work underground, with a guy that used a hammer for everything........I used to shake my head, but he did pretty well at getting things going.


We bought the contents of an abandoned machine shop, at least what was left, I suspect the better stuff had been taken out already. The roof was bad, water standing on the floor. There was a 16x54 SB lathe, not too bad of a looking lathe, if it were cleaned up, but the cone pulley was stuck to the spindle. I soaked, tapped, over the course of time.................hard to get penetrating oil into it. I finally, after little success, of soaking, gently prying, tapping on the cone pulley, put a real big allen key (one inch) in the chuck and hit the hex key with a three pound hammer.........walla, broke free and turned smoothly and easily.
 
The previous owner was to be a decent machinist and after seeing some of his work I believe it to be true. I that he would not let the apron run dry of oil judging from the cleanliness of the oil that is currently in the machine. For its age it was definitely changed and maintained by the guy. I did sit for some years in an unheated shed out back of his house so its quite possible the dampness got to it. I just didn't want to beat the snot out of something that didn't deserve it. I see I can post pictures from my work computer so I'll put up a few.

It's funny to see how large the 5 HP motor is under the lathe. I could probably get a new 20HP motor to fit in the same space easily. With a top speed of 392 RPM I don't thing I'll be needing more horsepower. 16 RPM is the slowest spindle speed so if it'll fit I should have no problems machining it.

image1.jpg
Here I'm pulling it off the trailer. Gravity was trying to take over toward the end. I limited the travel with a ratchet strap so it wouldn't come the whole way off the trailer. We set up a pair of 50 ton skates and blocked the trailer bed and pulled the lathe right onto them.

image2.jpg
Here it is in it's new home. It's not leveled or wired yet in the picture. I wired it on Saturday and will level it after I get the oil changed and painted/cleaned. Paint rep at work is going to hook me up with some 2 part epoxy primer at no cost.
 
Two horsepower should be plenty for that old beast.
Now you can find out its capabilities..............or limitations.
 
I beat the clutch knobs with a block of wood and the clutches broke free. The cross feed was the most stubborn of the two. Modern disk clutches have me spoiled. I think I may end up tearing everything apart to paint and clean everything. I think I'll go with a gray color when the time comes. Dark colors hide the grime better but I always thought gray looked good on a machine. I hate painting stuff like this but it will be worth it in the end.
 
I don't know if your lathe was in a temp controlled area........seems like that if your feed clutches were stuck, it probably wasn't. If you don't keep it in a temp controlled area, paint can be a tricky matter, that cast seems to shed it with temp changes.
 
No temp control before and it's in a pole barn now so I'll never be able to keep climate consistent in that. Our paint tech that comes in to work is going to bring me some good epoxy primer. It's free so I'll give it a go. Might be an epic failure but I got to try. It's nice when you can just wipe a machine clean and there's no way that'll happen like it is now. When the paint is falling off you can give me the old "I told ya" LOL.
 
A phosphoric acid etch, after a degreasing, may give it a fighting chance. The etch can be either a single process or maybe as an etching primer, followed by the two part primer/surfacer.
An extensive cleaning regiment, is also not at all desirable for precision machines........steam cleaning for example.
 
Already planned on the phosphoric acid. I have another chemical I mix with it also. The two help with corrosion and really hold paint well. I'm not going crazy cleaning it buy there's oil and swarf in every nook and cranny. Wish I would of swung by the car wash when it was on the trailer and oiled it afterwards.
 
Probably better you skipped the car wash. Water and grime can be pushed into places you'll never see again.

When I brought home my new lathe, which is quite grimy, I planed to steam clean at least the bed and non delicate stuff in the driveway before bringing it inside. Then thought better of it, I'm sure as careful as I could be I'd still get water and stuff where it didn't belong.

I think the only proper/safe way to steam clean a machine tool is after complete disassembly.
 
Last edited:
The only reason I didn't stop was exactly that. Didn't know enough about the machines design to be comfortable hosing it down. I also had a Bridgeport strapped next to it on the trailer I didn't want getting a bath. It's pretty hogged up and would have been a great start though. The motor isn't totally enclosed either and that probably would have went south too. I really wanted to knock the stuff off the ways and carriage but you know once you start using a pressure washer its hard to stop and I would have gotten carried away with it and got into trouble. After unloading further investigation revealed two covers, one in the headstock and another in the QCGB, that aren't well sealed. Water would have surely penetrated them and wreaked havoc. Compressed air, needle scaler, and wire wheel it is. I'm sure lots of solvent and degreaser too.
 
I removed the carriage and tailstock to clean the ways today. They'll need a light stoning at a few spots but there not to bad looking. Definitely good enough for the stuff I'll use it for. The carriage is plenty heavy especially with the taper attachment on. I also removed the guards on the drive. One is cracked and needs welded and they could use a good cleaning too. After that I tore off the headstock cover for inspection and removed the chuck. Then I drained the oil in the headstock. Pretty clean in there considering. I did find a bolt that belongs in a tool holder in there though. I didn't see a single broken tooth on any of the gears. The headstock seal was weeping a little oil so I pulled it and will replace it while it's apart. More good news came with the seal removal though. Behind the seal sits a Timken roller bearing, so no plain bearings on the headstock shaft. I'll throw some pictures on next time I'm on the computer.
 
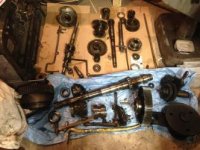
Well now I'm committed to a serious project. Too much sludge in the headstock for me to let go. Headstock is now empty and off the bed and everything but the carriage and QCGB are torn apart. All parts are going to be cleaned and all seals replaced. While I'm at it I'll document the bearings and races so I'll end up with a parts list. Everything is getting a coat of primer and paint since I'm this far.
image.jpg
image.jpg
image.jpg
 
and all seals replaced

Don't be surprised if there aren't any

The normal "seal" for machine tool spindles was the LABYRINTH, which has no rubbing parts to wear out. More of an OIL DIRECTOR than an OIL STOP - depends on free flowing drains to route oil to sump or reservoir
 
The headstock spindle does have a seal on it at each end. There were Garlock Klozure lips seals on the spindle and of course they had no part number on them. Measured the ID, thickness, and OD and found the part #. I then ran an interchange lookup on Napas site and called in the order. Had both seals the next morning. I was surprised that had something that large in stock locally.


Back
Top