What's new
What's new

Hilgar & Watts auto collimator eye piece?

shanej45

Aluminum
Joined
Feb 10, 2011
Location
Boise ID
I recently got a look at a Hilgar & Watts auto collimator TAL-5 that i purchased off of e-bay.
Several month went by from the time i purchased it to the time i got to look at it due to being in the armed services.
Now home on a short leave im very surprised to find out that it is missing its eye piece. The seller mentioned it was missing its light source. But armed with a few other threads about making one i was confident i could over come that tiny obstacle. but an eye piece!!!! And naturally it didn't come with any sort of manual.
can any one help me?
One other thing......any good book recommendations on the proper use of an auto collimator? i know the jist, but a good book on what to do and not do, for the best measurement possible would be very helpful.

thank you all
 
Autocollimator application . . .

shanej45,

Few books I have found have much other than:

Handbook of Dimensional Measurement, by Farago & Curtis.
My third edition (1994) has ten entries under autocollimator in its index and a four-page table showing all the many ways to use an autocollimator. Even so, it is not much information. If you are patient, you can find one on the internet in the $50-60 range. The fourth edition (2004) probably does not have any additional info on autocollimators and will probably cost an additional $25.

I am moving slowly on using my own autocollimator and have taken one series of measurements with it in this thread, post #229. In addition to the autocollimator itself, you will need one or more mirrors and other things such as an optical square, which is a prism which always reflects the light exactly ninety degrees.

I would be happy to explore the application of autocollimator with you, in this thread or via private message.

Archie
 
Sounds good to me. I might have a line on an eye piece or else my auto collimator days will be very short. I planed on using it to check my surface plate and rebuilding an old LeBlond regal. As for the mirrors, I don't have any currently. Was trying to get the eye piece before i sink any more money into it. It sounds like a challenge to make the base for the mirrors. But that's part of the fun.
 
Here are a few pictures that i hope will help identify the scope. I hope the pictures work.
As a side note: the Baldor grinder in the back ground i bought maybe a day or two before the picture. I have no idea why the name plate is on upside down.
 

Attachments

  • KIF_1268.jpg
    KIF_1268.jpg
    97.4 KB · Views: 1,749
  • KIF_1264.jpg
    KIF_1264.jpg
    95.6 KB · Views: 1,666
Autocollimator components . . .

shanej45,

You will have a nice system when you find/make the following:

o An eyepiece.

o A light source.

o One or more mirrors.

o Perhaps an optical square.​

The search for an eyepiece will take some patience and will be greatly helped if someone with a similar autocollimator will help define what you are looking for. The fact that your eye-piece-less unit has a micrometer for shifting the eyepiece is good news because it means that you do not need an eyepiece with a graduated reticule in it. In old autocollimators, the reticule allowed measurement by direct reading -- more advanced models used the micrometer. Some had both X and Y micrometers, but you can make an X measurement and then rotate the micrometer unit ninety degrees and then make a Y measurement. Anyway, the first step in the search for an eyepiece is to measure and post the diameter of the hole the eyepiece fits.

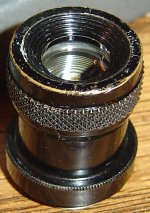
Regarding the light source, most autocollimators had a lamp house that dealt with mounting an incandescent light bulb and dealing with the heat it generated. A power supply was also needed. Many hobbiests have converted their autocollimators to use a LED (light emitting diide), which is better in all regards. The light from an LED is already unidirectional, so no condensing lens is needed. I took my set of measurements with a jury-rigged white LED pocket flashlight. The red plastic plug is keeping dust out of the hole where your light source mounts. I recommend you look for a small white LED flashlight that is slightly smaller than this hole. You may need to mount a small piece of frosted class to diffuse the light, but that may already be in place.

I purchased a one 1/10th wavelength first surface mirror from Edmund Optical for making my first mirror. 1/4 wavelength flatness may be acceptable for an autocollimator, but I read differing opinions on this, so I went with the flatter mirror. Later on, I will discuss my mirror mounting ideas. If you are going to survey a surface plate, you will need at least one mirror to move along straight-line paths. A second mirror, used as a "turning mirror" makes things more efficient by removing the need to relocate the autocollimator for each line of measurements. The most common pattern is called the "Union Jack" because of its similarity to the British flag, but any pattern that has a lot of lines parallel to the edges, al few diagonals (to check for twist) and covers the surface thoroughly will be fine. The pros have a very, very heavy tripod so as to mount the autocollimator off the surface plate, but you can rig almost anything so long as you have a very stable mount.

An optical square is only necessary if you are checking surfaces like machine tool ways for squareness. If you are testing a square on your surface plate, then an optical square might be useful. An optical square and mirrors can cost as much as the autocollimator itself, but if you are patient, you can find these things on eBay and other places. The best buys come from sellers that are not even certain what they are selling. My Taylor-Hobson autocollimator was listed on eBay by a professional camera outlet as a "telescope suitable for bird-watching",with no mention of the word autocollimator.

I am a beginner in the field of applying an autocollimator, so I would welcome correction of any misunderstandings on my part.

Archie

P.S.: This thread fits the measurement forum, but perhaps is best here because many more people are reading this forum. Most folks do consider an autocollimator to be an antique . . .
 
I'm pretty sure you know alot more than i do on the subject. Im running off of pictures i have found in Connley's machine tool reconditioning, and Moore's Foundations of mechanical accuracy. Both of which are great reference materials, but both treat it as minor mention.
The TAL-5 (the one i have) only has the measurement in the one axis and the TAL-6 has 2. Unknown at the time i bought it and was a surprise when i picked it up. Was the barrel of the TAL-5 rotates smooth in its mounts to 90 degrees. And has some adjustable stops at the limits. Not sure how much it could throw the readings off when you rotate it around. I figure a simple test is to take a reading, rotate it back and forth a few times and take the same reading. see if it shifts. might have to wait a few minutes. And let the heat from your hands dissipate. Not sure how much that will Change the readings in this case.
 
Hilger Watts TAL-5

Shane

Congrats on your new autocollimator. Hilger Watts made some very good optical tooling in its day and these autocollimators are generally pretty durable instruments. Both the missing illuminator and missing eyepiece are curable items. The eyepiece will take a good bit more legwork, but there are a lot of the HW autocollimators (some of which are for parts) stashed here and there. Until you get your instrument up and running I would suggest keeping both the illuminator port and the eyepiece port plugged or covered at all times and the instrument in its case when not needed. Optical tooling is a dust magnet and dust is not your friend. Also helpful would be to keep the instrument indoors (as in your living space somewhere) and protected from heat cold extremes and high humidity. Not on the concrete shop floor.

When you get the instrument ready for "first light" you have a high probability of discovering some dust on the optics when you first look thru it. Due to its age, this is normal and unless excessive it is a nuisance but does not necessarily impair the utility of the instrument. Resist all temptation to take the instrument apart to clean the optics. Once you have the eyepiece and illumination solved for you can always have a local calibration lab tune it up for you for about $200- $300 or so (no parts just cleaning and calibration for that price range) and the end result will not be a box of useless parts.

Archie has given you some very good advice on the illuminator. Keep in mind that the OEM unit was little more than a flashlight bulb, diffuser lens, and a simple power source. I can't remember at this moment, but your unit may have the diffuser downstream in the optics to the actual illuminator . In that case it likely is still in place. A led (cost about $1.00) a battery pack and a current limiting resistor is about all you need. Turn down a plug type mount for the led out of delrin or nylon and you have the first missing part solved for.

You may have to scrounge around a bit for the eyepiece. There are a number of folks that trade regularly in optical tooling on eBay. Watch the K&E, Davidson Optronics, Taylor Hobson , and of course Hilger Watts listings and you will recognize a pattern to the dealers there. They usually have parts from trashed units. I think I still have two of the HW autocollimators here ( complete instruments) , but no loose parts unfortunately. I will reach out to a couple of folks and see if I can locate anything useful if you wish. In the alternative, if an OEM eyepiece does not turn up in a reasonable period, it may be necessary to determine the specifics of the optical parts of the eyepiece - purchase them - and find a barrel what fits the optical tube. That is best left for a later PM if necessary.

Now for the really important question. Do you really want to use optical tooling to solve for the surface plate and machine rebuild issues ? Optical tooling is a really interesting field to delve into , but quite unnecessary for what you have said you want to do. On this site, Forrest Addy and others have covered procedures in detail using a ten second level, test indicators and other more readily available tooling that will do just what you want with very accurate results. Otherwise, see the following:

Recommended reading. (1) Optical Alignment Reference Manual - Boeing Aircraft Co. If you cannot locate one I have an address in Ontario where copies were availableas late as 2009. (2) Optical Tooling for Precise Manufacture and Alignment - Philip Kissam - McGraw Hill - 1962.
Neither of these are "autocollimator specific" but do cover all the topics that will help you understand the autocollimator and give you some ideas for set ups and procedures. Even with necessary and qualified equipment, reliable optical measurements are not "plug and play" by any stretch.

Mirrors: Archie was dead on regarding the need for mirror(s) . Once you read some more on autocollimation you will find that the autocollimator simply measures the angle deviation of the reflection from a surface relative to the autocollimator optics. In your case, rolling the barrel of the autocollimator to its stops will give you vertical and horizontal deviation from 90 degress. Take a peek at the Davidson Optronics website, specifically the material on the D616 and D615 mirrors and how they are used. These items are far too pricey for all but goverment contractors and optical labs where food is put on the table from their use. Much more reasonable alternatives are available. I may still have one or more 1 arc second parallel quartz flats here somewhere that would need to be coated on one side or both (read again the D616 material ) but would take care of most needs. Again, subject of a later PM is you are still not glazed over.

I apologize for the lengthy and somewhat unsolicited advise. At times I have wished someone had told me some of this earlier. Optical tooling is an area where even a little curiosity can become an expensive habit somewhat likened to the lament "All I was seeking was a ham sandwich and before I realized it my head was fully lodged in a pig's ass"
 
Mr Turner.
Thank you very much for that post it was exactly the type of info I was looking for and need.
I recently had an extremely nice gentlemen from taylor and hobson send me an eyepiece he had extra.
Currently I have not been able to check to see the fit or much of anything.
In fact all my projects and research is currently on hold until late November. Due to being stationed on the outskirts of kurkuk. I did have a small light in my brain that told me to cover up where the eyepiece would normally be, before I left.
I would like to look into the recommended books and get a better understanding of what I can accomplished or should attempt.
I was hoping bare minimum I could check maybe even correct my old salvaged surface plate. It started out life as a base to a starrett cmm of some sort but was striped bare and left in a salvage yard. The surface has very few nicks in it and seams to be in good condition. Would like to check it and make sure. Having a professional do this for me is not likely. And doing projects like this I learn so much in the process. I feel it is worth the falling flat on my face once in a while.......maybe a bit more often than once in a while.
Can't wait to pick this up again.
 
Hilger Watts TAL-5

Shane

Good to learn that you have an eyepiece. I completely overlooked the Taylor Hobson (now Spectrum Metrology if I recall correctly) possibility. They are very nice people do deal with and have helped me also from time to time.

You mentioned Connelly and Moore in an earlier post. Do you have a basic text in Metrology such as the Farago-Curtis that Archie mentioned? I do not have that book but I do have a very basic text Fundamentals of Dimensional Metrology - Busch that I refer to often. This one is indeed basic -- which is good from my viewpoint as it helps to stir up ideas and to clarify things when I wander off into the tall weeds at times. I mention this because optical tooling is but a single branch of the overall Metrology tree so to speak. Unless cost is not an issue we often have to devise solutions using basic principles and rely on other types of tooling (sometimes those we make ourselves or modify and refine as needed) to allow making reliable measurements with the optical gadgets.


I haven't located the parallel flats yet but I did find something which will work for you to start with if you want it. It's either quartz or Bk7 ( let you know for sure when I find the documentation on the lot -- It's here "somewhere" . The flat was one of several that have found their way to new locations a couple of years ago so the residual cost to me is zero. I will pass it along at the same price. I do know however that it is large enough ( 50 mm dia ) and it is 1/10 wave front surface. That's half of the problem solved. The larger part, the mount, is another issue. It will be difficult for you to fabricate one with what you have available most likely. I will locate my thinking cap and report any significant brain activity.
Send me your email address PM so we don't wear out our welcome here.
Z
 
I am finally home!!! trying to restart where i left off. But first i have to move my shop. And the extremely nice person that sent me a new eyepiece turned out to be the wrong one. Maybe i can get something to work. But my hopes are slim. I want to keep looking into this.
 
Info required . . .

Shane,

I suggest you post the diameter of the hole where your eyepiece isn't . . .

That will increase the odds that somebody will be able to help you with your search.

Archie

P.S.: It probably is a metric size.
 
Shane,

I've recently become the owner of a similar Hilger Watts autocollimator. It seems that the eyepiece just images the movable and fixed reticules. It also allows moving the lens closer to your eye in and out for focusing (by rotating the barrel holding that lens). Maybe the eyepiece you have can be modified to work on your unit. The important thing is whether it can be placed by hand close enough to focus the image of the reticules. If it's smaller than the hole in the autocollimator, you're in luck because an adapter could be made to hold it. I will measure the threads in the eyepiece hole on my autocollimator to see if it's the same as yours.

I used one of these at work probably 30 years ago and also designed optical mounts for science instruments back then, so when I get to playing around with my Hilger Watts, I'll post the results. I also know exactly what zeke is talking about with this optical tooling being overkill for the use we have in mind!

Irby
 
Sure! And it seems like fun too. If I can get a setup that works OK, I may use it eventually to check, and maybe help in rescraping, the ways on my old Chamberlain 6' planer. And I sure don't have a 6' camelback straightedge. Nor could I even lift one. My 48" one is a bit much for me to handle. As an aside, I still have a bag of the 1/8" (IIRC) steel balls left that we used in 3 point optics mounts, plus the drills to make a hole to press the balls into. All the nice mirror mounts I had got flooded with salt water back in 2003 and I didn't discover that until they were starting to turn into powder. :(

Irby
 
That reminds me, trying to find a 48" straight edge.
Im working on getting that ID of the threads. Moving even a small shop like mine is such a pain.
One day maybe, just maybe, i can actually make some head way on these projects.
 
Short story - I found this posted on the metrology section by DMF_TomB :

"just noticed this today at Brunson web site.

http://www.brunson.us/p/ListManuals.asp

these optical alignment equipment manuals were for many decades studied by Field Machinist apprentices who wished to someday align big machines to thousandths of an inch.
.
they seemed to be secured pdf files. Adobe Reader will pause on startup for a minute or 2 (not responding). i am not sure why.
.
for decades these manuals were expensive but maybe they figure it is better for business to have them on their web site.
.
Brunson offers training classes Brunson Metrology Training
.
i took a week of instrument calibration in their underground factory once. i thought it was a very good course and found the factory tour very interesting. "

Longer story - couple years back, I bought off ebay a Taylor Hobson micro alignment scope (has X and Y micrometers), a TH alignment scope (no micrometer) and collimator set, and a K&E precise tilting level, for the grand sum of about $30. Of course shipping was another 150, but I couldn't really complain.

The post above were linked to the first detailed publications I've found on the internet. I hav'nt put the tools to much use, but I have used the alignment scope's mic to measure bed wear on a lathe. The info posted in this thread has been very interesting! I will be pulling the tools out again and building some accessories for them sometime in the next year or so.

Wayne
 
OK, here's what my H-W eyepiece looks like. I measure (with calipers) 0.874" OD on the threads and 40 tpi by thread gauges. Doesn't look metric at all, although the Whitworth 55 degree thread gauge seemed to fit a slight bit better than the 60 degree gauge. The threads stick out 0.125" beyond the flange. The flange at the back, just ahead of the threads, measures 1.00" OD. The ID of the mounting threads measures 0.843". The end of the eyepiece can be rotated to focus the reticules for your eye. I'm not going to touch the reticule screen with the calipers, but the distance from the eyepiece flange (or the outer end of mounting threads in the autocollimator) to the screen is a little over 0.2".

Irby
 

Attachments

  • H-W eyepiece 1.JPG
    H-W eyepiece 1.JPG
    72.3 KB · Views: 557
  • H-W eyepiece 2.JPG
    H-W eyepiece 2.JPG
    95 KB · Views: 456
  • H-W eyepiece 3.JPG
    H-W eyepiece 3.JPG
    74.1 KB · Views: 512
  • H-W eyepiece 4.JPG
    H-W eyepiece 4.JPG
    67.7 KB · Views: 1,095
Last edited:
Shane,

I just looked back at the photos of your instrument and noticed you seem to have the barrel part of the eyepiece. The lens assembly on mine screws in and out of the barrel to adjust the focus. I can't unscrew it all the way and take it completely out because it hits some stop I can't see off hand.

Irby
 
Irby

Looking at your pictures, the one i received looks to be just like yours. I too cant disassemble it, at least i would rather not if it can be avoided. Maybe i could remove the barrel that's still attached. And it might just work. The person that sent it to me i have the feeling knows a great deal more about this than i ever will.
Just need to get back to my shop and take a peak.
I still have not got back to measure anything.

Thanks for the advice
Shane


Back
Top