What's new
What's new

Old Hardinge bench lathe turret not fully indexing

Jefflevine

Plastic
Joined
Mar 25, 2016
Hello All - first post here, so if I am posting to wrong forum or otherwise breaching protocol, please bear with me/let me know. Happy to be here!

I recently bought a sad rusty Cataract bench lathe (old style with the two rounded bases) and a turret (again old style, with the hexagonal shape).

Through assiduous lubrication and cleaning, I have the turret sliding and turning easily. The problem is that at the end of the handle's backstroke, the plunger does not snap forward on its own, but I need to turn the turret manually a tiny amount (1/16"?) to get the plunger to engage. The turret is turning the right amount with each stroke, accompanied by the turning of the stop rod barrel at the rear of the turret - it is just that the plunger is not snapping back into the underside of the turret at the end of the backstroke.

Can anyone either:
1. tell me what is going on, or
2. tell me what the right sequence is to remove the turret to see what the issue is? I removed a semi-split nut from the top of the turret spindle, and that threaded spindle moves up and down a little independently of the turret, but the turret is not lifting off.

Thanks,
Jeff
 
I would not remove the turret to start.
On the later ones, for some reason, sometimes the cover plate over the index pawl binds it.
I have an earlier model as well, but have not had it apart.
What I would do is swivel the cover plate out of the way, and then see if the screws on the side are correctly adjusted so the pawl (latch?) operates smoothly but without play. Also get a healthy dose of light way oil in while it's open.

smt
 
Hi Steve - I think what you are referring to as the cover plate, on mine, is a separate, removable rectangle that is retained by 2 dovetailed sides. I did take the cover plate completely out, which exposes to view the pawl - that is the square cross-section, long rectangular piece that slides forward and back into the turret base, right? Right next to it is a similarly shaped fixed piece with two machine screws set into it vertically. That whole interface has been cleaned and oiled. I can send a pic later today if that would help clarify. The pawl is sliding without interference. While I don't know what the parts I can't see look like, if feels like whatever is turning the turret to its next position is not turning it quite far enough so that the pawl can snap forward into its cavity.

Jeff
 
Jeff,

I second smt's advice about not removing the turret. I looked in mine (which is just like yours, except made by Elgin) and there is a pawl down in there that trips to allow the plunger on the top to go forward into a detent and lock the turret in position. Mine was working fine until I started fiddling with it and now it's stopped locking the turret. I can see a piece of cardboard down in there interfering with the action. When I get that out I will be able to continue looking at the workings of my turret to see if I can see something to help you.

I'm wondering if your slide is going all the way back. That may leave the turret not rotated around far enough. I see an adjustable screw on the bottom of the turret slide that is a stop for how far back it can travel. I'm wondering if that is being interfered on yous by some trash buildup where it hits a stop. I'll get a photo later on

In a post here about the same problem as you have, it was suggested to clean and oil everything well and that fixed it.

I'll keep looking at my turret to see what rotates the turret around and if there is anything that might help you.

Irby
 
IME old school turrets ''suddenly'' not indexing or locking correctly,99% of the time is down to dirt / chips etc in the works, ..........and cleaning is one sure way of disturbing said debris.

TIP;- Often the cause of the problem is so simple it auto ass kicking time.
 
The first thing I would try is moving the control lever more rapidly to the right. That may be all it takes to get the turret all the way around to the next position. In addition, having tooling in the turret will increase the rotional inertia and encourage the turret to try to keep rotating even after the slide hits the stop.

On the other hand, when I was turning out thousands of parts with my newer (1960 model) Hardinge truncated cone turret, it did suddenly stop working once. A call to Hardinge got an expert diagnosis that the coil compression spring on the locking bar had broken. He was right, and the new spring he sold me fixed the problem. That was over thirty years ago when the round turret was still in production. I expect the old experts have retired, so the current people would not be helpful on the pre-1960 hex turret.

Larry
 
Loosening, oiling, and readjusting plunger gib fixed the plunger sticking

Jeff, you may want to try this first before taking anything apart. It worked on my turret.

All this fooling around with my turret (like Jeff's) had started it acting like his - the locking plunger (for lack of a better description) wouldn't spring forward to lock the turret. Sometimes it would, mostly it wouldn't. It had been working fine, so I looked at the most simple fix - more oil on the moving parts. Helped some, but didn't completely fix it.

Then I tried loosening the 2 clamping screws on the plunger gib. It started working just fine, every time. So I pulled the gib up as far as it would go - it wouldn't come out - and it was dry on the sliding surface against the plunger. Oiled it, put it back together and adjusted it, and now that sticking is fixed. None of the oil I had previously put on the gib and plunger had soaked down to the sliding surfaces due to years of dried oil already there.

Here's a photo of the plunger, gib, adjusting screws and clamping screws. The 2 clamping screws hold the gib in place after adjusting. The 3 smaller screws on the side push the gib against the plunger. The 2 larger screws on the side go through the casing and screw into the gib, and are used to pull the gib against the 3 "pushing" screws. Typical means of adjusting - clamping screws just snug enough that gib can move, then trial and error on adjusting screws until plunger slides with no slop, finally tighten clamping screws.

167070d1458944685-old-hardinge-bench-lathe-turret-not-fully-indexing-plunger_gib_adjust.jpg


Irby
 

Attachments

  • plunger_gib_adjust.jpg
    plunger_gib_adjust.jpg
    94.5 KB · Views: 1,044
Sweet!!

Larry nails it! The problem was a wimpy machine operator - I should have known from the general robustness of the lathe that the Hardinge Brothers valued "oomph." I loaded in a couple of pieces of tooling and gave the lever more of a slam action and . . . "click!" What a great feeling. Thanks, Larry!

So, on to the next question.

Turret screw.jpg

This screw was just kind of rattling around in the threaded hole in the turret shaft. Anyone know what size screw to use, and what purpose it serves?

Also, how far to snug down that split nut before tightening its little screw?

And finally, being new to the forum, what is the best way to try to obtain another turret sleeve and bolt to replace the missing one?

Regards,
Jeff
 
That screw is just a cover for the hole in the turret shaft. The hole is for oil. The hole goes down the shaft and is cross-drilled to supply oil to the rotating parts of the turret.

And the split nut is snugged down until there is no slop in the turret yet you can turn it by hand. Sometimes those split nuts changed the adjustment when the little screw is tightened, so it may take an iteration get it right.

Irby
 
And finally, being new to the forum, what is the best way to try to obtain another turret sleeve and bolt to replace the missing one?

You're probably going to have to make one.
But if anyone announces a source, I'm interested. :)
I made one for a round turret a long time ago. Need 2 or 3 for the Hex turret which I've never got round to using.

It should not be necessary to slam the turret lever to effect actuation. Hardinge gear generally works very sweetly with modest effort. I'd check some of the other suggestions above a little deeper.

smt
 
Well, advice taken, but no dice. I removed the gib next to the plunger per Irby's suggestion and made sure all was clean in there.

Gib + plunger small.jpg

Cycled it a few times with the gib just loose in there. Re-checked all sides of the machine for clots of swarf or other obstacles. When I cycle it, I feel nothing sticking or binding; rather, it appears to me that the mechanism that turns the turret is simply not turning it that last 1/16" necessary for the plunger to go into the hole.

Any suggestions for next steps?

Thanks,
Jeff
 
But it works OK when you slam it. Hummm. You could try readjusting the screw (and jam nut) pointed to in this photo (one of yours). It SEEMS to set how far back the slide travels. Maybe it needs to be shortened a little so the slide goes back a little more. Remember the previous setting in case this doesn't work! :)

Underside1.jpg

Irby
 
Some progress . . .

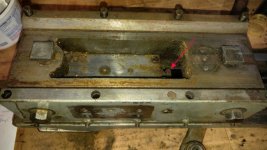
Well, kept at it, continuing to sluice with lubricant and clean out swarf (recall that when I got this it was a rust-frozen monolith). Noticed this window in the side of the carriage, which enabled me to see that all the turret gears were in good shape, and allowed me to remove some small chips and residue.

2016-03-26 19.22.47 (1024x576).jpg

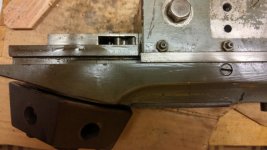
Then had a terrible moment when the turret would not turn at all, and upon inspection, saw that the pawl in the bottom was sticking.

2016-03-26 19.23.33 (1024x576).jpg

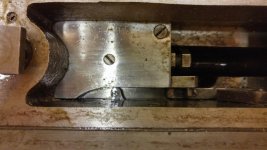
It turns out the pawl is actuated by a little spring held in place by a machine screw in the side of the carriage. I removed the screw and spring, then lubed the little horizontal tunnel that the screw fits in. Had to do it from the outside to the assembly for it to work - when I tried lubing it a few times at first from the pawl (interior) side it must not have been getting where it needed to.

Now everything seems to be ok. It still is not the "light touch" that some are referring to here, but the level of assertiveness required is far short of a slam - more like a definite stroke. I expect it will work even better when firmly attached to the bed and fitted with tooling for rotational mass.

(And Irby, I checked per your instruction, and the carriage is in fact moving 1/4 PAST the bed, so that aspect is ok.)

Jeff
 
As I thought most of it's crap in the works, if I didn't want to / couldn't, take it apart, I'd just keep working it to and fro with plenty of oil and flushing.
 
Jeff, I want to thank you for the photos you're sharing. I've been all through the insides of a Model L turret for the DSM, but this is the first I've seen of the guts of such an old Hardinge turret.
 
You're welcome - it's all about making it easier for the next guy faced with a balky old turret, right? And if I knew how to take off the turret, you'd be seeing a lot more "guts" photos! But in an assembly with that many hidden parts, I am loath to start pulling it apart with the possibility of something dropping off in there and me not knowing where it goes/went. A somewhat stiffly operating turret is a lot better than a broken one!

Now Irby's got me focussed on cleaning up those rusty turret faces - maybe a dremel with a buffing attachment?? Maybe 600 grit wet/dry with WD-40 and elbow grease??

Jeff
 
Those turret faces are not critical to anything so any way of removing the rust then polishing them up will be OK. You might even try coarser paper at first and then work up to the finest grit you can find. Plenty of WD-40 and elbow grease!!! The elbow grease part is why you need to find someone with a shaper or something to really do a nice job of re-machining them. ;)

BTW, the turret head can be gently pried off once you remove the split nut on top. First remove the bolt in the center of the head. It covers an oil hole in a hollow screw that holds the head on. Then remove the split nut after loosening the little screw that locks it. There are 4 pins that extend from the bottom of the turret head into a gear located below the head. On my turret, they are not a tight fit (and you can see one is broken off). They are what is causing any resistance to removing the head. I think 3 just go into the gear and a longer 4th pin extends through the gear and into a flange on the bottom of the hollow screw (at least that is what my turret has and it may have been modified). The gear turns the stop mechanism on the other end of the turret slide, and it is captured by other stuff inside the slide so it won't fall out. The long pin keeps the hollow screw from rotating when you tighten the nut on top. When you tighten that nut, it draws the gear against the bottom of the head and also pulls the head into a socket in the slide. You can see the shiny surfaces the head bears on in the 2nd photo. The hollow screw has a cross-drilled oil hole down in it to supply oil to the rotating parts. You can see that oil hole and at least one of the holes in the gear in the 1st photo. The 3 pins are not arranged symmetrically so the gear/turret head orientation is preserved when you take the head off and reinstall it. You will have to orient the head as you re-install it so the pins line up with the holes in the gear. As the long pin exits the bottom of the gear, you will have to rotate the hollow screw to get the 3rd pin to go into a hole in the flange on the bottom of that screw. It's not as hard as it sounds.

turret head off 2.jpg turret head off 1.jpg

Irby


Back
Top