What's new
What's new

Parts needed for Hendy 12 inch Shaper

Dave Vincent

Cast Iron
Joined
Nov 4, 2006
Location
Rochester, New York
I was running my Hendy 12 inch tool room shaper to day and the cross feed stoped working. I pulled it apart and found that feed rocker was broken in two pieces. The machine sometime in is life had a bad crash and wiped out the feed mechanism there are several shop made parts and the feed rocker had been poorly welded together and broke the welds. So if someone is parting out one of these machines, please contact me on this tread the PM or email.

Thank Dave Vincent
PS I will try to post some pictures
 
I'd send a PM to Hendeyman... he can probably supply the prints for the part or, better still, make it if that is what is needed. You'll likely be waiting forever to find the exact machine being parted out.
 
Broken shaper parts

IMG_0367.jpgIMG_0366.jpgIMG_0367.jpgIMG_0366.jpg
Hi Jim,
The part in the picture that is broken. The large hole fits over a 7/8 pin that sticks out of the side of the shaper on the operators side. In the small hole of this part there is a roller about 1 1/2" OD that rides on the on the cam that is bolted to the crank gear shaft. The small pin that goes though the casting is where the follower and spring rides to keep the roller against the cam. The slot that is broken out is where the feed arm block rides. In the picture of the side plate that long arm with all the milling machine marks on it is all so shop made and the small block in the center of the arm is the feed arm block which is also shop made. I know I need the broken part and the dimensions of the shop made arm or the arm if you have it and the feed arm block. It does not look right the hole is not centered in it. The serial number of this shaper is 1850. I hope you can understand my rambling on.

Thanks Dave
 

Attachments

  • IMG_0358.jpg
    IMG_0358.jpg
    93.9 KB · Views: 158
  • IMG_0356.jpg
    IMG_0356.jpg
    91.2 KB · Views: 136
Sorry, got behind in the shop and lost track of this one. I'll take look in the parts crate and see if I have something that looks like that. Jim
 
I found the arm and sliding block that looks like your picture, haven't found the block that follows the cam. I piled a lot of K&T parts along with the pieces I salvaged from the shaper in a wood crate. Some of the smaller pieces may be in another box. This machine also suffered from a crash, I'm not sure the long arm is original, the link it connects to has been brazed. It was partially disassembled when I brought it home from the scrap yard. You can do a search of my old posts for some of the details of the disassembly process. Any chance your broken piece could be repaired ? Jim
 

Attachments

  • image.jpg
    image.jpg
    18.3 KB · Views: 72
  • image.jpg
    image.jpg
    17.5 KB · Views: 126
  • image.jpg
    image.jpg
    16.8 KB · Views: 96
As noted, some previous owner made a welded repair and cleaned it up flush (possibly with an angle grinder). I do not know how much work is involved in getting that part in and out of the shaper, let along what kind of mess would result if the part failed in service. The other thought crossing my mind is the part likely sees some significant loading and sees this loading as continuous stress cycling. It appears the part is a casting, maybe gray iron, maybe semi-steel. The there is the issue of how accurate the hole centers have to be.

Looking at the broken part, it does not look like the PO who made the welded repair "vee'd" things out and got any real penetration, or maybe the part is just oil soaked and looking uniform in color at the fracture.

What I'd try first is to put the broken part into a fire such as a charcoal fire or a bed of coals from a wood fire. This will burn out any of the soaked-in oil. Once the pieces are cool, I'd assemble the broken pieces together and make some kind of a jig to hold the broken parts in place, using some of the pin or pivot holes. Having done that, I would first vee out the fractured area and proceed to braze the part together. I repair broken cast parts like this with brazing, and as I braze, I peen each pass using my needle scaler to remove flux and relieve some of the stresses. After brazing, I often reheat the brazed repair and then bury the repaired casting in a bucket of dry ashes. Welded repairs with nickel-alloy electrode (Ni Rod) are something I have also done, but whether the casting "takes weld" is another matter, and the small size of the part vs post weld stress has me thinking that brazing is the process I would use.

The other approach is simply to make a new part out of steel. Using welded to fabricate the boss (the round portion with the raised faces and thru hole), and welding the part up out of A-36 hot rolled steel is something I have done on similar situations, followed by machining. If the part is deep inside the shaper and a lot of work to get in and out, let alone the possibility of damage if it failed in service, I'd make a new part. I've done this on other machine parts and old engine parts that were broken into pieces. By reassembling the part using the "fracture joint" to align the pieces, I was able to "reverse engineer" the replacement part and get accurate measurements for making the new part.

About the only concern might be the sliding surfaces. If these were cast iron, the surfaces that they slid on (or which slid on the part) might wear differently. What is a safe bet is to mill the slot with the sliding surfaces oversized when roughing in the part. Build the sliding surfaces up with aluminum bronze braze, and machine to final dimensions. This should give better wear between the sliding surfaces.

I find that using hot rolled A-36 steel, and trying to "align" the rolling lines (like using the grain of wood correctly) to fabricate machine parts works well. I try to use complete joint penetration welds (CJP, sometimes referred to as "full penetration") when possible, and sequence the welds to try to control distortion from the welding. If possible, I do a "backwoods stress relieving" which is more of a full annealing. Not having a heat treating furnace, if the part is small enough, I put it into a pipe or can of sand and bury it in the coals in either and outdoor fire or, if during the heating season, it goes into the firebox of my coal burning boiler.
The parts soaks in the heat for a few hours. If a wood fire is used, I just let the fire burn itself out and let the part cool in the ashes. If it has been in the coal fired boiler firebox, it gets pulled after a few hours and goes into a bucket of ashes to slow cool overnight. I run over the part with an air die grinder and wire wheel, followed by the air needle scaler. This cleans the part and does a little more stress relieving by peening the surfaces. I then proceed with any machine work needed.

I've made parts in this manner to replace broken or missing or excessively worn parts. Sometimes, trying to repair a casting either is next to impossible due to how the fractures occurred or the quality of the cast iron, or the loads the casting will see put a weld or brazed repair at risk of in-service failure. I have "reverse engineered" the parts, but in this case, factor drawings may be available. Hendeyman has stated many times that he has drawings on file for many of the Hendey machine tools. If all else fails, contacting Hendeyman and purchasing the drawing(s) would enable a new part to be made from scratch using welded/machined construction.
 
Hi Jim,
Thanks for looking in your boxes. I am still hoping you will find the other piece. The long arm looks to be original to me. It has the oil groves and holes used in the oiling of the parts. Jim before this is over I will probably be wanting to get some parts from you.

HI Joe,
Thank you for your thoughts. I have contacted Hendeyman and he is in the process of sending me the drawings for the 3 parts. The broken part appears to be cast iron, gray iron. I get a reddish spark from grinding it. I believe you are correct That the PO did not v out the part before welding it. There was a part of the weld bead that came off just like you peeled it off, with no penetration.

My plan for the moment is hoping Jim can find the part. If that does not work out, with the drawing I am going to make the part. Do you have any recommendation on what type of steel to use that would be happy with the other parts rubbing on it. After rereading your post if I was to repair the part I would probably braze it as you have suggested. With having the drawing I could build up the side that the PO removed to much material from and machine it the correct size.

Thanks for both of your help
Dave
 
Hello Dave:

For fabricating a new part, I would use hot-rolled A-36 steel. It is cheap, readily available, and has good weldability with E 6010 and E 7018. As for the wear characteristics, this is where things get interesting. Cast gray iron has a certain amount of "free graphite" and is an excellent bearing material in its own right.

Making a new part out of steel is a whole other matter in terms of how the part which slides in it will wear. If the part which slides in the broken part is steel, there is a remote chance of galling, but with lubrication, this will not be an issue. My own 'druthers would be to mill the slot oversized, then build it up using silicon bronze or aluminum bronze brazing rod. Once this is done, machine the slot to required finished dimensions.

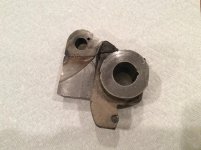
The reddish sparks you got are consistent with a gray iron part. Probably little or no scrap steel went into the melt. If you do repair it, brazing would be the way to go about it. As I wrote in my previous post, I'd make a fixture to hold the broken parts in alignment. I generally take a piece of structural steel channel and machine pins or studs that fit into the holes in the broken part. With the part put together so the fracture joint mates up, I then weld the pins or studs to the web of the channel. This gives me a fixture that will establish the broken pieces in correct alignment. After that, I vee out the fracture, leaving only a small land at the bottom of the vee. The purpose of this small land is to retain some of the fracture joint. This is my "insurance" that things are properly fitted together- along with the pins or studs or whatever other fixturing I've used. Sometimes, I weld a piece of angle to the channel to make a "fence" that machined flat surfaces can be pushed hard against to line things up. The fixture is my insurance that I've got the broken pieces in good alignment. It sometimes means turning a pin or shouldered stud, but it is worth that extra work up front. Other times, it is as simple as cutting some all thread rod for studs and locking the studs to the broken parts with nuts, then welding the studs to the channel or a piece of scrap steel plate. Making a solid fixture for broken parts that are otherwise next to impossible to clamp together is what I do. I do not own a platen or similar welding table, so making fixtures from scrap steel is about all I can do. Sometimes, it is a combination of tacking together some scraps of angle, channel, plate, and then vise grip welder's clamps to the rescue.

When you go to brazing the casting together, I like to clean the root pass really well. If possible on some jobs, I take a cut on it in the mill or lathe. If not, I run a die grinder and burring tool over the root pass to clean off the bronze and see if I have any porosities or lack of bonding with the base metal. You will know when you are brazing if the base metal is "wetting" or "taking braze", but I like to double check. I also keep an air die grinder with a wire wheel, another with a carbide burring tool, and an air needle scaler at hand when I do these sorts of jobs.

Getting back to type of steel, I prefer to go with a plain carbon structural steel, hot rolled. I try to orient the "rolling lines" in the best directions, much as a woodworker or carpenter will orient the grain of wood in structural applications. A-36 hot rolled structural steel is nothing fancy. It machines reasonably. On some jobs, I actually build up some areas with multiple weld passes to either add generous fillets or create areas that would not be there with the steel used as it was.
Building up pads, fillets, or adding some to get a required diameter in a localized area are all things I've done. I use 3/32" diameter E 7018, DCRP (DC electrode positive) for most of this kind of work. The reason for the smaller diameter electrode is to minimize how much heat I put into smaller parts like your shaper part. I stagger the welds, use a "backstep" technique, and peen the welds as I go along with the air needle scaler. Machining stick welds done with E 7018 and into the base of A-36 steel is easy going, no hard spots or problems, totally homogeneous.

As I said, my only concern would be the wearing that might occur from steel-on-steel with a replacement part made from steel. I keep some silicon bronze and some aluminum bronze brazing rod on hand. I find that using the paste type flux (Stay Silv, I think it is called) or the powdered flux with bare brazing rods gives me a good clean deposit of bronze without too much glassy slag. The prefluxed brazing rods are "low fuming" bronze, which is more of a brass. Chances are it would be OK for your application in terms of wear, and certainly OK to do a brazed repair with.
 
I favor semi steel for fabrication of parts for most machines. It should be as good as, or better than what was originally there. Machines well, welds nicely, gives a little extra rigidity


Back
Top