What's new
What's new

Hendey Bull Gear removal

RCPDesigns

Hot Rolled
Joined
Sep 3, 2014
Location
Atlanta GA.
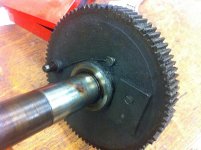
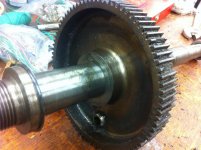
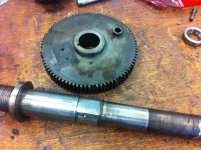
I searched the forums and feel pretty confident that the bull gear is just pressed onto the spindle and to get it off I should just press it off. I found a post where John Oder posted a diagram of the headstock for the straight bearing cone head. I can see threads on either end of the spindle but none for the bull gear nor anything else holding it on. Which is all great, except that it doesn't want to come off. I tried to press it off and quit when it didn't come off easily. I've broken way too much stuff in the "Press of Doom" so I decided to post here and see what you guys think.
That's question #1, next question is do you think it is possible that a bull gear from a later year cone head (taper bearings) will fit my spindle? I've found someone parting out a 14" cone head so if it will fit, I've found a gear! I've looked at the illustrations and it looks like the spindle is still straight where the bull gear is and the taper starts just after. I can't quite measure the spindle where the bull gear is because I can't get it off, but it appears to be 2" diameter.
 

Attachments

  • IMG_3175.jpg
    IMG_3175.jpg
    94.4 KB · Views: 841
  • IMG_3177.jpg
    IMG_3177.jpg
    94.9 KB · Views: 1,022
  • 3695.jpg
    3695.jpg
    62.5 KB · Views: 404
What size is your lathe? If its a 14", it might be worth looking into. I have a 16-8 apart in my shop right now and they are similar. Of course, similar gets us nowhere. They would have to be effectively identical to work. I'd start by measuring (or getting the measurements)of the gear from the lathe that's being scrapped. If its the same DP and tooth count it might be worth a try.
 
14"x6'
The bull gear has a circumference of 27.625" the diameter is 8.7933" I counted 85 teeth. The circumference is just a best guess so it is not that accurate. I'm going to have the other gear measured but I'm afraid it is going to be bigger. I was going to get the face plate from that lathe but the spindle on it is 2.25" with 6TPI. I think my spindle is more like 2" and 8TPI. Judging from the drawings, the diameter of the threaded end of the spindle is going to be the same as the diameter where the bull gear sits.
 
Your have the unique Hendey pleasure of just lifting the spindle out of the bearings. All later "Tie Bar" Hendeys have to have the spindle pass thru the bull gear and front spindle bearing in the process of disassembly - since there are no bearing caps to remove

If the gear prospect ISN'T 85 teeth and 10 DP, it isn't going to work
 
You probably know this, but the only way to press the gear off the spindle without damaging it is to make a set of steel plates with a hole cut (or bored) in them the diameter of the spindle. These are then placed under the gear to support the hub when the pressing out of the spindle is done. Proper and full support of the hub and transferring the load to the press platen is essential. I've seen people attempt to press out similar shafts from gears or pulleys, supporting them on the rims, and sometime they get lucky... and sometimes they wind up deforming the web between hub and rim, or cracking it.

My other "trick" (tho it is hardly that), is to take a small brazing tip on an Oxyacetylene torch and put some heat on the hub. If there is a keyway in the hub, put the heat at the area of the hub above the keyway (I call this the "arch". This is the thinnest section of the hub and will expand first, and will spring the rest of the bore open slightly. An old millwright super taught me this many years ago on turbine erecting jobs, and it is a trick I have used many times since. It has never failed me, and works when other people have heated hubs to a black heat and been unable to get them off the shafts, even with hydraulic pullers. I told them to let things cool overnight, and the next day, showed them where to put the heat. With hardly any strain, the puller then took the hub off the shaft- this being a 10" diameter shaft on a speed increasing gearbox for a hydroelectric turbine and generator.

Another trick is to get hold of some beeswax. Once you have heated the hub at the keyway area (heat only until you can just touch it lightly and then have to pull your fingers away), apply the beeswax to the hub/spindle. It will wick into the fit between the hub and spindle if the heat has expanded the hub any small amount, or around the key/keyway. Beeswax is often better than penetrating oil, and will act as a lubricant when you press the spindle out of the bull gear hub.

I am a great believer in giving press-fits a little help when trying to break them apart, and this help is in the form of some carefully applied and limited heating. My own thinking is a press fit often results in a permanent deformation of the metal parts in the area of the fit. The hub, being cast iron and softer, has probably deformed to some small amount, to accomodate the spindle. This deformation produces something of a "locking" action, and if the parts were pressed together dry, a slight galling sometimes occurs. Either way, the result- at least in my experience- seems like pressed fits come apart with more force required than it took to make them up. I figure that if I can "ease off" the fit even a small amount by thermal expansion, I go for it. Another trick we've used on hollow shafts was to pack them with dry ice pellets to chill them down and shrink them while in place, then put the heat to the hub of the shaft coupling we had to remove. A couple of hundred degrees of temperature difference between the hub and spindle can make a world of difference in how things come apart.
 
If you are absolutely, positively going to replace that bull gear in its entirety, then you could consider splitting it off the shaft.

I have the same problem - missing bull gear teeth on a tie-bar Hendey. When I get "a round tuit", I'm going the turn off the remaining teeth and have a ring shrunk on. New teeth will be cut in the ring after it is shrunk on, thus insuring concentricity.

Another possible solution, which I highly recommend and might pursue myself, is getting a quote from Hendeyman on a brand-new, made-to-print bull gear. I ordered some gears from him, and they arrived with a very high level of finish. The price was very reasonable.

John Ruth
 
Thanks for the input guys.

Joe: Yeah, unfortunately I learned the need to support items like that by busting up parts for my car. I tried heat on the hub. I'll focus more on the key area. Dry ice in the spindle might help things along as well.

John: Yep, Hendeyman has already quoted me on the bull gear so I'm good to go when I decide to go that route.

I think I'm going to verify that the other bull gear is:
1) going to fit
2) has been successfully removed from its spindle and is in good shape.

Mine could still be repaired at this point and I'd rather not make the situation worse at this point.
 
IMG_3179.jpgSo armed with the knowledge that Hendeyman could make a new gear and Joe's technique for heating the key area... I did just that. I applied heat to both sides over the key area and put it back in the press. It came out without issue. I noticed that the key had a lot of corrosion around it and some scraping. So, thanks Joe, that worked a charm.
 
RCP Designs:

I am glad the technique of "judicious heating" worked for you. I am also glad you got the bull gear off the spindle without damaging anything in the process. Old machine tool parts are kind of like "unobtainium" when dealing with castings. A little rust can stick things together better than the strongest Loctite. A little heat to break a bind and loosen a tight fit even a very small amount can work wonders. I tend to follow the old Hippocratic oath when it comes to working on machinery: "Do no harm". I also take the view that if one man designed it and others built it and put it together, it can come apart (unless it is welded soldily or driven hard and peened over or similarly locked together). I look for clues, study things, and often will spend more time making the correct tools to take something apart than doing the actual job. Years ago, on a turbine job, I learned that even the most massive of machined parts are precisely fit and not meant to be forced. I also learned from being "on the sidelines" as an engineer, when a millwright apprentice swung wild with a sledge and nailed a turbine shaft journal, that one misplaced blow of a sledge could result in several weeks delay, and quite a sum of money to put things right. The result is I tend to think and look and investigate and then think and look some more before I go taking any major steps like attempting to press off a hub from a shaft. As I said, my belief is what men designed, built and put together, other men can figure out, take apart, work on, and put to rights.

When you go to put the bull gear back on, my advice is to stone the spindle to knock down any slight burrs, particularly around the keyway. Clean out the keyway, and clean up the key, and check the fit. It should be snug in the keyways of the spindle and bullgear hub. I like to warm or heat things like bull gears in a pot of turbine oil, getting them to maybe 180-200 degrees F. Turbine oil in an old pot, with the bull gear up on a piece of channel steel to keep it off the bottom of the pot, is how I'd do it. Turbine oil (Tractor Hydraulic oil, ISO 46) is plenty good for the purpose. When the gear oil reaches 180-200 degrees F, let the gear soak in it for 30 minutes, so it is heated through. A camp stove or hotplate is what works for heating the oil. Or, if you are able to do it, place the bullgear in the oven in your kitchen and get it up to 200 degrees F and keep it there for 30-45 minutes. The growth on the gear may well be enough for it to drop right onto the spindle where it belongs, no pressing needed. You can also put the spindle into the freezer for an hour or so prior to fitting on the bull gear, but it will "frost up" when you take it out of the freezer. When this happens, I douse the cold part with alcohol to get rid of the frost. I've done bull gears on Southbend lathes in this way, no need of a press.

When you put the bull gear back onto the spindle after repairs, lubrication on the spindle and gear hub's bore and keyway is important. Some turbine oil is fine. I'd be hesitant to use something like "Dry Slide" or Moly disulfide compounds, since those can wind up in the lathe's spindle and cone pulley bearings.

I'm glad things worked for you. Oldtimers taught me tricks like this along the way, and I remembered them. This one time, we had to take a Falk gear-tooth coupling hub off a 10" diameter shaft. The mechanics assigned to the job were not the sharpest men in the crew, and one man was plainly a bull. Plenty willing, but not too sharp, and was going to do it his way. I told them: "get your puller set and take a light strain" (this was a porta power puller with about a 30 ton ram in it). "Once you have the puller set, take your rosebud and heat the portion of the hub where the keyway is, and when your spit sizzles on that part of the hub, pump on the porta power and give the hub a few raps with a bronze hammer..." I expected they'd have the hub pulled before morning break. By lunchtime, word reached me they were getting nowhere. By quitting time, they had run out of oxygen for the torch. I came up there the next morning, and the hub and shaft were black with scale on the hub from excessive heating. I asked the mechanics what they'd done and got the answer I expected: "Heated the s---t out of it, and it would not budge..." I told them to give me some soapstone, and I marked where the keyway was in the hub. I then told them: light the rosebud and get a nice medium flame on it, not a roaring flamethrower. Put the heat where I marked and NOWHERE else. I told them when to pull back with the rosebud, and spat on the hub at the soapstone marks. A bit more heat and my spit sizzled and danced. I told them to pump on the porta power puller and hit the hub with hammers. "Bang" went the hub and it came off the shaft easily. Of course, with as much heat put into that Falk gear tooth coupling hub as those two bulls had put into the previous day, the coupling hub was junk. The two bulls were amazed and then mad at me. Telling me I had some "trick" or something to that effect. I told them I had only done what I had described to them the previous morning, and they'd wasted a full day and f--d up a coupling hub which was going to cost time and money to replace- we'd get a new hub, have to bore it and cut in a keyway, to say nothing of their own time. Most of the mechanics knew if I told them something, it usually had some basis in fact and would work, but this one guy was just a bull, physically and mentally, and there was no telling him anything. The trick was to assign him to work where he could kill himself and not mess anything up, where a bull was needed. Sometimes, he got assigned to jobs requiring a little brain work, and then it was a question of who his partner was and whether he'd listen to his partner- who often was the one to ask me about the jobs. We have the most incredible gifts in our minds, senses and our physical bodies, and this kind of work gives us opportunity to use those gifts to figure stuff out and then do the actual work. It is a reward I never tire of, even after well over 40 years at this kind of work.
 
Thanks Joe, I was just getting ready to ask you how to get it back on! I've got a small oven in the shop for just such usage and the freezer in the garage will work well for the spindle.
I don't really have the time to work on the lathe right now but a little tinkering here and there has been quite enjoyable. Fall will be here soon and life will slow down a bit and I'm going to have a great time learning to make things with the lathe.
 
If you are absolutely, positively going to replace that bull gear in its entirety, then you could consider splitting it off the shaft.

I have the same problem - missing bull gear teeth on a tie-bar Hendey. When I get "a round tuit", I'm going the turn off the remaining teeth and have a ring shrunk on. New teeth will be cut in the ring after it is shrunk on, thus insuring concentricity.

John Ruth

Why take such a long route to fix the bullgear? Broken teeth can be rebuild by welding and re-cut, even driving in pins and shaping them with a file into a toothlike form will work.
 
Joe, Once again you have hit the nail on the head with a great post full of practical knowledge on how not to mess things up. Great advise of heating and removing parts as well as reassembling. I am going to remember the heat the keyway area trick. I usually only heat one side of something to egg shape it some to break the bond. They keyway side even makes more sense. I have probably done just that many times & never gave it a bit of thought.

As far as oil heaters go this might be helpful:
For small gears & bearings I use an old electric frying pan filled with motor or hydraulic oil. Set the temp dial to 225 or so & keep an eye on the temp with a thermometer. I do not exceed 250 degrees. Companies such as Caterpillar in their maintenance literature always caution about about exceeding 275 degrees F for bearings so I tend to stay below that. I have found you seldom need to get any more heat on things. If the fit is real tight I will freeze the shaft as well.

RCP keep up the reports, looks like this might be another great thread.

Cheers, Warren
 
So good news and bad news. The good news is that the bull gear appears to be a perfect fit. The bad news is that the seller cannot get the spindle out of the headstock. I've searched the forums and sent him a few links but I don't know if he has anymore time to mess with it. So close yet so far away...
 
I'd say that is fine for one or two teeth but the gear on this lathe is badly chewed up. I think he said there were 17 broken teeth.


Yes, there are 17 broken or missing teeth. The bright side of that though would be that by the time I had repaired all those teeth I would be really good at repairing teeth. ;)
 
RCP:

A saying I've developed over the years is: "There is no single right way to do very nearly anything". I realized this when I was in first grade and learning to write. I held my pencil in a way that worked for me, formed my letters in a way that worked for me instead of using the succession of "strokes" the teacher demonstrated, and I printed quite legibly. Unfortunately, the teacher saw it differently and kept grabbing my hand and hollering and forcing me to hold the pencil in the "right" way and make my letters in "the right way". As soon as her back was turned, I reverted and wrote the way that worked for me. At the dinner table, Mom wanted us to use our knife and fork in a certain way, putting them down between bites. I held the fork righty and the knife lefty and ate reasonably, not putting the utensils down. Mom had something to say. I had my manners, just handled the tools differently. I could never figure what the big deal was.

So it is with much of what we do in machine work. A number of members have come forth with ways to repair the bull gear. All of them are tried and proven methods.
I'll throw one out there for you as well. I learned this method years ago in Wyoming from a very gifted machinist named Joe Bookout. Bookout taught me to braze broken cast iron or other parts and then let the braze metal "cold form" under load. When I worked overseas a few years later, in order to do the job of erecting a large diesel engine and generator, we had to make anchor bolts out of 1" and larger hot rolled bar stock. That meant cutting threads in an old lathe the mill had, but someone had crashed the carriage and stripped teeth on the quadrant gears. I remembered Joe Bookout and what he'd taught me. We took the damaged gears off the lathe and put them in a wood fire to cook the grease and oil off them and out of the fractured areas of the teeth roots. We cleaned up the fractured areas with files. I was always taught that to prep cast iron for brazing or welding, it is best to chip, file, or machine it as grinding tends to "smear" the graphite or free carbon and the braze or weld won't "take" so well. I then built up the broken teeth with brazing, making solid brazed deposits of bronze. We then roughed these down using an angle grinder and filed. We had an ancient Gould and Eberhardt shaper that sounded like a rock crusher, but it ran. I ground a toolbit freehand to a approximate the tooth profile between two consecutive teeth (same as an involute milling cutter), but I ground it freehand. We bolted the gears to the vertical side of the shaper table and braced the rim with steel plate and tie rods to take the thrust of the shaper. Each tooth was lined up by eye and shaped by manually down-feeding the tool. I left each tooth a little bigger.

We then assembled the gears on the lathe, setting them up loose and pouring on plenty of oil. I started the lathe at its lowest speed and the teeth meshed and cold-formed. After they had formed somewhat, I closed up the gear lash on the quadrant or "banjo" and ran them in some more. The result was the teeth were perfectly formed against the good teeth on the mating gears. The bronze brazing had cold-worked into good teeth, and the cold working had burnished and work-hardened the teeth. We turned and cut threads quite a bit with that lathe and never had any problems.

With adjacent teeth being stripped, you could use this method, and with a knife edged file, open and rough-profile the teeth. Running them in by pulling the lathe over by hand is how I'd do it, using plenty of oil. On another overseas job, we had a US made pickup truck with an automatic transmission. It could not be push started, and the ring gear had some damaged teeth. To repair it would have meant dropping the transmission to get the flywheel out. We were at a remote sawmill camp. There was an old ex patriate Czech sawmill man. He had lived through a lot more than most living mortals will ever experience and had the patience of a saint. Nothing fazed him. He got that pickup truck up on blocks and opened the inspection cover to access the flywheel. One night, he spent his time with an oxyacetylene torch and small brazing tip, only he gas welded to build up broken gear teeth, then used pieces of hacksaw blades and small files he had ground to reshape the teeth. The truck worked, but once it was started for the day, it was kept running to minimize wear and tear on the repaired flywheel ring gear- which was plenty noisy when the starter pinion threw in.

I told my late father that tale when I got stateside after that job. Dad laughed and said that old sawmill man was a "fly dentist". Dad explained: during the Great Depression when things were really lean, people could not afford to do major repairs to cars and trucks, and other skilled men were wandering around looking for work. Some men were skilled welders and machinists, and they would show up at garages with a can of flux, rods, a small torch and a box full of files, chipping chisels, and similar. They'd offer to do cast iron repair welding and offer to fix damaged flywheel ring gears in place. They'd use the shop's oxygen and acetylene, with their own torch and tips. Dad said these guys were known as "fly dentists" since they could fix ring gears on flywheels.

I am a great believer in brazing to repair and build up cast iron parts. Brazing is machineable, does not puddle the base metal, and can be built up and washed over with the torch flame to get a good job. I think if you preheated the gear in a charcoal or wood fire and brazed it to build up the areas with broken teeth, you'd have enough meat to cut new teeth into. As I wrote, my own respect for brazing also stems from the ability of a brazed repair to cold-flow and work harden. This lets gear teeth "run in" and gets a person off the hook for cutting the repaired teeth exactly. If a person has no milling machine or other means of precisely re-cutting gear teeth on a repair job, I would recommend brazing. On big gear teeth, tapping in some steel screws across the line of each tooth to incorporate in the brazing is a way to add structural reinforcement, but if the teeth are of a finer pitch, then solid brazing works fine.

If you repaired all 17 teeth, I'd say you could hang out your shingle as a "fly dentist".
 
" The bad news is that the seller cannot get the spindle out of the headstock. I've searched the forums and sent him a few links but I don't know if he has anymore time to mess with it. So close yet so far away... "

Donor lathe is being scrapped, correct? It's a straight bearing CONE PULLEY head, correct? If both are correct, it's time for the Gas Axe. Have the seller cut the headstock below the bearings, and send you the whole mess, partial headstock, tie bar, cone pulley, spindle and bull gear.

Or have him ship you the entire headstock, which is removable without too much trouble.

You've already demonstrated that you are pretty handy with an arbor press......

I believe the lathe is a tie-bar conehead. I think the problem is that he can't get the spindle out of the headstock and thus can't get the bull gear. I'm also going to assume that since the spindle hasn't come out, the the bull gear cannot be accurately measure. The seller has tried using a sledgehammer to get the spindle out so I'm not as excited about the gear anymore. I'm sure the seller has other things to do so I can't really expect much more.

How much does the headstock weight? NH to GA shipping might cost more than having Hendeyman make a new gear.

Joe: Yes, I'm starting to lean more toward fixing the gear. I have some broken cast iron parts that I have found replacements for that I could use to develop my brazing skills. Brazing is a core skill for the type of things I'd like to do in the future so this would be a good time to work on that.
 
Just a couple of quick comments.
The headstock of a tie-bar isn't light (at least 60-80lb). The seller could try breaking it at the bearings, since they're the weakest spots: grind deep grooves with the angular grinder and use a chisel as a wedge. Cast iron doesn't have a lot of tensile strength.

Second, one simple trick for indexing properly gear teeth on a mill or shaper is to rest the gear on two pins resting on the top of the vise jaws. This trick is well documented by Archie Cheda in his Buffalo Forge Camelback Drill restoration thread (post #120).

Paolo


Back
Top