What's new
What's new

Ideas for a Capacitor Rack in RPC Panel

toolnut

Stainless
Joined
Aug 3, 2005
Location
Kingsport, TN
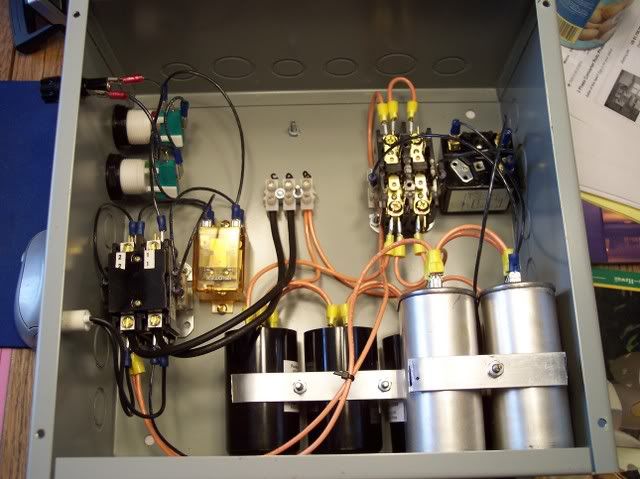
I have been trying to find a good way to mount run and start capacitors into a compact group for my latest RPC design. I am building some 10 hp RPCs and am using Hoffman 16 x 20 x 8 enclosures. I am thinking about a rack consisting of two shelves seperated by spacers and bolted to the enclosure bottom. Each shelf will have 1-3/4" dia holes for the capacitors and the capacitors will be hanging by their lips or will be sitting on the enclosure bottom.
I need some advice on the material for the shelves. I made a sketch of the arrangement and attached it here.
I could use Aluminum, laminated phenolic or some other plastic. I currently have my prototype made of Luan plywood as it is easy to work and cheap for trial and error work.

Bruce Norton
 

Attachments

  • Capacitor Rack.jpg
    Capacitor Rack.jpg
    61.6 KB · Views: 590
I like the idea of a cap rack. To me, taking the time for detail is what seperates quality workmanship. I not sure if they explode a certian way, like designed to blow from the top, so Im wondering if by having a sleeve around the top if it would direct the explosion towards the bottom? Im no physics major,(not even close).

Yes again, Im probably over thinking it! lol

You have much more expirence in building rpc. With your expirence have you seen more fires or more shorts. I would go off that.

I prob would use metal.
 
I use hose clamps, and thin flat steel with holes in it.

I take a bunch of large hose clamps and tack weld them to a couple pieces of thin flat steel with holes in it (looks like plumber's tape for hanging pipe, but thicker), one clamp near the top, the other near the bottom. The top clamps go on one side of the caps, on one piece of flat steel, and the bottom clamps go on the other. Then I put a cross brace on each end, and another in the middle to hold them all together. Then put some legs on it to mount it to the case. Put electrical tape around the caps to add a little cushion from the hose clamps. It doesn't look all that nifty, but it's VERY functional, easy to fab, and NOT FLAMABLE. I've never been a fan of putting flamable stuff in with electrical equipment. If it's inside the case, nobody will see it anyways. Be careful not to overtighten the hose clamps. Don't tack the hose clamps from the inside, use the holes in the flat steel, and tack the hose clamp through the flat steel from the outside. That way you don't get lumps that dent the caps. GRIND DOWN any goobers, and things that might dent or pierce the caps. If you do it right, all you need is a little tack on each clamp, and no cleanup should be necessary. :cheers:
 
There ARE actual clamps for round and oval caps. I think you can get some from Grainger and/or McMaster. Grainger is pretty limited in sizes.
 
For my motor start Caps, I used standard capacitor clamps. For the run and Power Factor, I used 1/4 fender washers and bent then to hold the lips of the
Caps. I drilled holes in back of the enclosure and used long 1/4-20 bolts and secured them with nut. Works great! By the way I ended up using a 3/4 hp pony motor and a time delay relay to start the unit. The start caps are sitting there disconnected now. Using a pony motor reduced the start current by a significant amount.

10HPPhaseConvertor.jpg
 
The run capacitors are designed to go open if they overpressure inside the can.
In that case the top bulges up, and the two contacts disconnect from the unit inside
the can.

Second the "avoid flammable stuff inside electrical enclosures" rule. Though that
white oak setup does look tasty. And not too flammable given the small volume of
wood.

If I ever did this, I would probably just zip-tie the capacitors to the wall of the
enclosure.

Zip-ties are my friend. :)

Jim
 
=====================
"Zip-ties are my friend. :)"
=====================

truer words were never spoken
 
I have seen this picture from other thread.

I am no expert but I see this implementation simple and clean

I got this picture from Hans B Post on topic Titled Purchased, not home built, phase converters

Here is the picture:
Monarchlathe061.jpg


:cheers:
 
I mounted my start caps using a couple pieces of aluminum angle, held in place with bolts tapped into the panel. The balance caps are held on the angle with zip ties.
 

Attachments

  • 3 phase photo 2.JPG
    3 phase photo 2.JPG
    22.7 KB · Views: 2,923
When I built mine I used some ex pipe tubing cut a 1/2 wide and split, Then welded to some 1/2 x 1/8 flat bar and bolted to the box. I split them and bent the tabs and drilled for bolts. It worked out well,


I get all my parts from old deep well control box's from a well driller.
It does take time to get what you need but the parts are free....:D
This one is not finished but it will work fine as is...

I build my own box's out of 10 GA. Aluminum deck plate witch was also free...

Paul
 

Attachments

  • RPC Box.JPG
    RPC Box.JPG
    67.9 KB · Views: 932
These are some very good photos and good ideas. Thanks a bunch for so many responses. I now need to make some mounting hardware and get to work.
 
Don't Dent The Caps!

I saw a picture where somebody overtightened the clamp where it dented the caps. Put something between the clamp and the caps for padding. Doesn't need to be much, that foam double sided tape works OK. I don't think I'd trust just double sided tape, the thought of a cap falling off, and shorting out on something just doesn't sit well. Electrical tape works too, but it doesn't stick the caps in place. Gasket material like you buy at the auto parts store for making your own gaskets works GREAT, stick it in place with a little RTV silicone. You want just enough torque to clamp the caps in place, and keep them from moving. Denting them can cause them to short out, allthough I've seen dented caps that worked just fine for a long time afterwards. It's just better to not dent them if it can be avoided.

Personally I like hose clamps because they exert even pressure, and they don't have a tendancy to dent the caps unless you go crazy with the torque. Old Iron's design looks good too. If you use flat stock, it would work better to bend it so it follows the cap's radius so it exerts more even pressure. It would help to keep it from denting the cap, and something to cushion would be good. I like the design with the bent washers, BUT it keeps the caps from pushing the tops off if they short. Could cause them to explode if something goes wrong. Any way you decide to go about it, even pressure, and cushioning between the clamp, and caps is good. Thin metal will flex around the caps, and is easier to bend to shape. :cheers:
 
J, these things ain't falling off...

The caps are about 2" OD and I put a full surface covering of tape on the bases. 2 sq inches will hold 2lbs in shear according to 3M. The caps weigh nothing close to that. Even tugging on them, they don't move.

This isn't regular double stick tape, it's "mounting tape" intended to be permanent. The designed uses are things like shelves and hooks.

Since I used run caps for my starter circuit, I'm not too worried about them drying out or popping. I got them surplus for what Grainger wanted for enough uf in electrolytics. Been running it for over 6mo's without issue.
 
Well, I hope not.

Not that I don't use things like that, but there are situations where the adhesive can let go. Say the cap shorts partially and starts to get hot, or the unit is exposed to an external heat source. The adhesive probably wasn't designed to hold up under heat, and if the adhesive holds, what about the paint? Say some sort of solvent gets spilled in there, and attacks the adhesive OR the paint underneath. Maybe the paint reacts with the adhesive, and the PAINT lets go. I've done similar things, and they usually work out OK, but when you're dealing with high current AC like you are with an RPC pannel, I'd rather physically mount the caps. It COULD get ugly if one of the caps let go. Granted, so long as nothing like the above happens, the tape is probably fine. My concerns are probably extreme, but I've seen some crazy things happen. :crazy:
 
I'll be sure to let you know if they ever come loose. ;)

The only known drawback to using this stuff is that you need to have a working converter to commit to using the caps you attach. Brackets or clamps would be far more forgiving for value changes.
 
The only known drawback to using this stuff is that you need to have a working converter to commit to using the caps you attach. Brackets or clamps would be far more forgiving for value changes.

Because of all the dialing in that has to be done, I usually mock up the cap array before throwing the stuff in a NEMA box. I think my mock up caps could be a different size/value than the final product anyway. I haven't done two that were identical yet.


Back
Top