What's new
What's new

Buying an Abene VHF3!

trafficbikes

Plastic
Joined
Jan 21, 2009
Location
New York
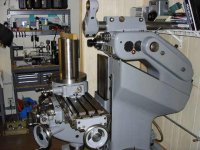
I'm going tomorrow to pick up a new (used) Abene mill - my first big machinery purchase. It's in pretty good condition - no slop in the ways, relatively clean, table in good condition, etc. There's some backlash on the feedscews that I'd like to get rid of, and I'm not sure the coolant pump or light work, and the ways are kinda gummed up. I also don't have a phase converter, and need to get an electrician out to wire one up, etc.

Oh - photos here.

So, questions:

Cleaning the ways & Bijur lube system: Do I get a pail of kerosene and a big pair of gloves and go at it? Try to flush out the lube system too? Scotch-brite pads? Scrapers? Should I take the table apart to really clean everything out? I don't think it's that bad as-is, but I'm probably never going to clean it in the future.

Backlash in the feedscrews: My limited understanding tells me that you can adjust the feedscrews to eliminate backlash. How is this done? Eventually I'd like to put a DRO on it, but for now some precise feedscrews would be good.

Phase converter: It's a 5hp spindle with a 2hp feed and a .06hp coolant pump. That means I need a 7.5hp phase converter, and TEMCo says I should use their 6500-11KW, which is a "medium load" converter. Is that accurate? Anyone have experience running an Abene on a smaller phase converter?

Light & Coolant pump: The coolant pump must run off the main power; does the light have a separate power supply?

I hear these machines are great, and I'm looking forward to having one of my own!

Spencer Wright
Traffic Cycle Design
http://trafficbikes.com
 
Hello Spencer

You bought yourself a really nice milling machine
The paint is origanal I think and if so that machine is not used that much

About cleaning
We use industrial degreaser dilutable with water It is a kind of soap
After cleaning the machine we suck up as much water as possible with a vacuum cleaner and then with a rag, finnelly some compressed air
You can clean up the oilreciever of the lube system and fill it up with clean oil Then do some excesive lubing While doing that move all the axes and clean the ways Keep doing so till you get clean oil on the ways

Hope this helps a bit
Peter from Holland
 
I run mine on a 10hp rotary. Backlash on the y or left/right is adjustable. there is a small knob facing you on the apron on the right side..just tighten a bit until you are happy. I have owned 2 of these. It is a tough bugger, finesse and can take a heck of a cut.
 
Congrats, another home for a Swedish bombshell

Spence,
I got my Abene back in 02'. My wife said it was a basket case, but I proved her wrong (in fact it looks new and some people have made me nice offers). I totally stripped it apart. Coolant got into the knee and solidified the oil; everything was ok, many gallons of kerosene latter and she's like new. Oh, I replaced all of the copper Bijur / Tecalemit oil feeder lines (the years of coolant / oil destroyed them).
I can step you thru the disassemble, I got lots of photos along the way. One thing you may or may not have noticed is that the surface bruises. This is because Abene smoothed the cast-iron with a filler putty coat prior to painting. I noticed that this retains oil and in the paint removal process, a lot of the body filler came away from the cast iron, so I completely removed all of it. I used a wood chisel in lieu of other methods (yea, I know I'm crazy but the results were worth it). Because all of the drive motors are basically not replaceable, I'd recommend that you take all of them to a qualified motor facility to have the windings checked and repair as needed along with the bearings. Believe me, you do not want a main motor failure cause you won't find one unless you have it imported from Sweden. With regards to all of the motor contactors, I also recommend that you take them apart and clean them with contact solvent (again, take many close-up photos of the wiring and take the time to label them with wire tag-tape and make your own wiring connection notes so you can get right). I would only unwire as much as you need to clean a contactor.
To remove the table, you need to remove the hand wheels (I made a thin wrench...you'll need to fab one). Afterwards, you remove the tapered gib keys, and the bottom retention plates and you lift the table off with a small crane...it's heavy).
It took me a year to rebuild (not full time).
Most of my photos are not digital so I'll have to scan them so I can post them.
Write me if I can help,
 

Attachments

  • abene.mm.jpg
    abene.mm.jpg
    37.3 KB · Views: 7,368
  • abene-drill-setup.jpg
    abene-drill-setup.jpg
    48.7 KB · Views: 5,074
Last edited:
Thanks all for the advice. I contacted Abene and they said my machine was made in 1965. I degreased it with kerosene then used some Simple Green, then water, then a bunch of way lube and WD40 all over everything. Not nearly as comprehensive as Abeneman (man, that machine looks beautiful!), but I felt pretty good about myself nonetheless (photos here). I also drained the oil from all the reservoirs and got an ER32 collet chuck for the NMTB40 spindle.

Photos are here.

I have a number of questions, though.

First: Do I need a 10hp RPC? The RPC manufacturers I've talked to are saying everything from "you could run the whole thing off a 5hp" to "Don't run it on anything less than a 10hp." I'm leaning towards a 7.5hp right now, but I'm not sure (I'll be using the machine to cut heat treated steel tubing, ranging up to about 1.5"x.035", with HSS holesaws ranging up to 1.5" diameter, at very low speeds - won't require all that much power, and I'll only be using the transverse feed at low rates while the spindle is running). Either way I'm definitely buying one, not making it myself - I want to make chips, not tie up copper.

While I'm waiting for the RPC and an electrician, I figure I should do a little more to clean the machine up. So:

1. The table has some rust on it (see photos in link above). I degreased it, rinsed with water, coated it with way lube and then sprayed everything down with WD40 to coat the spots in the t-slots that I couldn't get to otherwise. What should I do about the residual rust? It's not much but you can definitely see and feel it.

2. The box ways on the X-axis (transverse) have big gouges in them when you feed the saddle all the way to the back (see photos). I'm guessing there's nothing I can do and I just forget about it... but mostly that's because I don't want to pull the saddle off the ways. Am I being overly lazy?

3. I tried to pull the motor out to see whether it was a T-mount or U-mount (anyone know this? the RPC guys said it mattered) but couldn't. I figured it was because the belt drive wheel was on, but wasn't able to budge the almost-stripped hex socket screw holding it on. Any suggestions?

4. I was able to remove the hex socket screws on both the belt load wheel and the gear selector, but wasn't able to remove either from their shafts. The manual says I should clean and repack the bearings on the spindle, motor, and coolant pump, and I figure I should do the same with the three bearings on either side of the headstock - but doing so requires removing the belt load wheel. Any suggestions on that? Also should I remove the entire spindle from the headstock and attack it from the inside, or take the spindle apart in place?

5. I drained the knee of oil and it was jet black the whole way through. The Bijur handle sits almost all the way out, and I'm wondering if I should take it apart and clean it - or maybe I just don't have a good idea of how far these things are supposed to travel. Suggestions?

6. The table has an coolant spout that comes out the right-hand side, which I'm thinking I should get a hose for and lead it down to the clamp on the bottom of the frame, near the coolant pan. Then I'm seeing that the coolant should run to the back of the pan and drain back into the pump. Inside the frame, I see tubing going from the pump back up, but I can't see a reservoir or any substantial storage chamber. What kind of coolant capacity does this thing have? Assuming I'm right and there isn't a reservoir, couldn't the pump run dry and burn up? Either way, I should probably clean whatever's there - where should I start?

7. The dovetail ways on the knee are lightly rusted near the top. Again, I degreased, rinsed, and lubed. What else can I do?

8. The dials on the feedscrews are rusted and hard to read. I'm assuming I Scotch-brite them a touch... is that a bad idea? What are the graduations? The manual lists both mm and inches - it says that graduations are .05mm/.001", but that's actually a pretty terrible estimate. Anyone know which it actually is?

9. I messed with the backlash adjuster screw until I eliminated it, and then the feedscrew was totally frozen. Do I just have to live with some amount of backlash, or is there something else I should do to get rid of it without seizing the whole Y-feed?

10. Am I going to be kicking myself a few years down the line for not fully disassembling this thing? I think not, and it'll probably take a heck of an argument to change my mind, but I figured I'd ask.

Again, thanks to all for the feedback. I'm pretty new at this stuff, so I really appreciate it.

Spencer Wright
Traffic Cycle Design
http://trafficbikes.com
 
Ah, Where to start?

Spence,
I looked at the photos. First, try not to think about everything that needs attention all at once. It's overwhelming. Work in discrete chunks. I really believe you would be happier in the long run if you did a complete tear down IMHO. The drive motor in the base is a Swedish 2 speed motor. Not a NEMA frame size. Second the main drive motor is an odd ball. I would suggest a hex socket drive, say for a 1/2" drive. It was probably messed up using a non-metric allen wrench. Also, you'll need a gear puller (I had to grind the puller fingers a slight bit to get under the pulley. Befor you remove the allen head bolts on the fan end, mark the outer motor fan cover and the housing with a pin prick to facilitate proper re-installation. The motor is heavy and you'll need to place a towel on the machine when you man-handle it out. You can only remove it enough until you can disconnect the 3 lead wires.
After seeing the way scores on the saddle, I recommend that you remove the table. I would suspect allot of cleaning is really necessary. Also, if the knee oil was black, I believe that the oil has suffered biological decomposition (hence it has become corrosive, nothing unusual really, but you really want to check all of the table drive gears, bearings, and oil feed lines). Heck, my knee oil had solidify into dirt, and I had to dissolve / wash all of this dirt-like dried-up oil out of the gears, and everything else (was I bummed out...yes, but I learned alot, and I discovered that Abenes where bulit like tanks, no harm was done).
Use green scotchbright with kerosene on the table, use the finer grade on the graduated dials and on the ways. MAKE SURE that you totally rinse all of the grit off with fresh kerosene and blow dry, wipe clean with oil. With respect to the table way scores, I believe that the front, back, or both way wipers allow grit to get under the table saddle. If the scoring is really bad, perhaps you can contact a machine tool rebuilder and have the tops reground (nice thing about box ways). They'll need to take the same amount of the top as well (under the retaining plate surfaces to compensate for the reduced height). All, oil passages will need to be blown out with compressed air. I also filled them with kerosene and blew that out as well, folled by air drying.

Lot's of work, but once this machine is in top form, it will last you into your grave. OR, you can buy a few Chinese machines from now until then. But, you'll never be as happy with all of the compormises.
 
Spence, it really looks like something

Spence,
I reviewed your photos again, and it looks much better than my did. So don't get discouraged!!
 
Thanks Abeneman. It looks like my RPC will arrive Friday and be installed Monday, so I'll probably just dive straight in, doing whatever I can before then.
One question - can I clean all the oil reservoirs by just pouring kerosene in and letting it drain out?
I'll probably be peppering you with other queries later in the day/week. Thanks so much for the advice.
Spencer Wright
Traffic Cycle Design
http://trafficbikes.com
 
Way Repairs

Would add a note of caution here about using "scotchbrite' on your ways.
Not the best idea IMHO....you would be better served with a fine small oil stone or "slip". Lube the stone with solvent or kerosene and work it over the ways in long gentle strokes. Scotchbrite will make the surface look clean and bright but it will tend to round out the surfaces and create waves in the surface. Scotchbrite will also shed a ton of grit and fragments that will get into other sliding surfaces. Sliding ways need to be flat and straight or they are useless. Use the stone on the scratches as well.
A disassembly on that sliding element is a good idea as there is most likely chips or dirt stuck between the moving parts that will continue to cause trouble. If you remove the offending dirt and smooth the scratches using the stone the way will most likely work fine...you should however replace the way wipers on all the slides of this machine. Deep gouges can be filled using Devcon to eliminate the ability of dirt from getting into the grooves and around the wipers. Clean and rough the gouges with a dremel and a coarse burr. Flush with brake cleaner or alcohol . Once the Devcon is cured finish flat using the stone.....( i like the Titanium putty for this , but the iron putty is fine as well.)

Would suggest doing the spindle out of the machine. Easier to control the working environment and keep everything clean. Precision spindle bearings need care in handleing and servicing... Some good advice on bearings at sites like "Barden Bearing" read a bit before you attempt taking that spindle apart. A good quality grease is essential to making the spindle work properly. Ask Abene for their reccomendations on type and amount! Proper tools are also a must! Dedicated spanners and sockets are needed in most cases. Using punches to run locking and adjustment rings is a good way to cause trouble.
Looks like a nice machine to start....a bit of service now and you will likely get years of good service from her.
Cheers Ross
 
Ross-

Thanks for the advice, that sounds like a good idea. I should receive a 1000 grit hard Arkansas oilstone from McMaster-Carr tomorrow, and I'll be sure to use it carefully. I'm also getting a gear puller and some Devcon, but didn't shell out for the Ti version - that stuff's pricey.

I made a spanner on my Steinel mill (guess I'll have to overhaul that next...) for the feed hand wheels and was able to take apart the table and get started on the transverse saddle. I'm having a hard time taking it apart, though - there's a big screw in the middle of the front of the knee that's giving me trouble. It has a big wide slot (the kind that you'd put a quarter in to turn) and it's stuck... I sprayed a bunch of WD40 on it and am hoping it'll start to move in the morning. I figure I'll get the saddle off, clean the box ways, fix the gouges, and spend a little time poking around inside the knee. Then while I'm waiting for new wipers and a drive belt from Abene, I'll start messing with the spindle.

I'm not planning, however, on doing much with the long auto feed gears. Neither am I thinking about taking the knee off - the dovetail ways there look decent except for a little rust at the top.

I'm waiting for a response from Abene regarding a few small parts, a new belt, and advice on bearing overhauls, etc.

Thanks all for the advice. Obviously if you have more, don't hesitate. I'll post my progress in the next day or two.

Spencer Wright
Traffic Cycle Design
http://trafficbikes.com
 
One of the advantiges of using the proper grease in a spindle is it does keep its properties for a longer time
Most spindels are greased for life So if that spindle is running like it should don`t take it apart

Peter from Holland
 
Peter-

I like that idea. I'd rather not take anything apart that I don't have to.

But the machine isn't powered up right now, and won't be until late Monday, and I'd like to do all my maintenance before then. Know of a stress test that I could do to tell me whether to screw around with the spindle? I pulled the cover plates off of the bearings on the headstock, and they all looked good - mostly black, but no grit or grime. The bearings in the feedscrews are all grimy, but they aren't sealed nearly as well.

Another question: I think I could loosen the main spindle belt drive wheel fixing screw if I could only keep the wheel from rotating. I tried putting the belt on and tensioning it, then grabbing the load wheel - but no luck. Is there any way to lock the motor driveshaft so that I can loosen that screw?

thanks,

Spencer Wright
Traffic Cycle Design
http://trafficbikes.com
 
Peter-

I thought of that but don't think the gearing will matter. The gearbox is "downstream," so to speak, of the wheel I'm trying to move, hence the gearing won't make much of a difference. If anything I think I'd want to put it in the highest gear and try to hold the spindle itself, but what I really want to do is lock up the motor itself.

But for now I'm trying to removed the saddle, and that's proving rather difficult. I was able to remove the big slotted screw on the front of the knee. It had a retaining ring full of bearings behind it, and there's a race behind that. The race is on a spindle of some sort (I can look through the transverse feed handscrew hole and see that the spindle is maybe 1-1/8" in diameter with four keyways on it), and it fits loosely in the threaded hole that I pulled the slotted screw out of. It must be part of the saddle, because when I try to lift the saddle off the box ways it seems like it's preventing me from doing so. I'm guessing that the race is pressed onto the spindle, but I can't tell, and it's recessed maybe an inch into the hole so I can't figure how I'll get it out. I'm almost thinking about attacking the saddle from above, taking apart the auto feed differential, but would rather avoid that.

DSC_0035.html


I put pictures of my disassembly here.

Spencer Wright
Traffic Cycle Design
http://trafficbikes.com
 
Yeah, lots of pictures. I'm worried about putting this thing back together. I think I've got it all worked out...

Just so you don't get bored, though, here's some more progress.

Peter, good call on the impact wrench. I put a 6mm hex bit in my Makita impact driver and had it off in one shot. Never thought of that, but I'm sure I won't forget it now.

Still waiting for Abene to get back to me - I need a new drive belt, new seals on everything (I'm assuming the plasticy remnants that I pulled off of the gearbox cover plate were seals - it's beautiful inside though, oily but no grime that I can see at all, so I covered it up and am leaving it alone), a new spring here, a new bearing race there. Looking good.

Still trying to get the saddle off, though - I need a bigger retaining ring wrench to get the auto feed drive gear off, then I think it'll lift off. I guess I'll have to take the lube feed apart a little, but I think I'm getting closer to my goal anyway.

thanks,

Spencer Wright
Traffic Cycle Design
http://trafficbikes.com
 
Progress report?

Have you made any progress with this machine? It is a great post, and the photos are fantastic. I have an VHF-2 that I picked up for a song, and I thought about taking it apart to clean it up and rebuild it. It doesn't have the Bijur system and instead relies on little ports for oil. They look like grease zerks, so I think the previous owner(s) always used grease on it. It sounds awful, but the machine seems to be in fantastic shape (for as old as it is). Let us know if you've made any more progress with it. You're gonna love that mill when you get it up and running. I'm sure you'll use it for more than just mitering.
 
Yes! The mill is up and running, after much kerosene and elbow grease. I didn't screw with the feed or spindle motors; nor did I remove the knee. Everything else I did, including three (all failed) attempts at filling the gouges in the ways. I cleaned the ways well and wiped them down with alcohol, mixed the Devcon with vigor and accuracy, and kept my shop at 70* for about 24 hours - and then, in the process of lapping the hardened epoxy, ended up chipping it all off. I'm guessing I'll have the ways ground down next time I move (or something), when I'll also repaint the whole machine.

I got some KabelSchlepp wipers for the box ways, but by the time they'd arrived I had fashioned some wipers out of filter felt from McMaster-Carr (another future improvement that I'll get around to sometime). I replaced the leather belt with a NBR/nylon one, made a new spindle gear box cover seal out of TPFE, and took Scotch-Brite to the feed wheels until they glowed. I made orienting plates for some new leveling feet (that whole process was an unexpected major pain), and bought a 7.5hp phase converter from American Rotary.

I got the machine running (smoothly!) with auto feed in all directions and new oil everywhere. Then I set to work on the coolant pump, which is only giving me about 24" of head, even though it sits about 6' below the spindle. I took it apart, drained, flushed, scraped most of the congealed coolant out of, and vacuumed the coolant reservoir. I threw the submersible part of the coolant pump in a can of kerosene and then, after checking to see how much lift I could get out of it (no change) took the cover off of the impeller. I *think* that the impeller has been damaged - its arms are about 1/4" shorter than the radius of the chamber it spins in, and I'm trying to contact a pump repair shop nearby to see what I can do about it.

In the meantime I replaced the vinyl hoses from the coolant pump up to the spout on the frame and from the table down to the base, and changed the spiral-wound metal coolant spout to a Loc-Line plastic one (much more effective, methinks, even if it's anachronistic). I'm also thinking of installing Stainless Steel mesh filters (McMaster has them in 35% clear area, .006"x.0071" rectangle size - fine enough to filter at least some of the chips I'm making) both at the elbow leading out of the table and at the inlet into the coolant reservoir, and possibly at the inlet to the pump itself.

Pictures are all here. I've done enough mitering on it to feel very good about my purchase, although the three weeks hovering over a bucket of kerosene has had its costs and effects... I'm sure I'll be OK, though.

If anyone knows anything about centrifugal pumps, check those photos out - I'd appreciate feedback.

Thanks to all for the help!

Spencer Wright
Traffic Cycle Design
http://trafficbikes.com
 
Spencer:
That pump will not be very strong even in prefect condition....things to look at:
The bottom cover should be fit closely to the lower face of the impeller...should have on order of between .020" to perhaps .030"clearance..maybe a bit more..but closer is better.

The cover has an island in one quarter...teh impeller OD should run close to the inner face of that island and the island needs to be positioned just past the outlet port in the direction of rotation...That island is what forces the coolant to be pushed up the outlet. If you have a bunck of radial clearance to the island then the impeller is worn or the island is damaged...Correct to make the impeller run close as possible to the island. (.020" or so)
Make sure that any gasket applied to the cover does not add too much clearance to the face of the impeller.

Check to be sure the pump motor is rotating in the correct direction....Rotation should be to twist the coolant around the cover toward the outlet..... Just because the main spindle motor is rotating in the correct direction does not mean the coolant pump is...

Cheers Ross
 
Ross-

You've got it - the impeller is maybe 3/16" short of that island. I figure I need a new impeller, although I have no idea where I'd get one - google doesn't seem to show the pump manufacturer. I could get a new pump, but really want to make this easy on myself, and don't want to deal with retrofitting the mill for the pump or vise-versa. I also thought about trying to cut little impeller extenders out of 3/32" PTFE sheet (it's stiff, it seals things well...), and bolting the PTFE with really small screws to the faces of the impeller blades... that's not going to happen, though.

I also thought about whether I could improve the seal between the cover and the pump body, and had the same thought you pointed out - don't want to make any more room around the impeller. It fits pretty tightly anyway.

Really, what's probably going to happen is I buy a new pump. What's another $150, anyway, on top of the three weeks I spent scrubbing this thing?

*grumble*...

Oh well. Again, all suggestions welcome.

Spencer Wright
Traffic Cycle Design
http://trafficbikes.com


Back
Top