What's new
What's new

Bridgeport mill rebuild questions

mrtoes

Aluminum
Joined
Mar 15, 2014
Location
Amherst, NH
I am in the process of reconditioning a j head mill. I will be adding more questions to this thread as i go through the machine

To start with:
My table (9x36) had a good amount of surface rust on it, so i bought a large plastic tub and chelated it (molasses-water) for roughly three weeks. Today when i removed the table i was very disappointed with the result. Unfortunately i never took any pictures, but the molasses had seeped into the metal and turned the entire table brown. No matter how hard i tried, i could not remove the color. I went through just about every chemical known to man. Ontop of that, after 5 mins out of the tank the entire table flash rusted and butchered my already terrible looking surface finish. I know chelating (with molasses at a 9/1 ratio) is a tried and trued method for removing rust on large metal parts with bearing surfaces (Because it does not harm the metal under the rust). My question: Did i leave the table in long enough? What is the best way to clean the table after it is removed from the tank?

For anyone who has chelated their table/other components for a restoration, please give me all the details for what process you used. I have many other parts to do (knee, ram, saddle, etc) And would like to get it right next time.

Moving on
As soon as i removed the table from chelating, it became quite evident just how abused this machine was. There is not a single square inch of table surface that did not have a gouge or hole drilled in it. To a point that it looks almost intentional. The shop i bought the mill from apparently had no one trained to operate industrial machinery and therefore it took some abuse. I ran a fine grit stone over the top surface and found high points everywhere. The ways are in decent shape, but the table surface is trashed. I have decided to get the table ground (because i dont have the coin to get it scraped). Does anyone know a good shop to do the work in New England? And what cost am i looking at?

Lastly, I need to get my spindle bearings replaced. I have seen online that there is a shop (dont know who or where exactly) That replaces the original 2 open bearings with 4 sealed bearings. Is this a recommended upgrade? And how much more expensive is this versus the 2 original bearings.

I attached a few pics of when i first got the mill home
 

Attachments

  • 20140314_181541_resized-2.jpg
    20140314_181541_resized-2.jpg
    100.1 KB · Views: 1,726
  • 20140314_181609_resized_1.jpg
    20140314_181609_resized_1.jpg
    102.1 KB · Views: 1,905
What do you know about the mill that indicates replacement of the spindle bearings is needed?
Four sealed bearings. Will the mill be asked to perform some task that requires special rigidity?
What does an inspection of the quill/spindle assemble reveal? Is there end or side play? Run-out?
It is likely considering the age of the mill that the bore for the quill has a bell-mouth shape. Even if four
bearings added rigidity to the spindle the slop between the quill and the bore is a bigger problem.
John
 
the quill housing is still together. Not to long ago i spun the nose by hand and you can feel it grinding a bit. it doesnt feel terrible, although i dont want to put the mill completely back together and have spent loads of money on every other aspect of the machine just to have missed the spindle bearings. There doesnt seem to be any slop between the quill and housing, and the taper looks fine.

this machine is just for a home shop, although i still have plans to make some cash off it.
 
Since you have a molasses tank anyway, may be you should add a battery charger and do electrolysis instead.

I think it will remove the "brown stain" which may just be the result of molasses (especially in cold weather) taking a long time to work.

When you say have the "table ground" do you mean the ways? If you mean the surface, it is irrelevant if the ways are not attended to first. for instance, you will no longer be able to count on the table surface as a reference, since it will not be parallel to the ways. There are other problems, and lots of posts on this, over the history of PM.

If you do mean attending to the ways, I'm not sure grinding is any cheaper than scrapinng, and good chance the mating parts will need to be scraped anyway.

Why don't you finish cleaning it up, put it together, lube, adjust our the play in the ways, and see how bad it really is.

I have a beat to heck South Bend turret mill, with deep gouges in one part of the Y axis/saddle ways. This is because near as I can tell, the table was locked in one position (X), the column as well, an they used the mill as a drill press to do one operation in a short stroke section of the Y axis without ever cleaning chips out.

So my 50+ year old machine is butt ugly, and there is a small "discrepancy" near the center of Y, but really not much, considering the appearance. They might have never moved the column, the column ways are like brand new except some wear I've put on over the years. Ditto X: the table moves almost like new from end to end, though it tightens up a little at the extremes, due to typical sag when you hang it out that far.

There is a small amount of wear on the quill, since they used if for a DP. But it can be worked around when that operation is critical (bore with knee up,e.g.)

Point being, I don't think you can tell how much wear is on that machine without adjusting it and testing it. And you can't plan a course of action without numbers to back up your plan.

Even on a mill that does prove to be worn, you can use it to make an awful lot of small parts that would fit in a Kurt 6" vise, that you could not find the error in, if you know where to work on the table, and how to work to minimize error, even if the machine was brand new.

smt
 
A few years back Jeff Theile introduced Evapo-Rust Rust Remover - Evapo-Rust Super Safe Rust Remover - Home » Evapo-Rust to me and the scraping class he came too. It is some amazing stuff. I have never heard of using Molasses to de-rust anything. That's a new one to me. I see a some possible cures for you and the table. Advertise for a better table with less holes, plug the holes with iron inserts, take the table to a good welder and have it welded or buy some Dev-con aluminum filler and use it. I have done all of them over the years and all will work. Welding it, you will have to have the table ground. You should call around to all the grinding shops in your area and find out who grinds Bridgeport Tables. When I rebuild Bridgeport's I can get the complete table ground including the dovetails for around $500.00. Then the machine will look super. I use R&D Machine Rebuilding in Roberts WI. He also would 1/2 moon the top for part of the deal I am sure. Isn't member "Sidecar" -John a rebuilder up in your neck of the woods. I bet he could do it for you.

As far as the spindle bearings go, I would use the original design and just buy some class 7 bearings and not screw around replacing them with 4. It has ran that way for how many years? 40 or 50? And it sounds like you will be using it as a hobby? I buy my Bridgeport parts from High Quality Tools Inc. - Milling machine replacement parts, cutting tools, and more

They can I am sure direct you to a rebuilder or grind shop. If you start to take it apart. Buy a cheap digital camera and take lots of pictures, put the parts in coffee cans or heavy duty zip lock bags and label everything. It makes assembly a dream. Wash the parts wile you are removing them. Don't put parts in a cardboard box as you will surely loose small screws. I would suspect the ways are bad too...someone that drills holes in the table never lubed it properly or cleaned the ways I bet.

Have a pro rebuilder or one of the guys on here help you do this job. If you don't have the scraping tools and skill to scrape. Don't try it. The head is different if your a good mechanic. Good luck.. Rich
 
right you are about they ways. They never saw oil, instead someone pumped a ton of grease through the zirk fittings and gummed up the machine. As expected the grease collected years worth of small chips and scraped the hell out of the ways. had to break out the flesh dissolving chemicals to clean up the ways to get a better look at them. The flaking is gone, but i think there is still some life left. will get pics tomorrow.
 
Last edited:
its my understanding that rust removal through electrolysis is a bad method to use on any major machine components. Because it will consume metal that is rusted or not, also, it will de-temper hardened metals. please correct me if i am wrong.
 
of course you have the machine in front of you so perhaps you're in a better place to judge, but don't give up on the table surface so quickly.
you can stone down the burrs and other local high sports pretty easily without much time, money, skill etc.
then evaluate to see if the entire surface is out of flat or just ugly.
an important distinction is that 99.6% of the time the low spots, like drilled holes, don't really matter. you will probably have a vise on the table and all that is required is that the vise have a flat surface to sit on. ideally, you want a flat surface that is parallel to the ways.
other parts that might get mounted to the table directly need to be larger than the holes, but thats about it.
your table can look like swiss cheese or worse and still work fine.
as an example, consider that there are 3 giant T slots cut right down the length of it that don't compromise the functionality one bit.

if you go do go down the path of paying a rebuilder for some or all of the reconditioning, John Fahnestock at j&L scraping in MA is very well regarded.
 
what stone would you recommend for removing the high points?

Here are a few pics of the ways (not of the table)
 

Attachments

  • 032.jpg
    032.jpg
    86.8 KB · Views: 3,074
  • 033.jpg
    033.jpg
    94.5 KB · Views: 2,749
i just dont have the money to get the knee or saddle scraped. The table looks to be the ugliest, and i figure reconditioning the table is the cheapest ($500 or less is all i can afford) way to bring back some accuracy. Of course, i cant be sure how far the machine is out of spec because it didnt occur to me at the time to check when it was still together.
 
MrToes
If the budget is $500 just clean up the ways and put it together. Even worn out machines after some adjustments make great parts.
Gibs: check these at reassembly. Put them in without the gib screw to see if any 'drive' is left. For example locate the saddle (sans table) in the
center of travel. Slide in the oiled gib. Pull the saddle towards you while pushing in the gib. Stop and look to see if the head of the gib has recessed
beyond the point where the gib adjuster screw could drive it in further. If this is true the gib needs to be shimmed on the back side. Do this check
without the rear saddle wiper cover installed. Push the saddle away a short distance to remove the gib. You may need to tap from the back side to get it out so don't let the saddle get too close to the column.

If the X and Y leadscrew nuts are worn do not over tighten the adjuster in the knuckle bracket. Doing so may crack the shoulder in the bracket for the adjuster screw and then a new knuckle bracket has to be purchased.

I see the zerk fittings on the front of the saddle. These are for oil, not grease. There is a small pump oiler (name??) that will push oil thru those fittings.

If the head is taken apart, the quill comes out the bottom. But before doing that take every thing off the top end. But leave the worm feed bracket in place. The goal is to access the top of the quill. There are two small screws in the top of the quill to remove. They are 180 degrees apart. The screws hold two little tabs in place. The tabs are part of the dust shroud. If the screws are not removed the shroud gets trashed.

Some companies like High Quality Tools, HQT, sell an oiler kit with manual Biljur pump. It's not needed but thought I'd throw that out there.

Suggest pictures are taken as the head is taken apart.
The two precision bearings Have to be reassembled to the exact orientation found at removal. The wider shoulders of the bearings should be marked with an impression of a dot or a star to designate high point. This is done by the manufacturer of the bearings. The outer races should match up and the inner races should match up at time of reassembly.

Might get a sticker shock pricing new precision bearings. Lets hope these are still good. I expect the top bearing may be worn, it's typical.
The top bearing is a precision bearing.

The spacers for the precision bearings should be parallel. I like to check them on a surface plate using an indicator mounted on a surface gage.

John
 
Last edited:
If you can't afford a rebuild then clean it up and as you said stone it JR is right about, it needs a scraping, but if you can't afford it...do what you have to do so you can make some parts. It looks like it's been scraped before too. What you should do is take apart the X & Y screw bracket as it always gets filled with crud. In the middle T-Slot in the center ot the table there should be a set screw where your suppose to center the table and squirt oil into the hole in the top of the bracket to lube both brass nuts.

From the looks of the ways and what you said it seldom saw and oil. Those old Machines have zerk fitting...you can fill a grease gun with way oil and squirt that in there . Sometimes those old worn machines can take grease too, just need to keep the ways clean. The grease will purge the crud if you pump enough in there.

John the rebuilder is SideCar who I mentioned before. If your not to far from him, you should call him and see what he would charge to give it a "cut and flake" on the top of the knee, top and bottom of the saddle. I can't imagine he would say $250.00 if you have them cleaned and apart.

Cut and flake does not improve the accuracy but will help the lubrication. Rich
 
Hit another snag with the rebuild. It has taken me many months to get here, but I am finally tearing down the head. I am in the process of removing the quill feed engagement knob assembly. There is a spring loaded ball on the inside of the hand wheel clutch collar that is seized in place. I have tried everything to get this little bastard out, and in the process I may have angered the beast. The ball no longer moves and it has been badly gouged. From this point the next best option looks like drilling out the ball, and replacing the shaft, inner shaft and collar. Haven't priced it out but I would figure parts to be in the $200 range. Is there anyway for me to recover from this mess. Can I skip this part of the disassembly and simply remove the entire shaft with sub-components. Please help, I have been struggling with this ball for the last week and the first stages of insanity are setting in.
 
Hit another snag with the rebuild. It has taken me many months to get here, but I am finally tearing down the head. I am in the process of removing the quill feed engagement knob assembly. There is a spring loaded ball on the inside of the hand wheel clutch collar that is seized in place. I have tried everything to get this little bastard out, and in the process I may have angered the beast. The ball no longer moves and it has been badly gouged. From this point the next best option looks like drilling out the ball, and replacing the shaft, inner shaft and collar. Haven't priced it out but I would figure parts to be in the $200 range. Is there anyway for me to recover from this mess. Can I skip this part of the disassembly and simply remove the entire shaft with sub-components. Please help, I have been struggling with this ball for the last week and the first stages of insanity are setting in.

I dont recall the method I finally used to get it apart, but the ball in mine never came out. I got creative and somehow removed the entire assembly with both gears, shafts, the collar, and that other front linkage all intact so it is possible. If you watch ebay those assemblies pop up pretty regularly, I paid $75 a few months ago for a complete assembly in like-new condition including both shafts, the bevel gears, collar, and even a new knob which mine didnt have previously.
 
Pull the feed transmission (and gears, from top/sidecover of head), and drive up the feed pinon gear (remove setcrews that hold bushing) that decends into transmission with a soft punch..

All will come out the front..
 
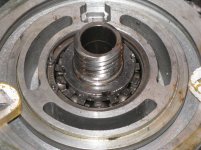
I ended up removing the quill feed shaft that released the auto down-feed assembly. never had to get that ball unstuck. Thats one problem solved, ran into more trouble with the gear box assembly (in between the belt housing and the quill body). I was able to remove the top cover and drain out the old gear oil. Now i cant remove the shaft nut that holds the large gear/shaft inside the gear box. I bought an adjustable spanner wrench just for this job, but there is a lip that wont allow the tool to sit flat and therefore whenever i apply pressure, any tool will slip off the nut and damage the teeth. ideas?
 

Attachments

  • 128.jpg
    128.jpg
    95.7 KB · Views: 1,649


Back
Top