What's new
What's new

Bridgeport Quill Seized in the Up Position

jto52

Plastic
Joined
Dec 2, 2001
Location
Florida USA
I have been scouring the machinist's message boards looking for someone who has faced the problem of a seized Bridgeport quill but so far I haven't found anything. I am hoping that some of the Bridgeport experts on this forum can help. I apologize for the length of this post but I am trying to include all of the details.

I recently acquired a 1955 vintage Bridgeport Mill with a J head on the cylindrical ram. The previous owner assured me that it was operational six months earlier when he acquired it from a local boat builder that went out of business. He had let it sit outside under a leaky tarp so some water did get to it. I have been disassembling it to bring it back to operation to at least a hobbyist level. (I am using the Ilion manual as a guide.)

In taking the head apart many of the parts have been stiff and difficult to remove, but liberally spraying it with B'laster has mostly loosened things up so that not a lot of force has been required. I have seen a little rust (primarily on the casting), but there seems to be a lot of "gunk" which is likely dried grease, oil, and dirt that became like paste when the rain water got to it. Once the parts I have removed so far are cleaned they work smoothly together.

The big problem with this machine (so far!) is the the quill is jammed at its uppermost position. Additionally, the spindle doesn't turn. I presumed when I acquired the machine that the bearings would be shot so the spindle not turning isn't too troublesome but the fact that the quill is stuck is causing a lot of difficulties. The fact that the quill is fully retracted means that I can't access the set screw that secures the quill nose piece, so the spindle cannot be slipped out the bottom of the housing. I have removed the clock spring and everything on the handle end of the pinion shaft and I can see the pinion gear and the teeth on the quill that engage the gear. While there is some rust on the casting, the pinion and the quill look fairly clean. On the other end of the shaft I have removed everything up to the worm gear/clutch ring. I don't know if there is a problem in the pinion/quill area (although I can't see anything that looks suspicious), but I am very hesitant to try to force the pinion shaft and gear past the quill. I may be able to remove the worm gear/clutch ring with the pinion shaft still in place but I don't know if that will help any. The double set screw holding the pinion bushing has been removed, however. Is attempting to drive out the pinion shaft something I should pursue or is this a bad idea? I have removed the quill lock shaft and lock shoes and the quill in this area also looks clean (no rust but a little grime that wiped off easily with a paper towel).

Additionally, I cannot remove the quill stop screw because the reverse trip ball lever is stuck and is a bit cockeyed in the hole. It sort of looks like the trip level plunger is sticking up a little and is blocking the reverse trip ball lever in. It's hard to tell. The quill stop knob blocks the view of the bottom of the trip level plunger. Is this merely a symptom of the quill being stuck or is it possibly the cause? Threading a 4-40 screw into the reverse trip ball lever and pulling on it doesn't help because the reverse trip ball lever is too cockeyed and jammed to come out. If the quill wasn't stuck I could perhaps jiggle the reverse trip ball lever to remove it. Again, I have been hesitant to try and force anything.

At the top of the quill I have removed the two screws. (The felt oil strainer was missing.) Are the screw holes actually in the top of the quill? I can see the spindle lock washer but I have no way to remove it while its down inside the quill housing. I did bend down the tab on the bearing lock washer and I tried tapping with a punch on the ears of the spindle lock washer but I didn't achieve anything because the angle of the punch was too acute.

My approach so far has been to assume that the quill is stuck because of grime and gunk so I am soaking it in a tub of B'laster. I am looking for possible other solutions to this problem. I have not tried heat or tapping on the top of the spindle and I won't until advised otherwise.

Any suggestions are appreciated.
 
Last first,
The two screws at the top do thread into the top of the quill. They secure the dust shield and the missing felt strainer in place. The head of one screw is shorter than the other and is located under the worm feed bracket.
The feed engage lever is in the neutral-disengaged position?
Reinstall the down feed handle assembly w/o the clock spring. Crank up the table to a height where some wood can be located an inch or so away from the spindle nose. Drop in the draw bar. Grasp the hex of the drawbar and apply downward force and tap on the drawbar end. Lead or brass hammer is preferred. Add spacers as need so your hand has room to grip the hex.
That's a start.
Avoid stripping every part off the head all at once. Work by component subassembly.
John
 
Thank you for your response. Getting as many parts off of the head seemed like a good idea at the time because I wanted to see what I had. There was a little water in it, and it's all out now. The feed engage lever has been removed.

Like I stated in the original post, the head is soaking in B'laster right now. I will take it out, remount it on the ram and try your suggestion next week.

Do you have any thoughts about the reverse trip ball lever and the trip level plunger?
 
My approach so far has been to assume that the quill is stuck because of grime and gunk so I am soaking it in a tub of B'laster. I am looking for possible other solutions to this problem. I have not tried heat or tapping on the top of the spindle and I won't until advised otherwise.

Don't do anything drastic. I remember that a penetrant product I used said to squirt on the seize connection and strike with a block of wood
or something like that. I don't know if it makes much difference considering you are not in a hurry. Just let it soak. Might take a few days.
 
the reverse trip ball lever and the trip level plunger?

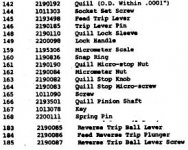
When the quill is in the full retract position the feed reverse trip plunger (184) is pushed up making removal of the
reverse trip ball lever (183) difficult.
The cap screw securing the quill stop knob (163) to the quill can be removed to relieve the trip plunger. However, the quill stop keeps the quill orientated so the rack is properly engaged with the quill pinion (180). It should be reattached when using the down feed handle to drop the quill.

The end of the reverse trip ball lever is threaded 5-40. There is only about 1 1/4 full threads but it is enough for a bite. Generally, once a screw is attached it can be removed.
It's going to flop around in the hole. A thin rod or scriber will help here. If it is bent extraction can be tedious and difficult but not impossible. The lever has to be inspected. Lay it on a flat surface and roll it. If bent it must be replaced as it will not trip the feed to disengage.

The feed reverse trip plunger is not drilled on center of the part. Use this at re-install and place the longer portion downward to insure contact with the quill stop knob.
John
Trip.jpgFeed 2.JPGFeed 3.JPGBP2.JPG
 
The cap screw securing the quill stop knob (163) to the quill can be removed to relieve the trip plunger. However, the quill stop keeps the quill orientated so the rack is properly engaged with the quill pinion (180). It should be reattached when using the down feed handle to drop the quill.

Perhaps I don't understand this but it seems like a catch-22. I can't remove the quill stop knob cap screw without first removing the quill stop screw. The quill stop screw won't come out without removing the reverse trip ball lever. It looks like the quill needs to move before the reverse trip ball lever can be removed.

The part about the quill stop knob being needed for quill alignment is a good tip that I will keep in mind.
 
The family of feed trip parts have to be removed before the quill can be removed from the housing.
Except the feed reverse trip plunger and the reverse trip ball lever.


***
By the way, is the micrometer nut screwed all the way up against the quill stop knob?
If it is jammed tight it must be backed off. Sometimes operators screw this all the way up when milling to hold the quill in place. That is a hint that the clamp for the quill needs adjustment.

Here are some pics of the parts that have to be removed.

Feed 1.JPGFeed 3.JPGFeed Trip Assembly.JPGFeed Trip Parts.JPGFeed 5.JPG
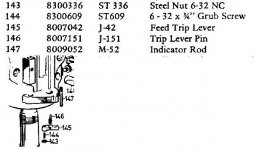
Start with the feed trip lever (145), snap ring, micrometer nut (depth stop), and then the quill stop can be removed.

***If the micrometer nut is screwed up against the quill stop the quill will not move for all the tea in China until the nut is backed off.
 
Last edited:
Anouther thing to try is losen slightly or retighten the 4 bolts that let the head rotate, over tightening them will lock the quill if carried to excess, at the least it may flex things a bit and help losen them up, the quills are a very very good fit in the castings.
 
Thanks for the responses.

The micrometer nut is screwed down and away from the quill stop. Originally it was very tight on the threads and the threads were grungy but squirting it with B'laster and running it up and down the screw several times released it and it is very smooth now. This has been typical of the parts in the head that I have taken off which is why I feel that grunge is what is sticking the quill. I have removed the feed trip components, although I get stuck when I try to remove the quill stop screw because the quill feed reverse trip plunger blocks in the reverse trip ball lever.

Also, the head is off of the ram so the bolts are removed.

Please keep coming with the suggestions.
 
Ah, it's the little hole at the top of the micrometer screw, that is the hang up.
powerfeed_ball_trip.jpgMicrometer Screw~.JPG

Back to the original problem, the quill has to move and once it backs off the plunger that ball trip should come out.

There are two diameters in the bore. The important one is for the quill and it does not extend the full length of the bore. I forget the distance but it is around ~5 3/4". Just above that is a second slightly larger diameter that extends from where the quill bore ends to the top of the casting, about another ~6 inches or so. The quill skirt lives in this bore.

Look at the casting behind the micrometer screw at a point past halfway up. There is a small gap marking the start of the bore for the quill skirt. Stand the head upright and squirt light oil into this gap on the left and right side. Lean the head back a little so it runs around the bore and gets to the back. Leave the head upright if you can and let it soak down.

Likely the quill has to be driven out. Beating on the end of the spindle, the splined shaft where the drawbar enters, will brinell the bearings. If they are already junk it won't matter but that is unknown at this point. If the spindle is locked up in the quill likely it's too late to save the bearings.
Lay the back of the head on plywood. Stuff a rag in the hole to collect the splinters. Get a piece of wood that can catch the top of the quill and give it a wack. Put your foot on the head so it doesn't travel too far. Kinda like sending the opponents ball when playing croquet.:D
If the quill starts to move watch for the quill skirt. Don't want to mash it. Use the down feed handle if possible or last resort drive on the splined end of the quill but protect it with a piece of wood.
This bit is the knuckledraggers method.
 
The quill is a tight fit in housing, only a few tenths clearance.

Water/rust will lock it up..

Remove feed trip lever at lower front section of quill housing.

Remove C clip holding Quill stop micro screw near bottom of screw. Let quill stop micro screw drop enough, to remove reverse trip ball lever (dogbone)

If spindle bearings spin nice and quiet (doubtful), Be carefull and patient.. getting quill to move.

Knuckle dragger time.. If bearings are bad..

New spindle bearings ~ 350.00 from H&W will take care of that, pulley and backgear bearings, may be needed also..
 
I'm not worried about the bearings; I believe that they are toast. The thing I'm concerned about is the rack on the quill and the pinion gear. I would feel better if I could get the pinion gear out first. Which is most likely to damage the quill, driving the pinion gear and shaft past it and out, or diving out the quill with the pinion gear in place?
 
Did the quill move up and down before disassembly? Have you tried removing the lower bearing cap. If those are screwed on too tight it will create the problems you are having. Also, there is a "lock screw" that holds that lower bearing cap in place. If those are too tight it will cause the quill to lock up in the upper position.
 
Did the quill move up and down before disassembly? Have you tried removing the lower bearing cap. If those are screwed on too tight it will create the problems you are having. Also, there is a "lock screw" that holds that lower bearing cap in place. If those are too tight it will cause the quill to lock up in the upper position.

The quill did not move when I obtained the machine. I cannot access the set screw that holds on the lower bearing cap.

I did have some slight success this morning. I tried jhruska's "knuckledragger" method with no result. I then tried tapping on the pinion shaft (again) and to my surprise this time it moved. I was able to remove the shaft, pinion gear, and bushing. I put the head back into the oil to soak again.
 
Good, now put well lubed pinion shaft back in...

Why??

So it can help with quill removal, steady pressure on quill handle (NORMAL 3/8 th in drilling pressure), while tapping on quill from above, will help with removal. Movement of quill will be seen/felt at end of quill feed handle if things start to move..

Another thought. Mount quill housing to ram backplate, tighten 4 front mounting bolts to 55 ft lb. This should bring housing bore into best shape for quill removal..
 
I'm not worried about the bearings; I believe that they are toast. The thing I'm concerned about is the rack on the quill and the pinion gear. I would feel better if I could get the pinion gear out first. Which is most likely to damage the quill, driving the pinion gear and shaft past it and out, or diving out the quill with the pinion gear in place?

The rack is cut into the quill from the top to a few inches from the bottom. It won't get hurt.
I have left the pinion in place and used it when reloading the quill assembly from the nose of the head.
Beating on something with a hammer is what I really detest. "do no harm" applies to machines as well as doctors.
Don't know what is available to you in the way of hardware or shop tooling. Have you ever used a bearing puller or a bearing back-up. The use here would be to apply a load first and then a rap with a hammer.
If MacGyver stops in ask him to put together a gizmo to apply a load on the quill. If there is a piece of aluminum around hold that against the splined end of the spindle. Get a good sized hammer and give it a rap. Early motion might be .005 to .010 at first. Try about 20/30 raps. Mark the nose of the spindle to gage any progress.

There was a Nomura 5" bar that had a stuck drawbar in the spindle. The spindle had been run without a tool holder.
The drawbar had a long stack of belleville washers that fused inside the spindle. I put a big puller at the front of the spindle and used a big hammer at the back of the quill to drive forward and out. When it started moving .015 a wack it felt like it was flying. The drawbar was around eight feet long but the washer stack was about three feet.
 

Attachments

  • bearing-puller-setup.jpg
    bearing-puller-setup.jpg
    24.5 KB · Views: 618
I too hate the idea of beating on something with a hammer. So far I haven't needed anything more than a few sharp raps with a plastic mallet to disassemble the other portions of the machine..

Unfortunately MacGyver hasn't been by here in quite a while and I haven't seen any way to load the bottom of the spindle. I am going to let it soak for a few more days and then will try the hammer again. On my first attempt I quit long before 20 raps because I saw no progress. In looking back perhaps it did do something because the pinion was freed not long after.

Everyone have a merry Christmas!


Back
Top