What's new
What's new

Hardinge Turning Tools For Turret - Needing Some Help!

bradjacob

Titanium
Joined
Nov 18, 2008
Location
Easton, PA
I've tried setting up my first job on my DSM59.

Everything was going pretty good until I tried to turn some diameter off the piece. The amount is .200, so I decided to take it off in three ops of .030 per cut.

I was getting some bad results and then it dawned on me that the cutter is NOT on center. Looking at the tools, why in the hell, do they have the setscrews on the top, pushing the tool AWAY from center??

It's been 3 nights now and I've nowhere. In fact, I've gone in reverse and the jobs are stacked up - so my level of anxiety is getting bad.

I'm feeling resentful for buying this machine, although I know it's not the machine, but rather my inexperience. Needless to say, I'm very discouraged at the moment and hope someone can shed some light on what I'm doing wrong. :wall: :mad5:

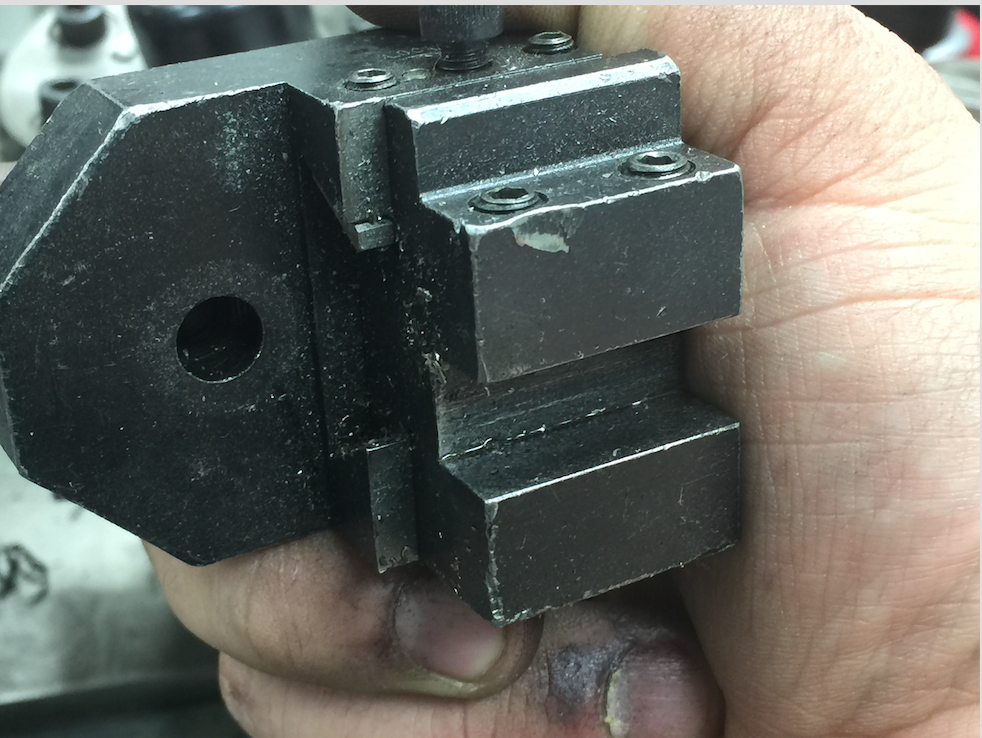
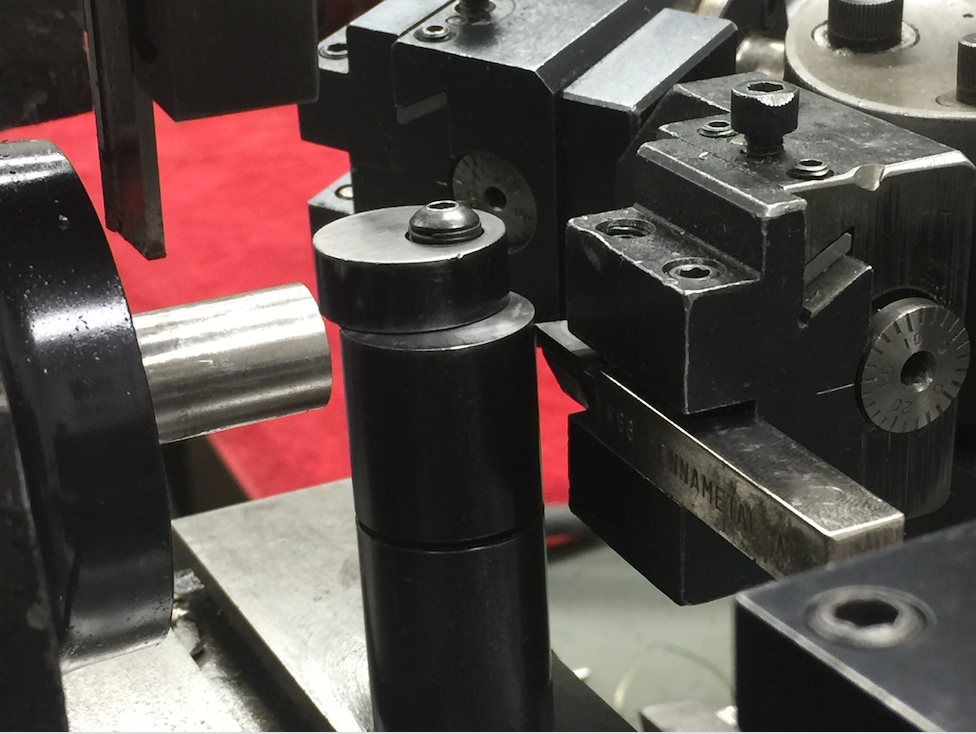
In this photo the set screws are on top and drive the tool down. WHY?
Screen%20Shot%202017-03-25%20at%2012.36.28%20AM_zps4d1thy38.png


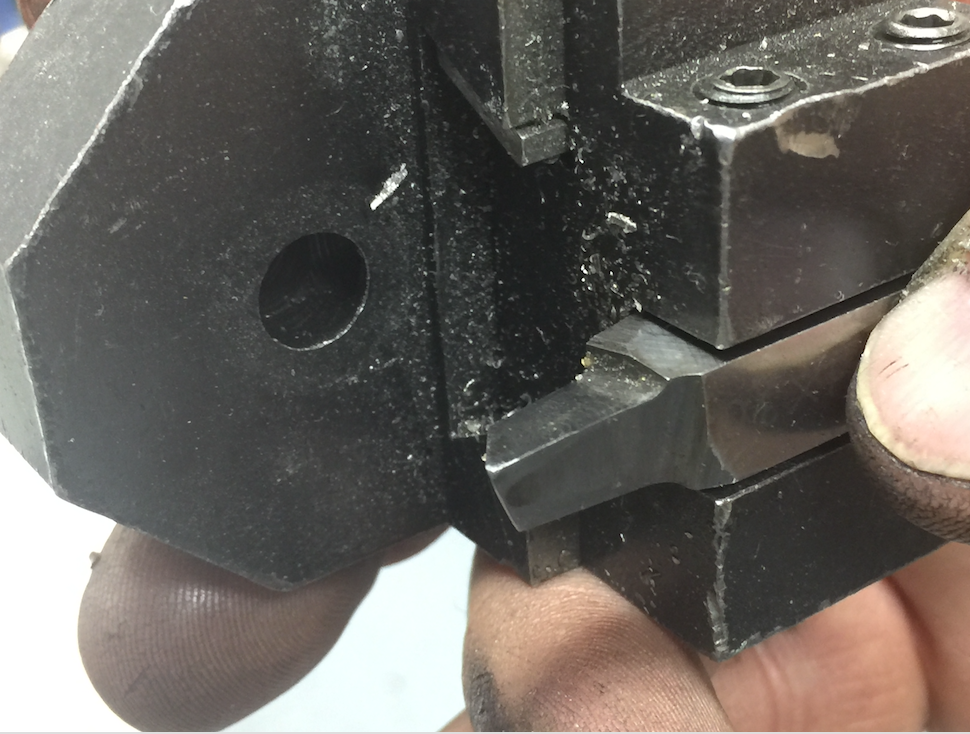
The top of the cutter-slot is on center. So any bits like this, with their edge being lower, can't be used? What if I wanted to use a tool who's cutting edge was not on plane with the tool-slot?
Screen%20Shot%202017-03-25%20at%2012.34.20%20AM_zpsvafwl10s.png


Screen%20Shot%202017-03-25%20at%2012.34.30%20AM_zpskgc1ng4p.png


THIS tool, seems to allow for some movement to dial in the proper height:
Screen%20Shot%202017-03-25%20at%2012.36.06%20AM_zps937gwksk.png


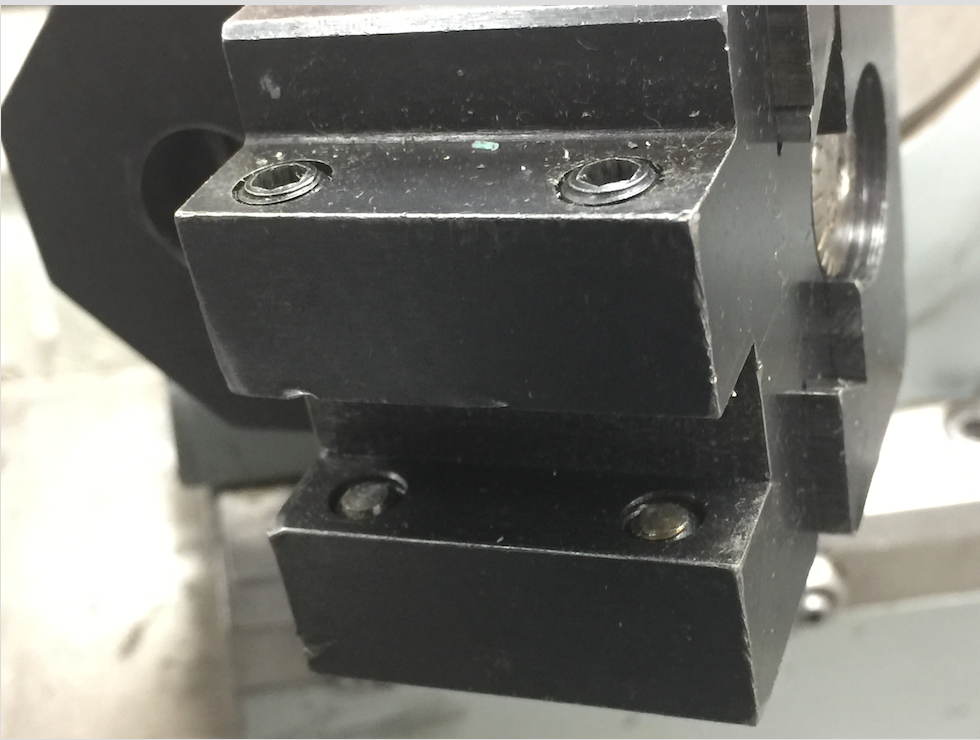
This holder, keeps the cutter SO far towards the center that bringing it out will cause the adjustment screw to fall out before I get to my position. And notice the setscrew position - it demands that you use a cutter that has no dip before the cutting edge (like braised carbide)
Screen%20Shot%202017-03-25%20at%2012.33.47%20AM_zpsr2kpn13d.png


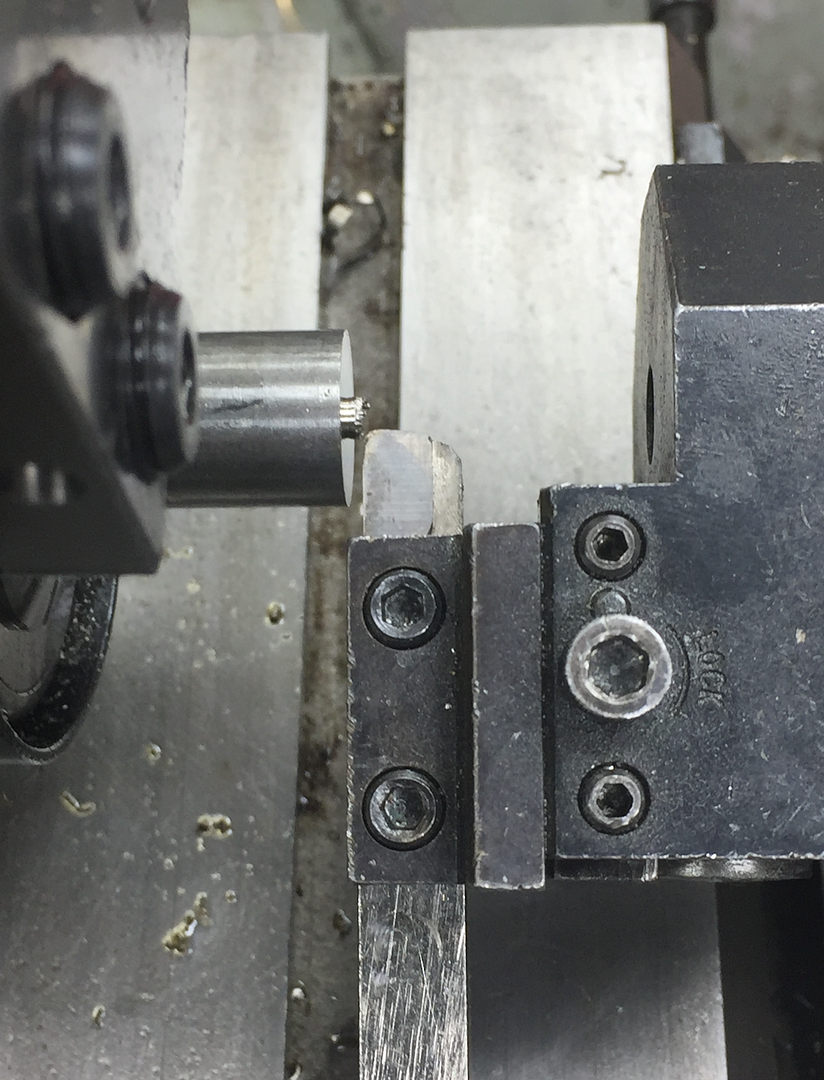
You can see the heights are pretty off:
Screen%20Shot%202017-03-25%20at%2012.34.49%20AM_zps1kfsxswp.png


Screen%20Shot%202017-03-25%20at%2012.34.39%20AM_zps9bqbd9kx.png
 
I have one of those tool holders. It should be on center with a 3/8 tool installed. The tool bit in your 2nd photo needs to be started over, grind it back to the point it is 3/8 thick the grind the top rake front to back only, so the whole cutting edge is still 3/8 high. The foreman in the first shop I worked used to get so mad when guys would grind the top of tools like your example.
Hardinge did have packages with color coded plastic shims to bring them back to center, the thickest shim was/is .02 thick. If the set screws had been from the other side you would have to grind the top of the tool the same height as the cutting edge every time you sharpened the tool. The rear tool on the cross slide is like that.
For taking a lot of material off with a turret lathe a box tool or hollow mill is the cat's meow. We are using a hollow mill to turn a 3/8 aluminum bar to 3/16 in one pass, feeding .008 per rev.
Not sure what is going on in your bottom photo. Maybe the wrong height gage? maybe the turret has been reground and the turret holes are not on center. the carbide tool looks like it was not ground on top. It is a 3/8 bit, correct?

Thanks for the info Fred. So Hardinge meant for the tools to be ground like that? I guess it'll be a habit that I'll need to break and a new technique adopted, which is fine.

I guess it answers the question of the travel. Using a braised-carbide bit, there is a gap between the cutting section and the body, so it kinda limits the use both the setscrews - it would orientate the bit too close to center.
 
As mentioned, stop grinding the HSS tools that way. It creates effective negative rake and you can't sharpen them without
changing the height.

Also notice that the tool holder has *four* setscrews. You can use these to put tilt on the tool to effectively raise the height of the
cutter. Think: front upper screw retracted all the way, front lower screw extended all the way. Rear upper screw extended, rear
lower screw retracted. This will move the tip of the tool upwards in relation to the workpiece.

A good way to grind tools for a holder like this:

jrr_toolbit.jpg
 
X2 on Fred's comments.

Your grinds on HSS should mimic the AR or BR braised carbide bits. I use about 4 degree top, side and front rake. You can also use the 3/8" shank insert tools that use the TCMT inserts. Rouse makes nice tools, but the inserts don't have the variety of chip breakers available.

The T3 tool holder is for very small diameters. You only need a quarter inch or less of top rake for small diameter stuff.

The T4 holder appears to be the size you need for the job.

The turning tools for the turret should point down in use.

The block on the back of the T4 and larger tools should sit on the top of the turret, to keep the tools from twisting during rapid indexes.

The tool setting block should be used to set the height of tools on the cross slide, and can be used to give an approx. setting for the turning tools by placing a shim or gage block on the presenter that is 1/2 the desired turn diameter.

Bill
 
As mentioned, stop grinding the HSS tools that way. It creates effective negative rake and you can't sharpen them without
changing the height.

Also notice that the tool holder has *four* setscrews. You can use these to put tilt on the tool to effectively raise the height of the
cutter. Think: front upper screw retracted all the way, front lower screw extended all the way. Rear upper screw extended, rear
lower screw retracted. This will move the tip of the tool upwards in relation to the workpiece.

A good way to grind tools for a holder like this:

jrr_toolbit.jpg

Jim - thanks man, really appreciate this. You (and the others) have definitely answered my question - and that is, the cutting edge must be the same as the cutter's top plane.
 
X2 on Fred's comments.

Your grinds on HSS should mimic the AR or BR braised carbide bits. I use about 4 degree top, side and front rake. You can also use the 3/8" shank insert tools that use the TCMT inserts. Rouse makes nice tools, but the inserts don't have the variety of chip breakers available.

The T3 tool holder is for very small diameters. You only need a quarter inch or less of top rake for small diameter stuff.

The T4 holder appears to be the size you need for the job.

The turning tools for the turret should point down in use.

The block on the back of the T4 and larger tools should sit on the top of the turret, to keep the tools from twisting during rapid indexes.

The tool setting block should be used to set the height of tools on the cross slide, and can be used to give an approx. setting for the turning tools by placing a shim or gage block on the presenter that is 1/2 the desired turn diameter.

Bill

Bill - thanks for this as well. Very good to know and I had no idea. See - this the power of talking to people with actual experience. Appreciate it!
 
Jim - thanks man, really appreciate this. You (and the others) have definitely answered my question - and that is, the cutting edge must be the same as the cutter's top plane.

True, but the real issue is, cutting edge ideally should be at the intersection of the vertical edge and the horizontal edge. That is,
a line that is co-linear with the *corner* of the tool.

This is actually pretty tough to achieve perfectly. I tend to rough out the grinds to start, leaving a land of about 0.050 on each side. Then
I use a finer wheel and approach slowly to the final edge. I always over-grind it a bit no matter how careful I am. Which means the
edge is a bit lower than the corner. As long as the cutting edge is at least parallel to the corner, that's good.

What frosts my cake is, my co-workers tend to 'sharpen' my lathe tools by grinding on the TOP surface, and worse, trying to
grind in un-needed back rake on them.

The tool grind shown above has zero back rake - I've never found it necessary - but can be sharpened by simply grinding on the
*end* of the tool. Doing so keeps the cutting edge at the same height.
 
A few shots of the setup I am using at this time.
I have found that many tools seem to cut better if they are .005" or so below center, this means it would leave a .010" nub if facing the part off.


The block I made to hold tools that will not fit in a Hardinge block.
DSCN1486.jpgDSCN1492.jpg

I made new blades for a B&S #200 hollow mill to form the end of parts. It will face to length, Chamfer ID and OD.
It is mounted in a TH extension block.
DSCN1489.jpgDSCN1496.jpgDSCN1497.jpg
 
A block I made to shift the tool in a turning tool block in the turret. It is needed to prevent interference with the turret and the cross slide tooling in this setup. I also use it in a T3 holder to cut a larger diameter than normally allowed, by just clamping the cutter with just the top 2 screws.

It is mounted in a DSM-1 fine adjust holder.

DSCN1487.jpgDSCN1494.jpgDSCN1493.jpg

Since I never could find a gang tool block to fit the Model D taper attachment, I made my own.

DSCN1491.jpgDSCN1498.jpg
 
The Brookfield DA-10

P4260192.jpgP4260189.jpg

And in action.DSCN1495.jpg

My collection of Diamond hones.
The Norton 500 grit is the workhorse that puts a razor edge on most tools.
I run them wet with mineral spirits.

DSCN1499.jpg
 
Brad, with a adjustable knee turning tool in the turret,like you have, you can remove .187" OD in one pass. Knee turning tools are excellent when you use the correct toolbit.
 
Love the home-made gang tool. At some point one realizes that the hardinge black oxide fancy
finish isn't really needed, 1018 works just fine for most applications.

Other item to watch: roller box tools, for small stuff. Those work amazingly well.
 
Roller box tools work good, when you get them set!, I have always had lots of trouble setting up box tools, personally the adjustable knee tools are just as good and faster for me to setup.

Love the home-made gang tool. At some point one realizes that the hardinge black oxide fancy
finish isn't really needed, 1018 works just fine for most applications.

Other item to watch: roller box tools, for small stuff. Those work amazingly well.
 
A few helpful things I have learned over the years:

I run 2' stock and pull the bar by hand. To know when I am near the end of bar, I put a ring with a marker about 2" from the end.

When cutting off parts, I don't let the parts fly off or catch them bare handed. For parts with a hole in them, I use a long arm Allen wrench and use the short arm to catch them. For parts without a hole, I use a 2" length of plastic or dowel rod with a suitable hole drilled in the end and support them till they drop off.

Bill
 
How do you run a 2' bar of stock in a Dsm 59 turret lathe? The most I can run is 18", a 2' bar would stick out of the end of the collet closer 6", and whip around!

Whipping depends upon the bar size and length, but it is always a good idea to keep the bar centered in the tube. For mass production, it is worth your time to make a bushing to fit the left end of the draw bar to keep the bar centered. When I was making hundreds of parts, I cut the stock (1/4 to 1 inch) to 3 foot lengths. Sometimes for a short job I roll up a strip of cardboard and jam it in the draw bar.

Larry

X2 on both bushing and rolled up cardboard; I've done both. Also, if you have some desire to run longer bars, and have the room and circumstances, I have found that a 6 or 8" diameter cardboard shipping tube makes an excellent, inexpensive bar support for temp purposes when cut to correct height to match spindle, with a V-notch cut across the top to hold the longer bar. Obviously, there are many refinements (and safety features...;-) that can be added, but this is a decent in-a-pinch setup if compelled by circumstance...
 
Thanks for all the knowledgeable and creative input. In addition to the wide array of stock tooling from Hardinge and others, seems these are limited only by one's creativity and willingness to improvise (I don't have one, but have been cogitating..).

This video also seemed a pretty good rundown of the basic functions and tooling available (and some modified tooling) for the DSM Hardinge DSM-59 - YouTube ; he also had a home-made spring-loaded plunger gizmo for the turret for sticking short parts into the collet (with a collet-stop most likely), which was useful. Thanks, Cheers

Andrew (Toolmiser) and I are friends. He made that video to help acquaint me with new purchase. He's a great guy.


Back
Top