What's new
What's new

Removing a broken comound slide cam bolt

Peter.

Titanium
Joined
Mar 28, 2007
Location
England UK
The cam bolt on my HLV was seized in solid and snapped when I tried to release it. It snapped right in the middle of the cam section which is approx. 2" in the hole leaving the thin end stuck fast in the small blind hole and half of the cam in the pull-stud which meant it had to come out somehow in order to dismantle the compound off the cross-slide. Looking at the end of the broken stud it was dirty over 2/3 the face so it looked like it was cracked for some time. Sure didn't take much to break it.

I tried drilling the stuck end so I could tap a thread for a slide-hammer - no joy there is was too hard for my HSS drill so I ground up a masonry bit and managed to drill in about 3/16" until the heat got into it and the end spun half a turn. This put the drill up against the side of the hole so I had to stop that. I was pleased that it had become un-frozen but it was still too tight to fall out even with loads of light tapping around the part with an aluminium drift.

In the end I used a trick I learned to get a broken hex key ball end out of a set screw one time. I got a TIG tungsten and put some shrink sleeving on it to prevent any arcing against the walls of the hole. I then used my TIG welder to fuse the end of the tungsten to the broken end by leaving just enough clearance to initiate the arc but close enough that it fused as soon as it struck. I had to wind the power up to 130amps before it would fuse with any strength but using a combination of this and light tapping on the pull-stud it finally came free and I got the broken end out with no damage to the casting or the pull-stud.

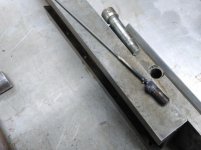
dipstud1.jpg

dipstud2.jpg
 
Alternative approach:

Drill hole in compound directly opposite the end of the stuck stub.

Tap the stub out through that hole with a small punch.

Tap the hole, install setscrew.

Stamp the words "OIL" alongside the setscrew!
 
That would be my normal approach Jim except directly opposite is the cutout and witness mark for the compound angle graduations.
 
If the HLV has had a hard life, you may find that said graduations are off by a fraction of a degree. I still need to re-scrape the dovetails on my 1952 HLV cross-slide to correct the error...
 
You probably know that you can make a new cam bolt from a socket head cap screw that is long enough to provide sufficient unthreaded shank. Such a screw may be hard to get in the UK, so I suggest you get several and make some spares. I am not sure what the screw length should be, but you need a 7/16 inch NC or NF screw and it needs to have 2.75 inch unthreaded.

This would probably do the job, 5 inch length (unthreaded length not given) at $28 (free shipping to me, but 1 -2 months delivery!) for 25 screws.. Amazon.com: 7/16-14 socket head cap screw - 5 inches / Socket Cap / Screws & Bolts / Fastene...: Industrial & Scientific

This seller has them in 5-packs for $7.24 + $5 postage in the USA and confirms the thread length is 1.38 inches. 7/16"-14 x 5" Black Oxide Steel Socket Head Cap Screw, 5 pk., U7.43.5 | eBay

My lathe has a 1/8 inch hole drilled above the index mark that looks like it could be OEM, except we know it was added by the user to address a broken cam bolt. The hole is well above the hash mark and looks fine without a plug. It would be a good idea to drill your hole now and avoid aggro the next time the cam breaks, probably years down the road for the next owner or two. You can turn a piece of steel to 7/16 and braze in a 1/8 drill bit and drill from the right side to assure the 1/8 hole will be centered in the cam hole.

Larry
 
Last edited:
If the HLV has had a hard life, you may find that said graduations are off by a fraction of a degree. I still need to re-scrape the dovetails on my 1952 HLV cross-slide to correct the error...


Mine has done a lot of turning & facing but no real amount of screw cutting judging by the leadscrew.. My cross-slide screw is very worn in the middle and there's wear on the main bedway. The cross slide ways need scraping though they are not scored. The compound ways look like new.

Mark does your machine have a rotary collar mechanism for the quick-retract? Mine does but most I see pictures of have a small lever on top.
 
...Mark does your machine have a rotary collar mechanism for the quick-retract? Mine does but most I see pictures of have a small lever on top.
The HLV has a retracting lever that rotates on a horizontal axis (around the feed screw). That design was exactly like the one used on the original 1915-19 design Hardinge Cataract screw cutting lathe. https://patentimages.storage.googleapis.com/pages/US1290550-0.png

In 1960, one of the changes for the HLV-H was to make the retracting lever rotate on a vertical axis.

Larry
 
Ah, thanks for the info Larry. I thought I had seen pics of earlier HLVs with the later style lever.

I am not sure, but I think the compounds on the 1950 machines and the 1960 machines can be swapped.

It is not uncommon to find a 1960 model DSM turret that Hardinge special made with a base to fit a pre-1946 ESM split bed, or a slide rest or tailstock of late design made to fit the split bed. Hardinge used to call those retrofit components "mail order" to explain that they were not originally sold on the lathe. You have to love a company that takes care of old customers in that way. I have quite a few examples of mail order components and like them because the newer versions were generally better than the older versions. But I think the HLV-H compound did not have to be modified to fit the older model.

Larry
 
That would be my normal approach Jim except directly opposite is the cutout and witness mark for the compound angle graduations.

Not true.

The hole you would need to drill to do this punch-out is about a quarter inch above the index mark for the angle
graduations. It fits a 6-32 setscrew. The hole does not come even close to the index mark.

I know this (because tyler knows this) as I inspected the HLVH at work today, where I had done this job a few
years ago.


Back
Top