What's new
What's new

Cinccinati toolmaster installing Newall DRO

draganm

Aluminum
Joined
Aug 6, 2007
Location
colorado
I'm installing a DRO on this machine, actually re-installing since it had an old Accurite II that was having a problem with X axis blinking out (yes I cleaned the scale, problem was on the display unit electronics).

The Y was straightforward on the left side since I re-used a pair of 1/2" studs that were put in decades ago and just made a new mounting plate.

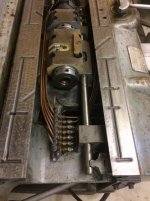
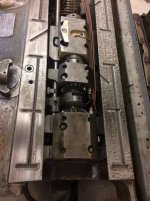
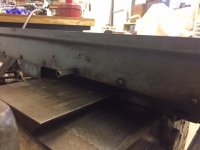
Little worried about X, the old one was in the front and it was always a problem to lock the x-axis since the big scale covered up everything, so I'm going in the back. My concern in the back is I don't want to drill into an oil passage. holes are going to be obviously in the saddle, 1.13" apart and 3.38" down from top of table, 3/4" deep.

Is this ok? anyone done this before?
thanks

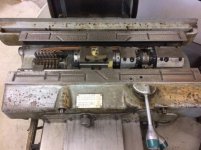
pic of guide with drill bushings for 1/4-20's
Toolmaster DRO install 003.jpg
 
I just put one on the back of mine without any issues, used M5 machine screws and went in about 1/2"
I can send pictures if you want


Sent from my iPhone using Tapatalk
 
I just put one on the back of mine without any issues, used M5 machine screws and went in about 1/2"
I can send pictures if you want


Sent from my iPhone using Tapatalk
yes please

I looked under the table and there is a oiler junction block on the far left side (opposite the one-shot plunger), with lines going every which way. On the right side, behind the X-axis feed screw, you can barely see a copper oil line going to what looks like the rear way. Sliding a rule in, it's exactly on center with the saddle. So hopefully any drilled/tapped holes will land to either side of this. This was impossible to take pic of though, really heard to see back there

Cincinnati oiling left side.jpgCincinnati oiling righ side front.jpgCincci oiling right side back 001.jpg
 
yes please

I looked under the table and there is a oiler junction block on the far left side (opposite the one-shot plunger), with lines going every which way. On the right side, behind the X-axis feed screw, you can barely see a copper oil line going to what looks like the rear way. Sliding a rule in, it's exactly on center with the saddle. So hopefully any drilled/tapped holes will land to either side of this. This was impossible to take pic of though, really heard to see back there

View attachment 182622View attachment 182623View attachment 182624
 
Draganm,

Any chance that you can measure the retaining clip in the collet nut if you are using monoset c collets?
I do not have the right one fitted and it is a pain to get the collet out when changing tooling.
Hope the pictures help.
 
my table was a bitch to drill/tap into with a pistol drill . you only need to go in 3/8" or so to secure the scale
i doubt you'll get carried away :D . i installed an Anilam/Acurite scale back there without a hitch.....
- don't forget to put a bumper of some kind between the saddle and the column, or you'll crash the scale ...
i just used a 3/8 capscrew in an existing hole near the readerhead.

it was the Y
scale that was a bitch- i had to fabricate a custom reader-head bracket from 1/4 aluminum plate .


i have a 1-D machine , so i don't use those collets.
 
Draganm,
Any chance that you can measure the retaining clip in the collet nut if you are using monoset c collets?
I remember those things, the entire set went with the original milling head years ago to our property serves division and then to public auction. sorry, I have no measurements for the C-clip.
This machine now is a bit of frankenstein , Toolmaster with a Lagun head that uses R8's collets. I call it our Laguninnati :)

Hope the pictures help.
Did you post pics, I don't see anything

What would be ideal is a pic of a toolmaster with the table off, surely someone has posted that here at one time?
 
View attachment 182683
it was the Y scale that was a bitch- i had to fabricate a custom reader-head bracket from 1/4 aluminum plate .
tell me about it, this took 2 days to finish. even trimming the covers was tedious.

Laguninnati Y scale 002.jpg

Picture of the Laguninnati, not bad machine really. 3HP head, power X and Y, adjustable back-lash both axis. Probably be here for another 50 years
Lagun-innati 001.jpg
 
I remember those things, the entire set went with the original milling head years ago to our property serves division and then to public auction. sorry, I have no measurements for the C-clip.
This machine now is a bit of frankenstein , Toolmaster with a Lagun head that uses R8's collets. I call it our Laguninnati :)

Did you post pics, I don't see anything

What would be ideal is a pic of a toolmaster with the table off, surely someone has posted that here at one time?

The pictures appear after your pictures in the post when I view it, the ones where you show the adjustable back lash nut


Sent from my iPhone using Tapatalk
 
thanks I see them now, did not appear earlier for some reason.

Your holes are much further apart, looks like 3.0" vs. the 1.13" on my factory Newall bracket. Not sure what I'll do, I think I'll put it on the back-burner for now.

Also interesting your knee-oiler plunger is on the opposite side of mine. On my machine the right side was completely cluttered with the power feed linkage so I had to go to the left side.
 
What would be ideal is a pic of a toolmaster with the table off, surely someone has posted that here at one time?

Draganm -

I have the table off my Cinel 202-12. Not sure how close it is to a Toolmaster as it has basically a 2MI bottom end on it with a Toolmaster top end. But if you want next time I'm out in the shop I can shoot a picture of the plumbing. From memory it is quite close to your pictures. I would imagine Cincinnati kept a lot of things similar between machines.

Dale
 
Dale that would be great. We actually have a 2Mi Horizontal here as well off in a corner. Never thought to compare them, but now that I look, the saddles look very similar.
If your table is off, a pic of the saddle top with oiling lines would be great.
much appreciated
 
Draganm -

For what they are worth, here are the pictures of my machine. You will also see how the scales were mounted on mine - not by me, installed when I got it.

If you need some other shot or have a question, just holler.

Dale
 

Attachments

  • 1-Cinel 1.jpg
    1-Cinel 1.jpg
    46.8 KB · Views: 389
  • 1-Cinel 2.jpg
    1-Cinel 2.jpg
    48.2 KB · Views: 354
  • 1-Cinel 3.jpg
    1-Cinel 3.jpg
    49.1 KB · Views: 330
  • 1-Cinel 4.jpg
    1-Cinel 4.jpg
    40.3 KB · Views: 313
  • 1-Cinel 5.jpg
    1-Cinel 5.jpg
    95.8 KB · Views: 295
thanks, it's different with 2 lines going to each end instead of one on center, but it tells me what I need to know. The hole goes in, then straight up, and then feeds the shallow oil channels. On mine as long as I don't drill on the exact center of the saddle I should be fine.

I didn't put the Lagun head on this Toolmaster either, according to the paperwork it was done in 1980, 20 years before my time, but it's a good machine. I have it right next to our CNC and sometimes can do secondary op's on the manual while the computer does all the heavy chip removal.

Interesting that on your 2mi the original scrape marks are still there except for the 2 front corners. People blowing in small chips or metal dust with compressed air maybe?

Do you plan to re-scrape?

Our 2Mi is one I don't plan to put a DRO on since we only use it as a horizontal drill press few times a year, but i like the machine and recently spent a lot of time fixing all the oil leaks. All the gears, shafts, clutches, and valving is mind-boggling. Building something like that today would cost more than a full blown CNC mill.

Cincci 2Mi.jpg
 
Interesting that on your 2mi the original scrape marks are still there except for the 2 front corners. People blowing in small chips or metal dust with compressed air maybe?

Do you plan to re-scrape?

Draganm -

I don't think this mill saw much heavy use at all. It came out of a high school in Buffalo, NY when the powers that be decided nobody needed to know anything about machining back in 2011. So most likely some abuse by kids - but I also can't imagine having a machine like this in a high school shop. But they had a couple TREE, Toolmaster like yours, etc.

I've never done any scraping - hopefully I'll live long enough in retirement to give it a shot. But for what I will do with this machine it's current accuracy is probably past my level of expertise anyhow. It came with the DRO, which worked prior to my removing it to move the machine. You are correct as to the complexity. I've studied the manual and the bottom end of this puppy is one complicated mechanical hydraulic creation.

Good luck with your machine.

Dale
 
Last edited:
To wrap this up, I went and drilled/tapped 2 holes on the back of the Toolmaster saddle at the locations listed above and did not run into any oil galleys. I went .63 deep to tip of drill which yields about .48 of full 1/4-20 UNC thread using a bottoming tap. I used a Dewalt 20V battery powered drill which is only a little over 7" long and gives you plenty of room to get in there .
thanks to all for help

BTW, I did scrape the paint off where the bracket goes to get down to a clean and parallel metal surface and also made a small plate to block off the drain-hole and keep chips from packing in behind reader head.

Cinci Toomaster Newall  DP700 X-axis reader head.jpg


Back
Top