What's new
What's new

6061 AL Finishing Suggestions Wanted

Bcavender

Plastic
Joined
Aug 1, 2017
I am entirely new to the finishing game.

After running a couple test runs over two tapered surfaces (center to edge ~20 thou taper - steep on the side taper) on a 2" round test piece, the surface is smooth to the touch, but appears pockmarked with random "splotches" for lack of a better technical term.

First run was at 5000 rpm at 80ipm with a 4 flute, 1/2 carbide ball endmill. The second at 5000 and 40 ipm with an indexed, two flute 1/2 ball. (0.004 chipload and 0.005 stepover.) Same problem with both tools. The problem is drastically worse on the shallow slope on the top of the workpiece.

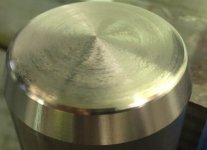
Run1.jpg

Run2.jpg

I am running this on a beefy Okuma VMC 4020 with 4 coolant spigots hitting the mill.

All suggestions greatly appreciated!

Bruce
 
I'm not a mold guy, I'm just a guy that has done enough 3D type contouring to know a few things
(some of them may be wrong)... .

Ball mills SUCK on shallow angles..

Looks to me like you are ripping and tearing and smearing because
you are running essentially zero surface speed at the center of the tool, and even if you do get
a good cut, there's no damn place for the chip to go

Run a bull nose.. Maybe a 1/2" with .090 or .120 rads. Maybe even a .06.

I've even got some parts I do that I contour with a 2" facemill with standard APKT's with a .030 rad.
 
That looks like plenty of angle to get away from the center of the tool, it doesn't take much. More RPM if you have it, make sure your coolant is healthy. Are you climb milling? How much material is your rougher leaving?
 
That looks like plenty of angle to get away from the center of the tool, it doesn't take much. More RPM if you have it, make sure your coolant is healthy. Are you climb milling? How much material is your rougher leaving?

center to edge ~20 thou taper - steep on the side taper) on a 2" round test piece,

.020 taper over say 3/4" leaves your effective tool diameter at .012"... And at 5000rpms, that's less than 16sfm.
There really isn't much cutting edge if any within a hair width and a half of center on a 1/2" ball mill.

Lets say its even a .050 taper. that puts your effective tool diameter at about .032", essentially the
same problem.
 
I am entirely new to the finishing game.

After running a couple test runs over two tapered surfaces (center to edge ~20 thou taper - steep on the side taper) on a 2" round test piece, the surface is smooth to the touch, but appears pockmarked with random "splotches" for lack of a better technical term.

First run was at 5000 rpm at 80ipm with a 4 flute, 1/2 carbide ball endmill. The second at 5000 and 40 ipm with an indexed, two flute 1/2 ball. (0.004 chipload and 0.005 stepover.) Same problem with both tools. The problem is drastically worse on the shallow slope on the top of the workpiece.

View attachment 227393

View attachment 227394

I am running this on a beefy Okuma VMC 4020 with 4 coolant spigots hitting the mill.

All suggestions greatly appreciated!

Bruce

Why only 5k rpm? Is that the MC-4020V? If so you should have 15k at your disposal.
GO max rpm, and use SHARP tooling. Bullnose preferrably.
 
Plus one on the bullnose. I use a 1/2" with a .100 Radius for my big shallow angle work. Also, I can't tell from the picture, but make sure that you are using a toolpath that will give you nice clean code. If you post out code that has a million little moves, you will starve the control and it will give you micro stutters along the path. In this case I would probably use a flow line type tool path spiraling in from the outside. I always try and surface uphill.
 
Bob's info is spot on.
Only other technique not mentioned yet: tilt the part. This will get you away from the center of the tool and up on the flute.
Your set-up will need to be bang-on however.

Or buy a lathe............
 
.020 taper over say 3/4" leaves your effective tool diameter at .012"... And at 5000rpms, that's less than 16sfm.
There really isn't much cutting edge if any within a hair width and a half of center on a 1/2" ball mill.
While you are technically correct, I've done a shitload of shallow (and even flat) 3D stuff and yes, the center of a ball nose is an issue, but it's not the issue this guy is having. I've never had a part come out as bad as what he showed. Not even close.

See picture below. That's 6061 with a very shallow toolpath that goes through flat several times. That part is straight off the mill. Again, the center-of-a-ball-nose issue is real, but very overstated most of the time.

Spin-Base.jpg

I'm sure a bullnose would fix the OP's problem either way, but I'm still betting he's conventional cutting.
 
Thanks for the suggestion. Will pick up a bull nose and give it a run.

It never dawned on me to try this with a simple mill with a healthy edge radius.

Interesting! Thanks!

Bruce
 
Matt,
I was climb milling with the ball in the finish pass. I set a 0.005" stepover taking out the 0.010" left by the rough pass. Any thoughts there?

Scallop.jpg

I picked these from using HSMadvisor's scallop calculator. I can't say enough good about that SW. I haven't even chipped a tooth since I started using it.

Bruce
 
WheelieKing,

Interesting idea. Hmmm...

Clearly getting prosperous enough for both machines would be the top goal :)
 
Matt,
I was climb milling with the ball in the finish pass. I set a 0.005" stepover taking out the 0.010" left by the rough pass. Any thoughts there?
No thoughts, your settings should have worked much better than your pictures show. Maybe not perfect, but way better. A bull nose will probably fix you right up.

And more RPM never hurt nobody in 6061.
 
Couple things ....
1. Use a bull nose with a large radius (yes already mentioned) I'd get a 1/2" with a 1/8" or 3/16" radius. A 4 flute ball is only going to have 2 flutes ground to center and its not going to have the edge prep you want for surfacing aluminum and getting a nice finish.
2. Are you stair step roughing this then going straight to finish? It looks like you need a semi finish pass to promote even material removal on finish pass.
3. Start at the bottom of the taper and climb cut going up to the top. You will have a much better finish going up then going down.
 
Matt,

Nice looking parts.

Appreciate your insight on the ball nose. I need to experiment more with slopes and try changing a few things up.

This test piece drops 0.070" from the center to where it breaks over (about 0.700" out) so at 1:10 it's far from flat. The surface I am getting is almost perfectly smooth to the touch with no visual lines, but the conundrum is that it still definitely looks like crap.

I wouldn't be surprised if there is more than one problem running around here to ferret out.

If you don't mind me asking, what CAM software do you use?

Tnx!
Bruce


What size ball were you using on these part and what stepover?
 
Last edited:
Dstryr,

1. Looking for the bullnose now, but finding mills with large corner radii. Dumb question: Is "bullnose" simply a flat endmill with large corner radii?

2. Definitely was stepping on the roughing going directly for the finish. What would you recommend to leave during the semi-finish path?

3. I was going climb milling top down. Will try the opposite in climb mode. Why does out to in finish better?

Thanks for your help!!!!!!!

Bruce
 
A thought, - is that Okuma beefy enough to mount a 6'' lathe chuck on the spindle? as in upside down lathe, whack a lathe tool in the vise or whatever and the jobs a goodun.
 
I wouldn't be surprised if there is more than one problem running around here to ferret out.

If you don't mind me asking, what CAM software do you use?
What size ball were you using on these part and what stepover?
I wouldn't be surprised either. Like I said before, there should have been no problem, in my experience, with the setup you tried. Maybe try leaving everything alone except going to max RPM and see what you get.

The part in my picture was programmed with Mastercam X9 with a constant scallop tool path. 1/8" 3FL ball nose, 12,000 RPM, 50 IPM, .028" stepover. The customer was wanting that specific look, thus the large stepover.

Is this Chinese 6061 by chance?

With a 1/2" ball (or bull) and a rigid setup, I wouldn't even rough that surface, just go straight to finishing.

And yes, a bull nose endmill is just a flat endmill with corner radii.

A thought, - is that Okuma beefy enough to mount a 6'' lathe chuck on the spindle? as in upside down lathe, whack a lathe tool in the vise or whatever and the jobs a goodun.
I highly recommend NOT doing this. Many years ago as I was learning, I built a tool block for the vises that had a bunch of lathe tools in it, and adapted a 3" 3 jaw chuck to a 40 taper tool holder. It was a great learning experience, hand programming odd ball stuff and got some work I wouldn't have otherwise. I was really glad I tried it, right up until I put the 3 jaw chuck in the spindle one day and the fucking pull stud broke while the chuck was still in my hand. If that happened during machining, it would have taken out the spindle at least, and at worst killed me or a bystander.


Back
Top