What's new
What's new

Advice on processes needed for task...

Dave K2

Stainless
Joined
Apr 18, 2007
Location
Hertfordshire, England
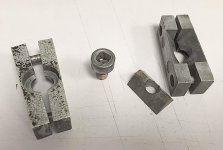
I have been requested may times to make the part shown in my picture.
Quoin.jpg

Its an expanding block used by letterpress printers.

When closed they are 50mm long by 17mm sq, the screw needs a square socket too to match existing tools.

Usually the blocks seem to be made from a hard grade of aluminium and the wedges from steel.

The two blocks are held loosely with crushed aluminium tube rivets so they can expand as the screw is tightened.

I just can't figure a way of making them in small batches in any way that is profitable - what sort of equipment would it take?

All I have is a CNC conversion of a Bridgeport mill which works very nicely but....

Any thoughts?
 
You need a machine with a tool changer. :)
I started with a CNC knee mill. Life gets a lot easier when the machine changes tools for you.
 
Tolerances a not really an issue here - they are used in whats left of machinery from the 1940's for locking blocks into the press. Half a mm here or there will make no difference at all. Providing the wedge matches the socket and the screw has the same thread as the nut it will work.

I use them daily in in my main job and am fully aware of what clearances there are etc :)

There were some that came from India - they were total trash, made from something that resembled a sponge and fell apart in a week or two. The originals went out of production many years ago now and we just soak up any that appear on auction sites or factory clearances.
 
You may know the tolerances needed and have them firmly stored upstairs in your head, but we don't see theme here on this posting of yours.

A fully dimensioned and toleranced drawing is the language of the machinist.

Not "Arm waving" and "Oh this can be loose" and "this needs to fit here".

"A fully dimensioned and toleranced drawing is the language of the machinist."
 
Fair enough but all i was looking for was something along the lines of "...you need a cnc blah blah with rotary whatsit and at least a doo-dah..." and so-on.

I have no CMM ability and all i have is a beaten up pile of broken items in a box. The dimensions were given - 50mm long and 17mm square when closed fully. Lets say tolerance is +1.0mm / -0.5mm.
 
You may know the tolerances needed and have them firmly stored upstairs in your head, but we don't see theme here on this posting of yours.

A fully dimensioned and toleranced drawing is the language of the machinist.

Not "Arm waving" and "Oh this can be loose" and "this needs to fit here".

"A fully dimensioned and toleranced drawing is the language of the machinist."

Good god, I'm pretty sure all he is asking is "how would you set this up" or "what tooling would you use". This is blacksmith work as I call it, extremely low volume and probably ±.062"
Looks like you need some Alum bar stock and a simple 45° degree fixture for your vise?
 
I think I'd make some fixtures to make multiple parts at a time.
Program to use 1 endmill, no toolchanges. Stab the holes, interpolate to size.
Mill ends, mill vee pocket, etc.

If this is side work you're doing from home, making these fast and efficient isn't high priority.
Doing the least amount of work is.

Load the fixture, hit the button, go watch TV.
Load the next fixture, hit the button, go have a beer, etc.
 
Square socket screw is probably the biggest issue. Not realistically makable for sensible money and not something easily found off the shelf in the UK.

I'd go further than RStewart in fixturing and do the sort of proper job needed to make decent batches, say 50 - 100 in sensible time. As its going to be a repeat job doing batches for stock might be best way. Fixturing is not going to be terribly complicated as the basic parts are one or two pieces of bar with holes so mounting is easy if you can fit the holes first. Forget the vice. Arrange a tooling plate with appropriate holes to do strips a foot or two long. For example cast alloy tooling plate 20 mm thick can be found at around £30 for 300 mm square. Would get it done 5 or 6 at a time but I'd go bigger. Add some holes, plain & tapped a pair of fences one vertical one a triangular (ish) fence and you are good to go.

I've learnt the hard way that cheaping out on fixturing or even knife and fork style no fixturing on a dozen off job that you know is going to repeat is not a good way to go. Eaten or "lunch timed" set up cost too often doing that!

Loose tolerances imply its a functional rather than exact replica thats needed so do consider if some small changes in shape or size can make them far easier to produce. Obvious one is will a standard bar stock size do? Does it have to be crushed alloy rivets or will an easier functional equivalent do or at least will a standard alloy tube be near enough?

Clive
 
Thanks, now i'm getting a vision :)

I can see a few fixtures needed myself -

Say i go for tooling to make 6 pieces in each batch (3 finished items) - they can be made as strips and sawn apart later then cleaned on the belt sander. Lets imaging two bars cut to make three pieces each when finished.

Plate with V grooves in to orient the bars for the angled notches, nothing else can be done at this setup due to odd angle. Couple or three bar clamps to hold them in place.

Next plate has slots machined to bar width to allow the four small holes to be milled and the counterbores to be interpolated. Again, simple bar straps to fix.

Next plate has groove again, this time the larger screw hole and counterbore and made, same easy clamping.

Now, this is already a revelation to me - i'm a part timer as you guessed rightly :) and fixture plates have only come into my field of play since i converted the mill to CNC last year. Obviously I can combine ALL fixtures into ONE plate.

Next up is the Triangle steel wedge - similar idea or something else??

Then we have probably the toughest part - where to source screws with a square tool fitment?

Thanks so far
 
I'd go for one plate with bolted on fences to hold material for the angled cuts rather than V groove which will tend to weaken things. Big advantage of one plate is you only need one fixture set-up cycle.

Fit the holes first and simple bolts can do the rest of the hold down bit rather than clamps. Clamps always seem to need one or two more hands than the standard complement and a tapping festival before final tightening to get everything aligned and out of the way of the cutter. For the wedge I'd use a triangular fence to do two strips, (but only one side) per set up. Once you have the holes fitted and a batch of strips cut to length the CNC can be left to run with a suitable compromise cutter mounted up. In your situation the gains from optimum cutter selection for each job aren't available anyway.

Clive
 
I wouldn't combine all the ops onto 1 fixture plate. You'll spend too long filling the fixture with parts, and too long running the fixture empty.

Unless you bite the bullet the first time and leave all the unfinished stations loaded for the next time you make these.
 
Thanks, I can see the holes first being a good way.

I'm not quite seeing the triangular fence idea yet for the wedges, any chance of a *********-packet sketch?

Dave
 
I'm just going to make a wager that this isn't a large volume proposition (>1000). So I would keep it very simple and minimize tool changes. I would make vise fixtures that cascade the part from saw cut blank to finished part. I think it could all be done with one end mill. Op1 far left, cut OD, face top, circle mill the slide holes. OP2 (right side of vise) face off backside of op1 and make the shallow counter bores. Op3 (angle fixture/ left side of second vise) cut angled slot. Op4 (right side of second vise) cut bottom counter bore and screw clearance hole. Tumble and Ship.

Every time the machine stops a new blank goes in station one and finished part comes out of station 4. I would just use the largest end mill that could make the slide clearance hole and never do a tool change. Not very efficient, but better than getting up and changing tools. Cycle time should be about 3 or 4 minutes depending on the scale, with no operator intervention.

Buy a rotary broach for the square holed screw and make them out of existing SHCS on the lathe.

Build the wedge with the appropriate drafted cutter. Might as well make it 45 to keep it cheap and simple.

Use off the shelf dowel pins for the slides. Stake them in place.
 
Thanks, i'm struggling to get a vision of this method though :(

Yes qty's will be small but ongoing like most of my stuff.

I have found a source for custom screws but at £7.50ea i don't think that will work :)
 
Do yo have an indexer for your CNC?

If you could get square stock close to the size of one side of your aluminum part, then a collet or pot chuck in an indexer would allow you to make 1/2 of the aluminum parts in one set up, with one endmill and one drill. If you make the blanks with extra material, the excess could be sawn off in a second op.

Or if you had a thru hole in your indexer, just feed the stock thru, face to length with the endmill, machine all profiles, and part off with your endmill (clean up the cut of on a belt sander). I used to do parts like this.

The wedge shaped part could be made in a similar manner.

I cannot think of a easy solution for the square bolt head. EDM or rotary broaching would work but are not cheap.
 
Thanks, I can see the holes first being a good way.

I'm not quite seeing the triangular fence idea yet for the wedges, any chance of a *********-packet sketch?

Dave

Can't do a sketch right now, sorry. Think of a triangular block with registration pins to pick up on some of the holes each side. Bar stock push clamped against it with the square side poking up at an angle. Run the cutter along as required to remove the excess material producing one side of the wedge. Flip and repeat to produce the other side. Cutter face is always parallel to the table. Wedge angle is set by the angle of the triangle. If the triangle is symmetrical you can do two strips at a time. Clamping may need creativity.

On reflection if I had expectation of doing much of this size / style of work I'd look into picking up one of the aluminium optical breadboards from Thor labs Solid Aluminum Optical Breadboards or similar. Smaller ones aren't silly expensive, two or three times price of tooling plate, and they have all those holes ready drilled and tapped so its easy to bolt carriers and fences on. Were I to go that way I'd bolt bar stock in place and machine fences with steps to keep things off the breadboard in situ. I have a couple I use occasionally but being a manual shop I'm not really set-up to exploit them. I do quantity surcharges not discounts! Want more than two or three you pay extra.

As always at your level of business its hard to get the spend on set-up to do quicker job or cheaper but takes longer balance right.

I see where BoozeDaily and G00 Proto are coming from. Good points too. I think load up a fixture with lots of blanks then go and have tea or whatever works better for apart time shop doing smaller quantities. No right answer. Just best fit for you.

Clive
 
Thanks, as you said, clamping the triangular wedge is a bit of thought :) Its not 45deg either, more like 50 or more.

I think it was G00 Proto that came up with the vice fixture where blanks went in one end and parts came out the other? I can see that working but will need manual intervention to move the parts along after each pass surely? So not really set and forget. However, I do like the idea of one tool fits all and having all the paths in one program - thats quite neat but will take more thought on the fixturing.

So far the main issue is the screw - i had a quote yesterday of £7.50ea, once i cleaned up the coffee i spat i went back to searching. I could change to a standard hex BUT this will force users to buy new wrenches OR use a plain allen wrench risk overloading the wedge - I think the square socket was to make people use the special short-handled tools that i also make ;)

I have no idea of the cost of a rotary broach but it sounds expensive so probably a non-starter.


Back
Top