What's new
What's new

Doosan DNM 400 Fanuc Straight Vise Program and Variables

PaCowboy

Plastic
Joined
Jun 15, 2012
Location
York, PA
We have several Haas machines that we use the program below with our Renishaw probe to get our vices straight on the table. It's a lot nicer and faster than using an indicator. We have a Renishaw probe on our Doosan DNM400 and would like to do the same thing on it. I am not sure where to find my variables (the 500 numbers in the program) on the Fanuc controller and if I am even able to access them while the machine would be running the program. I attached a pic below of our controller so you can see that we have an older controller. I know I can probe a G54 and a G55 and do the math but this program runs continuously back and forth changing the variable as you tap the vice until stopped by the operator. Any help will be greatly appreciated.
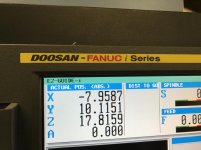
IMG_0563.jpg


%
O07164 (Squaring the Vice Macro)
(Set G154 P98 X & Y for the first point. )
(Set G154 P99 X & Y for the second point. )
(The probe will travel between the two set points. )
(At each point the probe will travel in )
(the Y positive direction for 0.5" to find the jaw. )
(#500 represents the distance in the Y axis between )
(the first ans second point. )
#500= 0
#501= 0
#502= 0
#503= 0
#504= 0
G00 G40 G49 G90
G103 P1
(Probe on)
M53
G04 P0.5
M62
(Probe First Set)
(Move Y 0.5")
N100
G154 P99
G31 X0 F300.
G31 Y0 F5.
G31 Y0.5 F5.
G91
G01 Y-0.02
G90
G31 Y0.5 F1.
#502= #5062
G01 Y0 F300. (Pull off)
G154 P98
G31 X0 F300.
G31 Y0.5 F5.
G91
G01 Y-0.02
G90
G31 Y0.5 F1.
#500= #5062 - #502
G01 Y0 F300. (Pull off)
M99 P100
%
 
program below with our Renishaw probe to get our vices straight

hy cowboy :) so you no longer align the vise ? you simply clamp it random and rotate program coordinates ?

or that Renishaw actually aligns the vice, just like a normal human being ?

or vice is clamped on a rotary axis ?

We have a Renishaw probe on our Doosan DNM400 and would like to do the same thing on it.

probes particularities are relative to probe_manufacturer and control_type/generation :)

i dont know how2doit for the doosan, but i can tell you how i have done it for a thing<>doosan :)

... remember the [name] for the procedure that does a simple axis probing
... search the file that contains that procedure, by searching the [name] string inside system files
... once i found the file, i opened it and look inside it, searching for the variables that store actual axis position ( thus the result of probing sequence )
... i wrote a procedure that measures 2 points, and i calculate the angle, by reading the values from the variables located inside that searched file, + some math :)

kindly !
 
issue is not digging to find variables :)

issue is that probes are delivered with a limited software ... just how a cnc control is delivered without basic macros :)
 
Ok so let me see if I understand... You let the probe touch the two points in along the vise and then see what the difference is. Then the operator taps it and runs it again and again till he see's that parameter #500 is 0.0 (or as close as you need it) right? So all you want to do it be able to see what parameter #500's reading is?

If so in Auto mode since you are running a program (that looks like a Oi-D control but not sure) press the *OFFSET* key. Then press the right arrow soft key once. The press the *MACRO* soft key and scroll down to #500 with the page down key.

I am just thinking out loud here but you could add some operator messages to the program so that you don't actually have to look at the variable. Something like-

IF [#500 GTE 0.1] THEN#3006=1(VISE MORE THAN 0.1 OUT OF SQUARE)
IF[#500 LTE 0.09] THEN#3006=1(VISE LESS THAN 0.1 OUT OF SQUARE)
IF[#500 LTE 0.0005] THEN#3006=1(VISE SQUARE WITHIN 0.0005)

Forgive my amounts, 0.1,0.09,0.0005, as I am a metric guy and just pulled those out of no where.
 
Probe touches 2 points of contact. Macro 500 tells us how much it is out. Tap vice to get as close to .0000 as possible. Programs runs continuously back and forth with Macro 500 changing after each complete cycle.
 
Ok so let me see if I understand... You let the probe touch the two points in along the vise and then see what the difference is. Then the operator taps it and runs it again and again till he see's that parameter #500 is 0.0 (or as close as you need it) right? So all you want to do it be able to see what parameter #500's reading is?

If so in Auto mode since you are running a program (that looks like a Oi-D control but not sure) press the *OFFSET* key. Then press the right arrow soft key once. The press the *MACRO* soft key and scroll down to #500 with the page down key.

I am just thinking out loud here but you could add some operator messages to the program so that you don't actually have to look at the variable. Something like-

IF [#500 GTE 0.1] THEN#3006=1(VISE MORE THAN 0.1 OUT OF SQUARE)
IF[#500 LTE 0.09] THEN#3006=1(VISE LESS THAN 0.1 OUT OF SQUARE)
IF[#500 LTE 0.0005] THEN#3006=1(VISE SQUARE WITHIN 0.0005)

Forgive my amounts, 0.1,0.09,0.0005, as I am a metric guy and just pulled those out of no where.

You are correct in the functionality of the program and your numbers are good. Thank you for the information for the Macro. I think I am going to have to use G54.1 P01 and G54.1 P02 instead of the G154 P99 and G154 P98 as I do not have these.
 
there is nothing like a good old comparator :)

it is possible to allign a vice with a single sweep from left to right ( or viceversa ), thus tapping the vice while comparator moves :)

using a probe takes longer ...

probe delivers data about 2 points, while a comparator will give data about a line

this is the reason why some measurements with a cmm are not so accurate as classical methods :)
 
New snags hit with the program transfer from Haas to Fanuc:

Haas G103 - BLOCK LOOK AHEAD LIMIT
G31 - SKIP FUNCTION
M53 - NON MODAL MACHINE COORDINATE SYSTEM
M62 - USER OPTIONAL OFF

NC programming as per ISO(DIN 66025) and RS274 (list found online)
G103 - CYLINDER BARREL TRANSFORMATION "ON," with real-time-radius compensation (RRC)
G31 - N/A
M47 THRU M69 N/A

How do we work around these codes to make the program work properly?
 
Do you have the probing package installed on the Fanuc or are you just slapping the probe from your Haas in there and trying to run that program?
 
New snags hit with the program transfer from Haas to Fanuc:

Haas G103 - BLOCK LOOK AHEAD LIMIT
G31 - SKIP FUNCTION
M53 - NON MODAL MACHINE COORDINATE SYSTEM
M62 - USER OPTIONAL OFF

NC programming as per ISO(DIN 66025) and RS274 (list found online)
G103 - CYLINDER BARREL TRANSFORMATION "ON," with real-time-radius compensation (RRC)
G31 - N/A
M47 THRU M69 N/A

How do we work around these codes to make the program work properly?

Need to read Fanuc manual. It is not exactly RS274.
MTB must have defined M codes for probe operation. It is machine-specific.
 
You know, I'm probably one of the first to say "Hey lets just use the probe to do ___ "

I could understand if you're using it to set rotation angle, but to square up the vise? The hell?

That just seems like one of the worst applications for a probe. How is a magbase indicator not quicker to align a vise?

Using the probe, you get no direct feedback from each whack with the deadblow. It just moves some random amount, and you just keep going at it?

With an indicator, you can directly see how much each blow moves the vise. Should only take 2 or 3 times back 'n forth to dial in and confirm..


How many probe hits on average do you take to square up a vise?


Probes are great, but they're not the answer to every problem.
 
computing angles with a probe may be used for many things, including aligning a vice :)

i think you should contact Renishaw, or look for Bloom guys, maybe they will help you :)
 
Just curious. How long does it take an operator to align a vise using the probe like this?

Sounds like total pissing in the wind tapping the vise and rechecking it with the probe until it's straight. It doesn't make it smart just because you are using a touch probe. It's the underlying method that makes no sense. It is the same premise as using an edge finder to line a vise up. If only someone made a way to give you some type indication how far you tapped the vise each time you could tap it the exact amount you needed to the first time and be done.
 
In many cases, aligning the vice with, say, x-axis is not necessary.
One can simply compute the angle, and run the same program with a rotated coordinate system.
This would be a way faster.
 
One can simply compute the angle, and run the same program with a rotated coordinate system

... depends if someone is comfortable with having syncro axis movement when roughing, instead of single axis movement

2nd axis would have to give up the hold state, and begin a cinematic / movement

you lose rigidity :) more or less ...


Back
Top