What's new
What's new

Machining hard anodize problems

Bigbore050

Aluminum
Joined
Apr 4, 2016
I having some trouble with machining some hard anodized aluminum and I’m looking for some opinions before I invest in more tooling.

Material: 6061-T6
Coating: Back hard anodize class 3 type 2
Current Tooling: Harvey Tool 942247-C8 3/64 square endmill 3x LOC 3 flute TiB2(Titanium Diboride) coated.

We use to machine these parts complete but the coater was having issues masking the parts so now we are cutting the masked features after anodize.

I need to machine a .055 wide .038 deep square groove next to a .07 high wall. I left .008 per side on the wall before anodize and machine it to size with a 1/8 endmill to remove the hard coat before the small cutter comes in to machine the groove. We started running the same speeds and feeds after anodize that we were running before anodize. 12,000 rpm and a feed of 17ipm ramping to depth at 1 degree and slotting full width at 17ipm. This netted us 150-250 parts per Endmill. Now with the hard coat we are only achieving 3 to 8 parts per Endmill. All of the breaks have happened after the ramping in when the cutter was in full cut. I’m afraid that the coating even only being .002 thick is dulling my edge increasing deflection and causing the break. I have been trying the find the broken end to see where my wear was but have not be able to find one yet. We have slowed the feed down to 5ipm and we are currently still running at 15 parts.

On our next run I will leave a step on the floor so the 1/8 Endmill will remove most of the hard coat on the floor and the wall prior to machining the groove but that won’t help me on the 250 pc. Batch I’m currently running.

I was looking at trying the same endmill with either an amorphous diamond(942247-C4) or CVD diamond coating(995747), but I have zero experience with tooling of this kind. I have some MA Fords coming from msc with .01 corner raduis 2 and 4 flute versions to try since I get them next day and my last endmill is in the machine. Going to place a order with Harvey today. Any suggestions would be greatly appreciated.
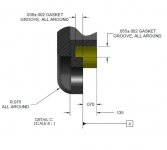
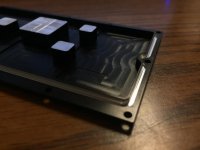
001-225 Capture.JPGIMG_3853.jpg
 
Your surface speed needs to be decreased, because the Ano is HARD. Use one roughing tool to knock the Ano off, Semi-finisher, followed by a finishing tool.

I've machined plenty of it, yes your gonna go through some roughing tools.

Drilling a start hole for your endmill to plunge into helps.
 
Can't help you with endmill suggestion but hard anodize is HARD, like 65hrc. You've left .008 per surface to remove, your anodize is about .004 thick. So 1/2 your doc is in material that's 65hrc and it's abrasive.
 
Can't help you with endmill suggestion but hard anodize is HARD, like 65hrc. You've left .008 per surface to remove, your anodize is about .004 thick. So 1/2 your doc is in material that's 65hrc and it's abrasive.

I don't have any problems with that operation. The .004 is no match for a 1/8 endmill. I agree I could leave more and I might on the next run but its the small 3/64 endmill cutting the groove breaking on me.

On second thought; find an anodizer that knows how to mask parts.

I couldn't agree with you more but that is on the customers end. I do know they have gone to multiple anodizers.
 
On second thought; find an anodizer that knows how to mask parts.

yeah. right.:nutter:

seriously, not likely to get any consistency month-in month out. MUCH better to cut after from a QC / business side. experience.....
 
What if you left all that material there prior to anodizing? In other words, machine down enough so you can make a chamfer on the top surface and just enough for the step to be anodized. After anodizing, you can quickly rough it out with a 1/4" tool and then your only cutting aluminum with the small endmill. And conventional cut with the 1/4" tool so it's not cutting into the oxide.
 
What if you left all that material there prior to anodizing? In other words, machine down enough so you can make a chamfer on the top surface and just enough for the step to be anodized. After anodizing, you can quickly rough it out with a 1/4" tool and then your only cutting aluminum with the small endmill. And conventional cut with the 1/4" tool so it's not cutting into the oxide.

That will be a must on the next run.
 
Aluminum anodize is the same stuff as a typical bench grinder stone is! Only 1-2 thou thick admiditdly, but its tough stuff. Best advice i can give is treat it like cast iron with the skin still on, ie conventional cut it, let the cutting edge exit through it, not enter the cut, feed up, speed - depth of cut down. Less times the cutting edge goes through that ano layer, the longer it will last.
 
Never tried to cut anodize... But... Could you grind it, to rough it out? There are all sorts of ceramic or stone abrasives that come on 1/8" shanks, like dremel bits, or actual industrial ones, your choice... Might work out a good bit cheaper?
 
Does the print call for the edge of that groove to be deburred in any way, or must it be sharp? If you're losing the corners of your small cutter as it enters the cut from the top, perhaps you can precede that operation with a ballnose or chamfer end mill to break the edge and leave just virgin aluminum for the small cutter to interact with.
 
Don't ramp, don't rub. Get thru crust ASAP and cut.
Otherwise your just wearing out your tooling.
Conventional milling with a roughing tool and go back to tickle with finisher.

You'll still eat tooling..but if you can lessen it a few degree's
 
Your process leaves a hard anodized layer at the top of the 0.055 groove for the 3/64" end mill to cut. This dulls the end of the tool, then it breaks.

"I need to machine a .055 wide .038 deep square groove next to a .07 high wall. I left .008 per side on the wall before anodize and machine it to size with a 1/8 endmill to remove the hard coat before the small cutter comes in to machine the groove."

If the 1/8" tool does not FINISH the wall some is left for the small tool to cut. The large tool is wearing at the end, leaving a ridge for the small tool to cut. Try cutting a fuzz extra wall off with the larger tool.
 
I appreciate all the help and suggestions. Probably should have posted here during the planning stages since I defiantly didn't put enough though into my processes before hand. We did run a 10 part sample before machining the whole order but lost 2 parts before ano and only cut 8. But its just my luck 8 parts was the breaking point on the endmill.

In case anyone has a similar issue...

I contacted Harvey on the diamond tooling and they are confident the amorphous diamond will eat through no problem. They didn't suggest the CVD on 6061 since the CVD coating is a bit thicker and those cutters grind more than cut.

They said I could just cut though the ano with the amorphous and come back with my original tooling or just ramp to depth like I am and cut/finish the entire groove with the amorphous. Should have some here Monday to try.
 
Derailing the thread a little, why don't they just leave the slot anodized? Dimensional tolerance? A good anodizer (I know, hard to find) will add only about +/- 0.0002 to your tolerance window. If it is porosity then the solutions are more obscure.
 
Derailing the thread a little, why don't they just leave the slot anodized? Dimensional tolerance? A good anodizer (I know, hard to find) will add only about +/- 0.0002 to your tolerance window. If it is porosity then the solutions are more obscure.

Conductivity I believe.
 
the amorphous diamond endmills basically stay sharper for longer, especially when dealing with abrasive materials. they work very well for avoiding the burrs in particular plastics and brass that come from losing sharp edge in tiny endmilled features. I would definitely try these with the hard anno cutting to see how it changes your results. roughing tool to clean thru the hardcoat is a good call too.


Derailing the thread a little, why don't they just leave the slot anodized? Dimensional tolerance? A good anodizer (I know, hard to find) will add only about +/- 0.0002 to your tolerance window. If it is porosity then the solutions are more obscure.

typically, anodize is removed/masked in electronics parts because the anodized surface is insulating, and the part needs some grounding/conductivity so the anodize is cut away for that reason. same applies for thermal reasons, I believe. No clue why an oring/gasket area would need to be cleared, though.


Back
Top