evidence_UA
Aluminum
- Joined
- Nov 23, 2015
Hi,
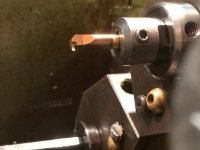
previous face grooving jobs where done by milling because of the low volumes and now im having a 100+pcs production run with the face grooving operation so for that reason i have purchased Iscar's HFAIR blade with holder and 5mm width (0.2inches) inserts. But the problem is we are getting a very noisy cutting and the tool life is way too short... I have attached a grooving element drawing (in mm and inches) for detailed information.
Material is AISI 420 (32HRC), cutting speed 40m/min and 0,05mm/rev. The strategy is pecking with constant depth of 0.5mm. We do it for chipbreaking because im afraid it might break the tool if we will go full depth without intermediate retracting. The grooving element takes about 10 minutes to cut.
Maybe you can suggest me more productive cycles? Thank you

")