What's new
What's new

Finally bought an FP2

Danny VanVoorn

Titanium
Joined
Nov 3, 2002
Location
St.Louis, Missouri, USA
Now I did it; bought an FP2 sight unseen with only one lousy picture and no information. When I say no information I mean it, don't know if it is 220v or 440v or something different, don't know if first generation or second, don't know if it's unworn or if the slides look like a farmers field on planting day? About the only things I do know is it has a vertical head, the tilting table and the over arm end support and the serial number is 6463. Talked to the owner in person and all he knows is he bought a truck load of equipment from somebody and so far all has been ok? I'm ready to hook up a trailer and drive two states away to pick it up and the owner tells me he's out of town, won't be there until Thursday at the earliest.
Got one question somebody might know; is 2000 lbs. weight on these pretty close or am I being optimistic?
Dan

PS Will post some pictures as soon as I get with the machine.
 
My manual of 2and gen FP2...Round head (not long reach) ,outside motor, single dial shifting for feeds and spindle speeds quotes weight as
approx 1095 kg. (2410 #) basic machine with electrical cabinet....pretty sure that quote is less the work table.

For the basic swivel angle table (2214) add additional 132#.
Larger tables are heavier...

Welcome to the powered "Y" axis, 40 spindle and horizontal quill world.....betting you are going to like that machine.

Cheers Ross
 
Somewhere in the PM archive is at least a partial serial number list. That sounds like it would be a two dial machine (concentric dials).
 
Congrats Danny.

You'll love that machine and ask yourself, why you didn't buy one earlier....

I have S/N 5084 and that's one of the last of generation one.

So yours will be twin dials with motor outside, 400mm in x, standard head and overarm.

Remember to get the support bearing - it should be fitted to that machine by the first owner.

I bet you even have some SK40 tooling for your High Speed head.

Cheers
Erik
 
Danny, welcome to the FP2 owners club! When are you going to get the machine? Please post some photos when you have them. I have also bought one machine, sight unseen (a Jones and Shipman 540 APR 6 x 18" surface grinder) and this was a good experience. Cheers, Bruce
 
My manual of 2and gen FP2...Round head (not long reach) ,outside motor, single dial shifting for feeds and spindle speeds quotes weight as
approx 1095 kg. (2410 #) basic machine with electrical cabinet....pretty sure that quote is less the work table.

For the basic swivel angle table (2214) add additional 132#.
Larger tables are heavier...

Welcome to the powered "Y" axis, 40 spindle and horizontal quill world.....betting you are going to like that machine.

Cheers Ross
Ross,
Yea, I'm ready to get it here and try it out. Looking at a Gen2 FP2 manual as I'm typing I'm thinking the motor and bracket should come right off the back of the machine, considering the wires? Might lighten it a little and help centralize the weight some for moving.

Congrats Danny.

You'll love that machine and ask yourself, why you didn't buy one earlier....

I have S/N 5084 and that's one of the last of generation one.

So yours will be twin dials with motor outside, 400mm in x, standard head and overarm.

Remember to get the support bearing - it should be fitted to that machine by the first owner.

I bet you even have some SK40 tooling for your High Speed head.

Cheers
Erik

Erik,
I'm pretty well tooled in both SK40 and #4 MT tooling to fit the early Deckel line, I must have bought all that was offered when I first found out about these machines. Have been playing around with cutting the 2mm X 20mm buttress threads for both styles of tooling and find it's rewarding to make up something that is unobtainable from the usual sources. It's nice to have a drill chuck that has the proper arbor on it instead of using a collet to hold a straight shank.
I spent the last thirty six years of my career at McDonnell Douglas making aircraft parts classified as a "journeyman machinist" "milling machine specialist" running some powerful, state of the art mills. When I discovered the FP1 I knew I wanted one fully equipped so I focused on that before I retired, still have a few small things that aren't there even though it's been about 20 years looking. Can't really stress enough how much more they are than just a mill when you have all the toys on hand to go with em. Always did want an FP2 but really don't need it sort of thing, have a horizontal mill out in the shop with 2 foot of travel. I also didn't think I'd ever get an FP2 with all the accessories, too rare but the more I thought about it not needed to appreciate the machine. That still didn't keep me from looking and seen this one, had the money and now I can hardly wait to get it.

Danny, welcome to the FP2 owners club! When are you going to get the machine? Please post some photos when you have them. I have also bought one machine, sight unseen (a Jones and Shipman 540 APR 6 x 18" surface grinder) and this was a good experience. Cheers, Bruce

Bruce,
I want it here and planned on picking the machine up Thursday but realize I have another obligation on Friday so may have to wait until Monday. This is about a 10 hour drive with loading and unloading, that is time consuming when I have to work like the Egyptians did building pyramids.
I hope to remember to take some pictures before I shoe horn it into the shop, once I do that it'll be too late. Don't have enough room to have machines sitting out like models in a new car show room. The only time I'll move it is if needed to adjust things or make repairs. I've bought a number of Deckel mills and have discovered that when a person lives in the mid west as I do "sight unseen" is normal. Up till now it has worked out fine, hope this one goes good too. It seems like east and west coast have most of them but maybe that's just a feeling I have and they're just that rare. I do know I have only physically looked at 4 machines before buying and only bought one of them, all of these were a long drive away.
Dan
 
It Made The Trip

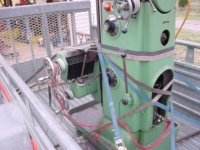
I got one of my obligations out of the way, now for the promised pictures.
DSC01914.JPGDSC01912.JPGDSC01913.JPGDSC01917.JPGDSC01915.JPG
I have a few more pictures but the forum allows me to post this many pictures, guess they don't want someone to clog up the works too bad? I will say the trip went well and the machine is safely on the shop floor, glad that's done. Now for the chore of cleaning it up, checking and fixing anything that's is amiss and oiling everything as it should be.
Dan
 
A Few More Pictures

I thought I should try to show everything that I hauled home. I didn't take a picture of the electric cabinet (it is here also) I think we all know what they look like. Dan
DSC01918.JPGDSC01916.JPG

I already have a few questions but I need to get off the computer so will revisit them as I can.
 
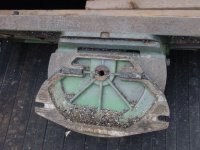
I am confused by the picture of the table. According to the planer stripes and keys, it looks like it was mounted to the face of the apron, but with only three bolts, and only one of those was at the top. Are you missing a piece with a circular t-slot that goes between the table and apron?
 
I am confused by the picture of the table. According to the planer stripes and keys, it looks like it was mounted to the face of the apron, but with only three bolts, and only one of those was at the top. Are you missing a piece with a circular t-slot that goes between the table and apron?
I'm not sure I know what you're referring to, I think it's all there though. The tilt revolves around that single top bolt and the circular slot is on the other side of that plate, the clamping T bolts are visible on the other side.
Dan
 
Oh, OK. But is there still only a single bolt through the pivot center clamping the whole thing to the X apron? I would expect bolts in the two bottom ears to be mostly seeing compression, and not doing much, due to the overhung weight.

By the way, I really like the proper swivels you have for lifting the table.
 
I am confused by the picture of the table. According to the planer stripes and keys, it looks like it was mounted to the face of the apron, but with only three bolts, and only one of those was at the top. Are you missing a piece with a circular t-slot that goes between the table and apron?

It's all there, AFAICT. There are 2 keys on the back of the table on each side of the center hole towards the top, those go into the slots on the vertical mount and keep the table from twisting. One t-nut through the top center hole, and 2 t-nuts on the bottom are what actually hold the table to the vertical mount.

I've love to find me an FP2, they seem to be getting rare as hen's teeth...big congrats to Danny! :cheers:
 
Danny,

Nice looking machine, thanks for posting photos. I suggest you buy yourself a 5-gallon bucket of Evaporust, it will help you with a lot of these parts.

From the Z-axis-screw cover it appears that the machine as originally gray but then repainted green. Is that right? I thought it was only in Germany that they did that. (My machine had two coats of badly applied green paint on top of the grey. But not badly-enough applied to peel off completely, only in places :angry:

Cheers,
Buce
 
Oh, OK. But is there still only a single bolt through the pivot center clamping the whole thing to the X apron? I would expect bolts in the two bottom ears to be mostly seeing compression, and not doing much, due to the overhung weight.

By the way, I really like the proper swivels you have for lifting the table.
Probably is a lot of stress on the single bolt at the top only but that is the way it's designed, it is on or real close to the center line so think it will support the weight well enough. I do like the way this table has enough clearance to allow it to be lowered one set of holes, the FP1 swivel table can not be lowered and robs a couple of inches of head space.
Those swivel eye bolts are nice, it's surprising how much weight those are rated for and with only 12 lbs. foot torque? I had those in my tool box when I retired and find more uses for them here than I ever did at my job. The 1/2"-13 and 5/8"-11 were sometimes used all day long when I had set ups but not my 1/4"-20 and 3/8"-18 eye bolts.
 
Danny,

Nice looking machine, thanks for posting photos. I suggest you buy yourself a 5-gallon bucket of Evaporust, it will help you with a lot of these parts.

From the Z-axis-screw cover it appears that the machine as originally gray but then repainted green. Is that right? I thought it was only in Germany that they did that. (My machine had two coats of badly applied green paint on top of the grey. But not badly-enough applied to peel off completely, only in places :angry:

Cheers,
Buce
Evaporust? I think this machine needs it but has many other things to address besides making it pretty. Apparently anyone with paint is qualified to do an Earl Shribe (spelling?) paint job, for those across the big pond that's an old I think long gone Anerican company that used to repaint cars cheap and IMO looked like it. It's going to be a while before I think about powering this up, it has a couple of things I need or really want to address. I can't seem to move the horizontal quill, I don't know if the clamp is hanging up or if there is something wrong with the crank handle and gearing? The machine appears to have been wired for 440 volts but is capable of 220 volts easy enough. The issue is someone robbed some components out of the electric cabinet to add to the situation. I'm really thinking about finding a suitable starter with proper protection and scrapping that electric cabinet. I remember a month ago throwing a suitable starter in the trash, had it for years and never found a use for it. I think these challenges have a way of keeping a guys mind active enough in a beneficial way? I appreciate your comments. Dan
Dan
 
Congrats Danny! :cheers:

Thanks Alan, as I said in a previous post I've always wanted one of these. Problems always been for me is the price, even the ones pictured sitting out side in the weather were nuts in that regard. I don't know yet if this one was a good choice or not, in some ways it looks like it was ran hard and others it looks like a keeper, time will tell? I do know one thing "it's filthy dirty", until I get it cleaned up some and oil everything twice I won't even try.
Dan
 
Hi Dan,

The evaporust is a good way of removing corrosion from the table and some of the other large parts. That's not for appearance, it's for function.

Too bad about the paint, there are lots of us in that boat!

The horizontal quill might have some corrosion that is binding it, the fit is very close. I suggest you remove the handle/gear assembly (instructions for this are at the end of the manual) then feed in some penetrating oil where the quill meets the casting.

One of these days I will get rid of the electrical cabinet to save space. I'll replace it with a TECO VFD, that provides all safety and overload functions PLUS slow start, braking, and variable speed, all for a couple of hundred dollars, max, and in a tiny little box that can sit on the back of the machine.

Cheers,
Bruce
 
Hi Dan,


The horizontal quill might have some corrosion that is binding it, the fit is very close. I suggest you remove the handle/gear assembly (instructions for this are at the end of the manual) then feed in some penetrating oil where the quill meets the casting.

One of these days I will get rid of the electrical cabinet to save space. I'll replace it with a TECO VFD, that provides all safety and overload functions PLUS slow start, braking, and variable speed, all for a couple of hundred dollars, max, and in a tiny little box that can sit on the back of the machine.

Cheers,
Bruce
Since I have no attachments that I will need the electric cabinet for I'm leaning towards a proper motor starter mounter to the back of the machine. I have a rotary phase converter and the shop is hard wired to it with many receptacles so I see no real advantage to get into the VFD here. Just a simple pig tail with a proper plug on it and it should be good to go.
I did take that assembly off the horizontal work head, nothing a little adjustment won't fix there. I was able to move the spindle some by tapping on the draw bar with a wooden block and a mallet but it's way too tight. I know you have been into yours recently and wonder if you know of any reason why the manual says not to remove the ring around the spindle. I'm talking about the piece with the four cap screws holding it in, seen looking at the front of the machine? I did take one of the screws out and is has a bigger thread that looks like a guy could jack it out of there with proper size bolts? I have an idea that it may be tapered and used to take up excess play but without removing it I'll not know for sure. Any ideas or input might help me out here, I'm navigating uncharted waters.
Dan
 
Don't think i would remove the outer ring....Factory setup has the bolt holes filled.
My belief is that the outer ring on the horizontal captures the clamping ring that locks the spindle....close fit front to back to the clamp ring
Believe the outer ring is finished once installed on the ID with the rest of the housing bore...that fit should be close and true and is part of the support for the spindle cartridge.

Better to remove the spindle and clean up any problems then....There is a retaining pin threaded through the casting on top of the quill that limits the travel of the quill and prevents rotation.
Screw is available once the vertical head assembly is removed (think yours is already off). The hand feed rack exits the end of the quill , so you do not need to remove the handle or drive pinion. Just wind the hand wheel
out as the quill is extended once the pin is removed.
Oh, and think you have to remove the draw bar as well.(not positive, but i believe the collar overhangs the drive key slots) ...drive out the cross pin in the collar at the rear, unscrew the collar, and the draw bar will come out through the spindle.

Looked through the printed material i have and can't find a factory drawing of that outer ring assembly in anything i have.....seems like the factory is telling us something.
Cheers Ross


Back
Top