Since you asked, here are a few pics.
A friend of mine asks me to bore the mains of VW crankcases from time to time.
Of course, this is a rather easy job that numerous specialized shops perform everyday for cheap, but at first I thought why not give it a try, just to see how it feels in Ross's shoes once in my life ;-)
So I tryied to figure out a way to do it. My first idea was a corddrill driven boring bar of my fabrication, with the bar spinning in two added bronze bushings. Nothing new here, there are a lot of examples on the net. So I made a bar and two add-on journals from bits lying here and there. The bar was driven by the mean of a ball end allen key, minimizing operator's input.

Then I realized I'd have to face the walls next to the bore at the clutch end too. Since I couldn't figure out a reliable way to control the depth of cut of the facing tool with my set up, I decided it would be more efficient to do all the machining in one setup on the Deckel. Considering the versatility of the machine, I would necessarily find a way to do it.
To get gravity and boring bar drop out of the equation, I decided the vertical route was the way to go.
So here's how it goes : the crankcase casting is clamped directly on the longitudinal carriage of the FP1 via an old shaper T-slots cube. That setup allows me to tram it both in x and y axis.
As I told you before, I first map the errors of the clutch/gearbox plane, using an indicator attached on the boring bar spinning in the added journals.

From my limited experience, those assembly planes are often far from beeing flat.
When I have the numbers, I know how to tram the cranckcase relatively to the spindle axis.

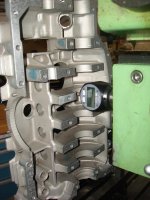
Then, I center the spindle, indicating the lowest bore of the cranckcase.
I do it that way because I will use that bore to support the end of the boring bar, with a pressed in journal (a ring with the OD turned to the exact diameter of the bore, and a bronze bushing for the bar).
So the upper end of the boring bar is held in a collet in the spindle (spindle, collet and bar marked for the lower runout position), and the lower end spins in the added journal.
I feel like this is the way of doing things that will allow me to get the best "average" reference, between the original line of the mains, and the plane of the gearbox/clutch (wich seems almost as, if not more important to me).
As I said before, I've adopted this method since it was the easyest. I've never have good luck trying to align two bores at a time... My attempts to get centered on the second one always result in getting off the first one and I always end up chasing my tail for hours.
By tramming a plane first and then centering a bore (direction/location), things get a lot easyer.
The rest is easy.
Note that the pic below was taken during the mounting of the boring bar. The machining operation starts with boring bar almost fully engaged in the crankcase. The travel used on z is no more than 30mm, each bore beeing machined by a dedicated presetted tool.

At the end of the operation, I even face the gearbox/clutch plane, in order to get everything as straight, square and true as possible.

Anyway. As the process was a bit tedious nevertheless, I figured out an easyer way yet to do things a while ago ;-)
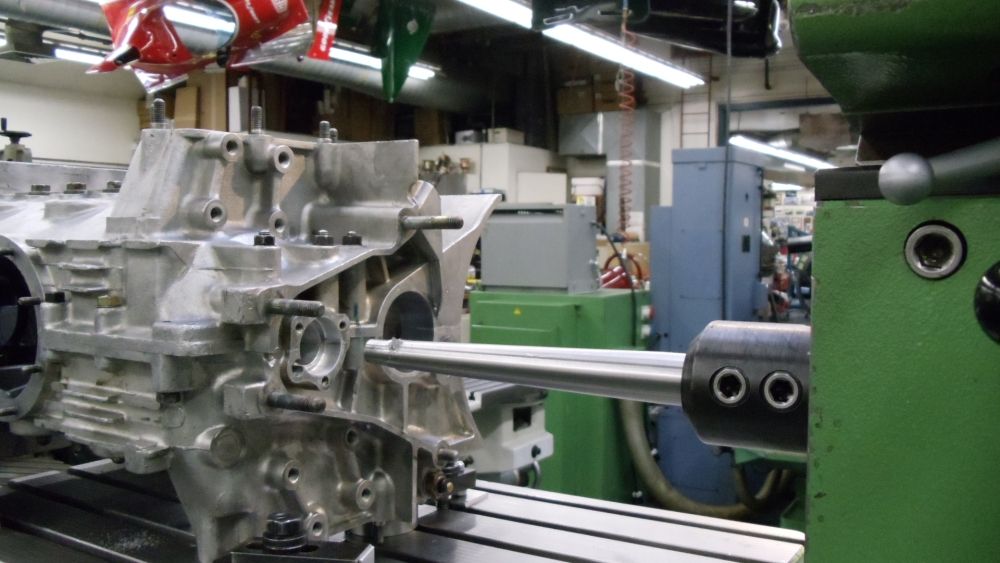
As the reason for using a milling machine was the need to control the feed of the boring bar, I tought I could have the best of both worlds using a cordless drill to drive the boring bar spinning in bronze bushings attached to the crankcase, AND the Deckel feed.
All I had to do was to clamp the crankcase on the table of the machine so that the end of the boring bar would rest against a ball bearing attached at the end of a shell mill holder (in the spindle, that is).
The boring bar beeing supported by added on journals, no need to tram nor center the crankcase.
It's easy then, to push the boring bar with the cord drill with one hand, while turning the x-handwhell with the other to gently control the feed. One can even use the auto feed and the stops of the machine !


 I made a drilling reaming cycle to do this.If I do many more of these I am going to make the mirror image jig I planned up.
 .I like to see others set ups as well.I got my bar from a real good dude on ebay.Was browsing his large assortment of used boring stuff, messaged him what I was looking to do,he sent me mine for 50 bucks shipped.I still had to modify it and hone the carbide
") .
.


 Oil hole mods. to a full scale one.


 .
.