What's new
What's new

Poor mans EDM that actually works

Joined
Aug 20, 2006
Location
Hesperia, SoCal
Quote: "It is totally manual of course but so is snapping off a tap." My kind of rationale but with an NC mill to advance it, I'm not sure about the "totally" part.:)

Somewhere between hacksaw and hexapod, < G&L Variax Hexapod Mill - YouTube > lie all of us and I've no doubt that one of those spots features a profitable machine shop with occasional need for tap disintegration that can justify the time and expense that you describe but not a top of the line machine that could never pay for it'self.

I've no doubt that sharing your easy success will spark similar "accessories" with perhaps a bit more sophistication, (like fluid circulation) and usefulness.

Good for you crossthread, the opposite of one earning a living by hostile take-over but rather a display of the ingenuity that produced something worth taking over! The free world needs to remember.....

Bob
 
I saw plans for one of these poor mans EDMs back in the 70s. It was published in a do it your selfer magazine. Any way they used 2 light bulbs for the 2 current limiting resistors. Change the light bulb wattage and change the resistance.
 
That is a brilliant setup.

I would be interested to know more details about the etching. If you stick two electrodes into salt water, won't the power supply just short out?

What is the voltage? What is the salinity of the bath? Just add salt until saturated?
 
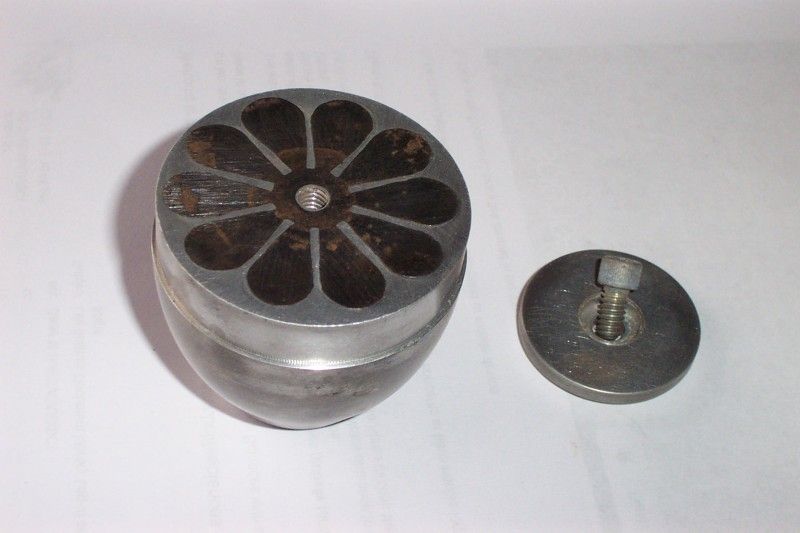
Interesting observations as always Robert. Thanks. JSCPM. The first one of these "etchers" that I built was something similar to what Fred was describing except for light bulbs I used a pyrex pie plate with salt water in it and two copper plates about two inches square. Move the plates apart=less current move them together=more current. It actually worked very well but was a bit messy and took up a lot of space. I believe this principal was used in the mining industry for controlling current to DC motors or something like that. I remember seeing a picture of a barrel of salt water with electrodes in it for current control. Could be dreaming. I don't saturate the water with salt at all. Just a spoon full or so in about a quart of water and no it doesn't short out. I use a variac and a single diode (half wave) to adjust the voltage to about 10 volts. I have used a 12 volt battery charger in the past and that works fine as well. I just increase the voltage with my variac until I start to see bubbles coming from the etch lines which again are just scraped into the primer with a scribe. The lines will turn black in about a minute and then soon thereafter the reed valve will just fall out. Sometimes I stop the process a little short and just pop the reeds out with my fingers. These are six lobe petal shaped reed valves about two inches across (think pulse jet reed valves). If you hook it up with the wrong polarity just reverse the leads until the etched lines start to bubble. It is amazingly fast and simple. I usually use two coats of automotive primer.
 
This is an example of the reeds. These are a bit crispy from heat but you get the idea. I don't know any other way to make these without warping them other then the method I use. Thanks.

dcp_5291.jpg
 
This is an example of the reeds. These are a bit crispy from heat but you get the idea. I don't know any other way to make these without warping them other then the method I use. Thanks.

dcp_5291.jpg

Photobucket is totally worthless. Please upload image to web site directly. In the menu bar for "Reply" is a "Tree" icon that has the mouseover "Insert image". This can be used to upload an image directly to the forum.
 
The current limiter consisting of plates in water is called a "water rheostat".

When you etch your valves, what do you use for cathode (I assume that the workpiece is the (+) anode?

I vaguely remember a description of a DIY EDM like yours, but with the electrode spring-assisted to contact the work, but with a magnet coil (solenoid) mechanically in parallel with the spring and electrically in series with the current, to withdraw the electrode a little each time it sparks. I suppose this would improve flushing and prevent shorts.

What is the need of the isolation transformer: why not just rectify the Variac output?

Thank you for posting this!
 
crosshtread,

Very cool looking reed valves. This seems like an application that a CNC laser cutting machine would also do well on. Would your technique work on stainless steel? Perhaps modified? Different electrolyte?

Also congratulations on an elegant and inexpensive technique for burning out a broken tap. Seems to me that you are a few steps away from "technique" to "product" with that idea. ;) Obligatory caveat: I realize it is a long way from simple technique to actual product you can sell.

A couple of years ago I had a broken 6-32 tap in a workpiece that had a lot of time invested in it. I did it chemically with a simmering hot solution of Aluminum Sulfate (Alum) that neatly "dissolved" the steel tap from my block of aluminum. Took a couple of days but I didn't have to jockey it along... I just left it to do its magic over the weekend.

There is a book out on DIY EDM, I bought a copy a few years ago and have yet to build one. It will be a few years before I get going on that project anyhow.
Lindsay: EDM How-To Book

-DU-
 
I will try using the "tree" instead of photobucket. Thanks for the tip. I do not use an isolation transformer in my setup. Only to step down the voltage and I am currently using a variac for that. The other contact is just a clip lead that I drop in the water. At first I was using a little piece of copper plate but I don't think it is really needed. It does eat up the alligator clip though and you might want to try a metal plate and keep the clip out of the salt water.
 
So, the ones that were built with light bulbs for resisters, were they powered from a battery or a DC power supply? Or were they just plugged into the wall? By reading the descriptions it almost looks like they are just plugged into the wall. But I also think that it requires dc to remove the metal. If someone could clarify I would appreciate it.
 
Yes David that is what it is. They burn up reed valves fairly quickly sometimes and I needed a way to mass produce them. Yes Joe it does require DC. One I built I just plugged into the wall and used my salt bath rheostat to control the current. The diode was out of an old microwave.
 
I played around with a setup similar to you what you used to make the reed valves this weekend. But instead of using a scribe to mark where I wanted it cut I used a CO2 laser which allows me to make very precises parts and a rewired computer power supply as my source of DC. The only problem I have had with it is I can't cut aluminum with it since the laser cant cut through the outer layer of oxide. But all the other metals I have tried it on worked very well. Thank you for posting the idea.
 
Crossthread, I PM'd you before I noticed the continuation of this thread, so ignore that. I've been trying to cut arbor shims with the electrolysis method and your success looks very promising. All the shim stock I have about is brass so I tried that. I used a 5/20/50 auto battery charger, a band of aluminum flashing lining the inside of a mason jar, (think leyden jar), and a saturated solution of copper sulfate (root kill powder 25 percent copper content).

I painted the brass with automotive lacquer paint and scribed the shim washer on one side. I used the 5 amp setting on the charger. + to the brass suspended in the jar and - to the alum. The scribe turned brown quickly but did not progress after five minutes. I raised the amps to 20. Little bit of bubbling but the electrolysis undercut the paint at the scribe and left me with about 1/16 inch wide eroded line after ten more minutes. In all much less then .001 appears to have been removed.
Did something wrong surely.

I'll try a soda/salt solution and steel shim and see if I have better luck. Can you offer any more hints and tips? I'd prefer to make these out of spring steel actually. Is generic automotive primer grey sufficient for a mask? Does saturating the solution offer an improvement? Was copper sulfite improper for etching brass? Is aluminum improper for the cathode?
 
Last edited:
Well, I just ordered the following
Amazon.com: Precision Brand Carbon Steel 1008 Shim Stock Roll Assortment, Full Hard Temper, AISI 1008/AISI 1010, ASTM A109 for Chemistry, 0.001", 0.0015", 0.002", 0.003", 0.004", 0.005", 0.006", 0.007", 0.008", 0.010", 0.012", 0.015", 0.020", 0.025",
so I hope I can get this figured out. Was going to try to come up with some form of rotating adjustable circle/pattern cutting bit with replaceable razor knife tip for cutting gaskets and brass shim. It may work, with patience, on steel shim as well. But I'll keep experimenting with the electrolysis. I hope you will add a few more hints/tips to this thread as relates to this.


Back
Top