What's new
What's new

Setup tips for welding a square of angle iron?

AeroncaChamp

Cast Iron
Joined
Mar 2, 2007
Location
Westford, Massachusetts
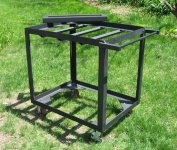
Came into a stack of fire brick and an nice old iron vise - decided to build a rolling welder's table using the brick for a top surface and an iron plate across one end to mount the vise to and provide some metal surface for clamping work on.

I need to form a couple of rectangles out of angle iron with nice square corners and that lie flat. I have enough experience to know that this is likely to end up a warped mess if I just start welding the seams together, so...

Any tips or advice for how to set this up and approach to welding?

I have four of those magnetic angle blocks, plenty of clamps, and a good flat surface to start with. I thought I'd cut the best miters I can, square it up and get it flat, clamp the joints, tack the corners, nudge it around if necessary, then close the joints.

I've got an OA setup, nothing fancy, and a bit of experience gained at the school of hard knocks (putting an old wreck of a Chevy back together, which became my first car.)
 
Mitering is not the best way to join angles. Its better to inset the angle nut cutting clearance in one piece so the other matches. You will have three welds. I really dont know how to explain it.
 
aeroncachamp,
I have made a bunch of these frames to build shelving, I like to miter.

Here's how I do it:
1. set miter saw to 46 degrees not 45. you want the inside of the joint
to be a little gap when you are at 90 degrees. Also take the opposing pieces
and lay them next to each other, trim them to be the same length.
2. lay the pieces out on the table, square the first 2 pieces using a square.
3. Place a tack weld on the extreme outside, ussually on the upright leg,
the very top.
4. continue tacking the other pieces to form the complete frame.
5. Now with tack's only on the extreme edge, they can be bent without
breaking (as opposed as tacks placed on the inside). Measure diagonally
or use a square to square thing's up.
6. place a tack in the inside, on the miter. Do not place the tack too far
into the "crotch" of the miter, you won't be able to grind it flush.
7. The 46 deg. left a little "gap-o-sis" to enable you to swing your
pieces into square, 45 deg. would cause a bind, and try to rip
or break the tack.
8. flip over the frame and weld the bottom of the miter, balancing your
welding to retain the squareness. (check it often)
9. weld the outside corner. if stick welding, run down hill fast, and you
will melt the corner in , and will not have too much to grind off.
You'll want this corner ground off to fit into the radius of the upright
angle.

10. if making shelves, weld your upright angles only on the bottom of
shelf, hiding your welds, and making a better looking job.

If you place welds from the shelf to the upright, on the outside,
it is difficult to not burn or melt the sharp edge of the top of the
angle forming the shelf. welding only underneath eliminates this
problem.

Clear as mud, right...
Doug
 
Thanks for the tips - tacking the outside corners first seems to be key... I hadn't appreciated that this would best allow adjusting for square and flat . I probably would have "over tacked" and ended up with a twist.

Digger, your comment about welding the in/under-sides got me thinking. While my top one opens up to support the bricks, I can flip the lower one over to open down, thus better shielding the wheels from slag and drops. It wasn't until I was trying to figure out your #10 comment and realized that for shelves, you probably have the angles opening down?

Macona,
I think I understand what you're suggesting re an alternative to mitering - is the attached rough sketch what you're saying? (sorry, I'm a terrible draftsman).

Thanks again for the helpful tips!
 

Attachments

  • joint.jpg
    joint.jpg
    35 KB · Views: 14,277
Thats called "coping", as opposed to mitering.

I have done both, and find that mitering is much quicker- especially in terms of cutting them out. My ironworker will cope/notch, so I could theoretically do em that way, but its really fussy.

I usually tig something like this, which allows for tiny tacks, so you can begin by tacking top and bottom outside, then inside, so the frame doesnt move much at all.

I use the big cast iron clamps- the Bessey, like this- http://www.amazon.com/Bessey-WSM-9-...f=sr_1_22?ie=UTF8&s=hi&qid=1206028474&sr=1-22
and it usually holds angle tight enough there is very little warpage.

I have one Bessey, and then 4 of the Grizzly the same size- not as nice as the Bessey, but with 4, you can preclamp an entire frame, and then it really stays put.

For small stuff, like 1/2" angle, I use the little cast aluminum picture frame clamps- I used to get em at Sears, dont know if they still make em.

Another trick I use on rectangular frames of all types, not just angle, is to take a couple of pieces of round bar, and weld them onto an adjustable turnbuckle, and then tack weld that across the the two pieces that are mitered, making a big triangle. Then, by adjusting the turnbuckle, you can bring the legs in or out to make em perfect, after tacking but before welding.
If you do this with 4 turnbuckles, you can get all 4 corners dialed in, then weld em all, making for pretty square finished frames.
Grind off the turnbuckles, and use em over and over again.
 
aeroncachamp,
the drawing you attached shows them upside down of how
I use them.

I make the frames so I drop a piece of plywood down into the
frame and I like the angle a little higher to keep boxes
and stuff from falling off. I usually use 1 1/8" x 1/8" angle out
to 3' long and bump up to 1 1/4" x 1/8" for 4' long shelves.
I have used 3/8" up to 1/2' thick plywood. (whatever I've got on hand)

Yes I have access to a coper, and can make the joint you
have drawn in one stroke of the ironworker, but those legs
are square, with no "wiggle room". As you roll the one piece
around the corner (more than 90 deg.) to get it square,
you make the piece "longer" as it hits on the inside tongue.

If you cope it grossely wide open, when you try to fill it
with weld, you end up pulling the joint.

yes the miter has a little "gap-o-sis", but the second tack
nails it. Then the gap to fill will not wiggle, and is very slight,
easy to fill. We are really talking about a 1/16" here.

All in all, for me, the miter works the best.

I have also made the frames with the sides and back
running with the angle legs up, and flip over the front angle
for a "no lip" shelf. These work good for shelves holding the little
drawers like for 10-32 screws, where the bottom drawer would
foul on the upturned lip.

I would build your cart with the bottom angle same as the upper,
and place a shelf there. Will provide more protection to the wheels,
and you can always use more flat surface area.


Remember to place the lower shelf up enough to get
a push broom under there. I use 6"-8"
 
I was a shipfitter and built Navy ships all through the 1970s. The US Navy specifies that all angle corners
will be coped and not mitered. Add up the weld inches - you get more weld i.e. it's a stronger joint. If you
leave little gaps you can still tack/test/straighten and also get better penetration when you weld.

But today I just cut 45s and weld 'em up. With a MIG welder and tiny tacks, it's pretty easy to control
warpage.

Grant
 
Someone posted a video on youtube about how to weld a 45 in angle iron. Seams to me that the order in which the weld was done made a difference and his explaination made sense to me. I cant remember how it was done but a search of youtube should find what you want.

Charles
 
Couldn't find the youtube video related to this...

I got the top and bottom frames welded - they came out nice and square and flat. Thanks again for the helpful advice.

I went with the miters, only because I could cut those more easily and more accurately than I could the coped joint. Clearly, the cope would have been better, but I feared I would have made a mess of it - square cuts no problem, but the cut along the length would have been a mess. Downside of the miter, I'm going to need to drill a hole through or near the weld for the wheels.

I'll try to post a picture or two of the completed table... assuming I get the legs on straight ;)
 
And the final outcome...

Thanks all for the helpful advice - it's been finished for a while and I've already gotten some good use out of it.

I ended up mitering the corners - didn't think I would be able to cut the coped joints, but if I did it again, I think I'd try harder. The miters were a bit trickier to weld as some of the seams were open and needed filling, so my miters weren't as accurate as I thought they'd be. The tips given on tacking and squaring it up were right on, as were tips about forming the shelf - they came out dead square and flat. Thanks! that was my biggest worry.

The odd rectangle of square tubing (sitting on top) supports the steel top section; The square tube was just the right size to get the brick and steel surfaces to match... don't ya love it when the piece of scrap you saved in that corner pile turns out to be just what you need. That steel section bolts through that square tube and to the cart making it rock solid. The steel overhangs a bit on the end to allow clamping to that straight edge. If I did it again, I'd leave a bit more overhang on the sides.

I decided to save the nice old vise (a big ol' 5") for my shop bench, so the welding cart got the relatively newer (and much lighter weight) 3 1/2" Craftsman that used to be on the shop bench. If I didn't have the extra vise on hand, I wouldn't have bought one just for the cart.

Now, maybe a drawer or two or a couple of shelves...

Thanks again for the helpful advice.
 

Attachments

  • 0805114- 001sm.jpg
    0805114- 001sm.jpg
    93.3 KB · Views: 12,417
  • 0805114- 002sm.jpg
    0805114- 002sm.jpg
    95.4 KB · Views: 14,147
  • 0805114- 003sm.jpg
    0805114- 003sm.jpg
    91.1 KB · Views: 6,276
  • 0805114- 006sm.jpg
    0805114- 006sm.jpg
    94.6 KB · Views: 10,949
Looks very nice

AeroncaChamp,
It looks like it came out well, yes you will have a little gap
to fill in the inside of the miter, that's your "give" area, if it wasn't
there, as you rack the square, the inside would hit, and now
your leg length would change.

One more minor detail to dress it up a bit. See those vertical
legs coming up the sides of the top shelf frame ?
Make that frame about 1" wider and 1" longer overall, so the legs
come up under neath the frame, inset about 1/2" each side
so as to make a little "overhang" of the top frame.
Your weld is hidden up in there, and the 1/2" is wide enough
so as not to burn a ragged edge.


tnx
Doug
 
... Make that frame about 1" wider and 1" longer overall, so the legs come up under neath the frame, inset about 1/2" each side so as to make a little "overhang" of the top frame...

I actually thought about doing something like this while sketching it up, but was afraid the whole thing wouldn't be strong enough to resist racking and twisting under the weight of the bricks and any work I'd tossed up there... in fact, my original plan was to weld in diagonal braces to stiffen it (and part of why I didn't plan drawers into it from the beginning, thinking the cross braces would interfere). Boy did I miss my guess on that count.

Your idea is excellent, and if I ever do it again... (in addition to looking nicer, it would also allow more area to clamp things down around the edges.)
 
Thats called "coping", as opposed to mitering.

Just a thought but wouldn't the same idea (coping) be good for corners in square or rectangular tubing as well as angles? Ignoring the difficulty in cutting it of course.

Peyton
 
You can do that and if you have a vertical bandsaw it is easier to do.

Easiest thing to do is just to buy those plastic snap in caps as usually its just for cosmetic purposes that you need to cover the holes.

You cope for angle iron for strength.
 
Some notes
Welding shrinks the material and it shrinks the most where you stop welding
So what happens if you do al the welding of the mitters from the outside to the inside
All the angles will be smaller than 90degrees and the sides bend inside
To straigten them you hammer the welds So don`t grind them till you are don
To set the diagonals the same lenght take the rectuangle in your hands with the longest diagonal vertically and bump it on the floor
You can weld one side to the inside and the other to the outside but then you can end up with a angle bigger than square That is much harder to correct so I prefere to weld them from the outside to the inside

Peter


Back
Top