What's new
What's new

Counterbore depth - how to setup?

Hoppy

Cast Iron
Joined
Feb 21, 2005
Location
Millington, NJ
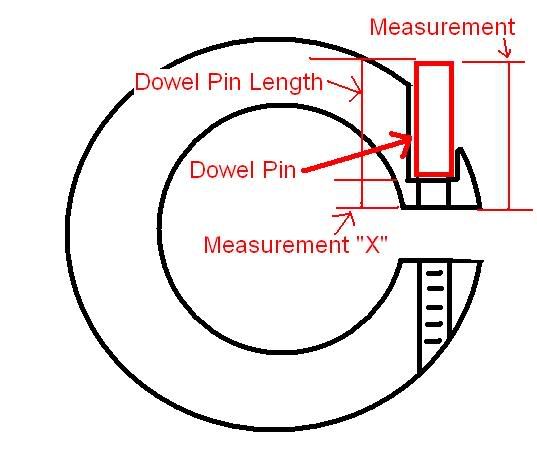
I made a collar the other day with an I.D. of about 3" and an O.D. of about 4". The depth of the counterbore for the cap screw that "closes" the collar wasn't critical for my part, but while I was machining it I began to wonder what I would do if the depth was important. Take a look at the (very rough!) sectional sketch below. If you're doing the counterbore on a vertical mill (with no DRO), how would you know when the proper depth was reached so that you could hit a given value for dimension "X"?
DSCF1943.jpg
 
Hoppy,

That looks like a tough one. If I had to do that since you wouldnt have a nice flat to measure off on the part to measure X how about taking a dowel pin measure it and then put it in the hole so you can measure the distance between the slot and the top of the dowel pin then substracting the lenght of the pin to get the value of "X".


So its in a math equation:

X = Measurement - (Dowel pin Length)

This is how I'd have done it. :cool:

Edit Here is a picture to show what I mean:

CounterBoreJPEG.jpg


So once you get started the counterbore measure it once to see how much deeper you need to go and set the drill stop to stop at the distance it would still need to go
Crude but should work


Dimitri
 
If you clamp the pc in the vise so part of the slot is beyond the edge of the vise then place a pin or pc of flat stock in the slot set the end mill on top of the pc in the slot then move the tool up the distance of " x ".
 
Instead of using a pin, use the screw you plan on using in that hole and turn it downsideup...or you could say...threadsup...
 
In a manufacturing environment, we would have a flat piece of ground steel (which most probably be would also be a gage for the slot (split) width. Could just be less than slot width.
This would be mounted to a good base, and placed on surface plate.
Zero travel indicator on height gage on top of ground piece.
Lift indicator stem up, slide piece under.
Set stem in bottom of c'bore.
Read dimension "x" on indicator.
(or hit button on height gage to electronically store data.

The first part- I figure that z depth with cam system used to program machines. Tool length offset is made somewhere else- where it can be done accurately.
 
Mount the collar in the vise with the bottom of X level with the top of the jaws. Lower the quill until the bottom of the counterbore flutes are the desired distance above the vise jaws (top of X). Set the depth stop. Feed down until the depth stop is contacted.
----------------------
Barry Milton
 
To Hide the head of the screw... Counterbore until the entire dia. of the c'bore has cleaned up a full diameter. Stop the spindle & lower c'bore to the depth just cut. Then, take the screw & use it to set the depth stop on the quill. Finish counterboring, the depth will be correct..
 
Im sorry, just re-read initial post.
I had cnc on the brain.

I echo precisionworks.
Set a depth stop relative to something -
You could pull quill out enough, "touch off" parallels (tool not rotating- slide a piece of paper back and forth under tool until it grabs paper) under part and drop knee the distance from bottom up.
Loose tolerance, you could figure the depth from the point when the (rotating) tool touches part.
 
There's many ways. Here's one I like.

Set your Depth Zero from the top of the part. Offset to where the counterbore is and then go to the required depth from that point in space.

Oh wait, you say no DRO. No quill dro ? arg. That's too much cranking then.
 
Just as SND states. Redimension the drawing so you have the distance from counterbore floor to top of OD. Now, raise quill to with in say 1/2 of full return and lock. Raise knee til c/b lip is touching OD at C/L. Reposition XY til over hole. Now place a gageblock (this is easy done with adjustable parallels)stack equal to the dimension noted earlier, between your quill stop to the adjustable stop. You're all set. cb till stops. Piece o' cake.


Back
Top