What's new
What's new

Alliant Mill Problem

beckley23

Titanium
Joined
Feb 19, 2003
Location
Louisville, KY, USA
I have an Alliant 2 Hp, variable speed mill , mn 42VC circa 1984. Several months ago, I don't use it much, the head got noisy and continued to get worse until I decided that it was time to tear it apart or this head was going to self destruct. I figured the usual bushing problems, what I found was much worse.
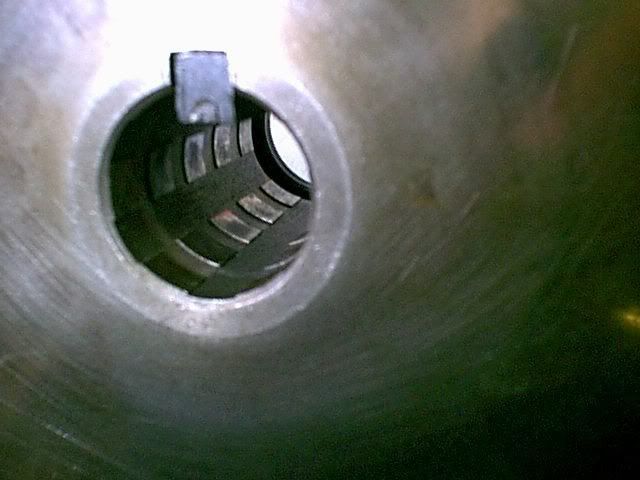
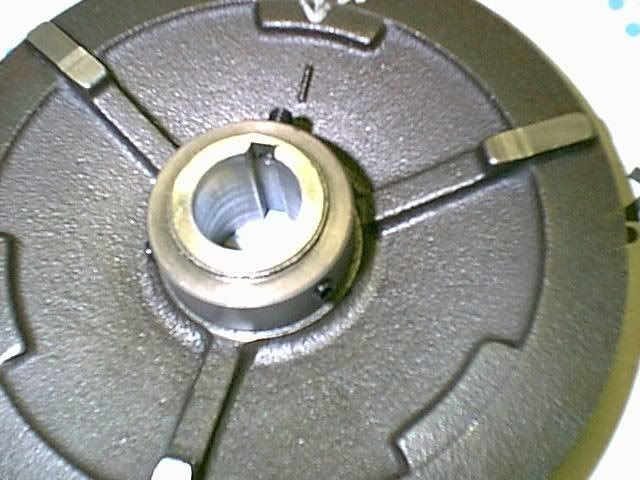
The fixed motor sheave half that's next to the end bell, lost its key and set screw, and the bore wallowed out from 25mm(.9842") to 25.5mm next to the belt to 26mm+ next to the end bell. In addition the key way is 7mm, a non standard size from what I can tell.
a2.jpg

a1.jpg

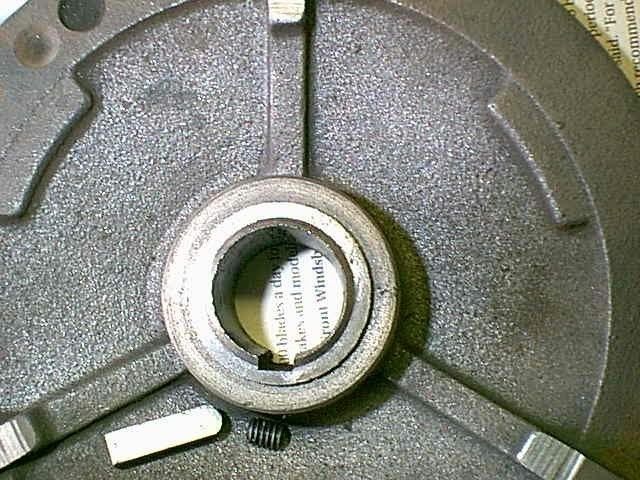
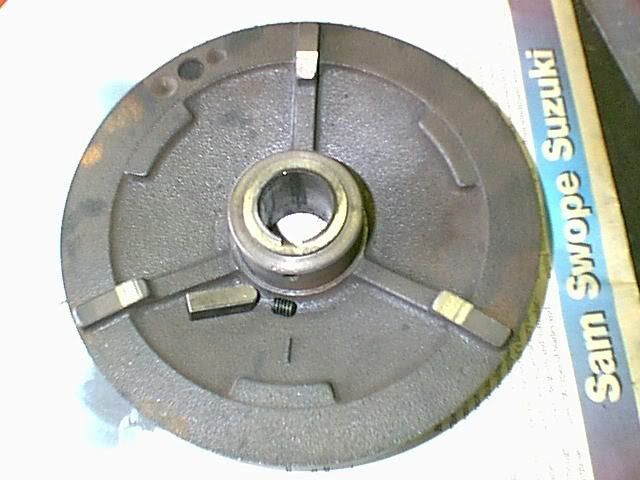
The boss in the picture is 48mm(1.890").
I am contemplating a couple of different repairs;
a) clean up the bore and make a split sleeve insert leaving as much of the keyway intact as possible, a friend has suggested silver soldering the sleeve in place, and reassembling. I would size the bore for a light press fit after soldering.
b) bore the existing hole out past the existing keyway and make an insert, with new keyway, to press fit in the sheave. Attaching the insert positively to the sheave is presenting some problems, plus the special keyway is another issue.
Pros/Cons any body.
Before you jump on me, I have contacted High Quality tools, and REM Sales about a new sheave. REM Sales referred me to Sharp Industries, who thus far, has been unresponsive. The "Catch 22" stituation is they want part numbers, I don't have a manual, and apparently they don't either, although Sharp has to cross the Alliant to their machine.
Harry
 
Hard to believe REM sales doesn't have the part on the shelf. But I'd use it as an excuse to up-grade to a VFD retrofit!
 
Your best bet is to bore the sleeve out past the key, and make a completely new insert with the keyway in it. Make it a press fit. Finish bore it while it is already pressed in to the housing.
You can make the key with your mill, like shaper or something like that, use an old end mill, grind it to the right size and shape to slot something, and put it in the spindle, and use the quill to go up and down like you are shaving off a little at a time just like a slotting head. For occasional use it works great.

When I repair these on the sliding pulley, I make them out of something like oilite (bearing material)
It is easy to shave a key way in to compared to steel.
But since it is the fixed pulley that does not matter to slide up and down, but might be easier to make.
It works smooth as new and quiet when I do the repairs on them like that.
This is NOT the same as a Sharp, maybe a really old Sharp but they will get you the wrong one if you order from a new parts book. The Sharp was different, I just tried to order one for someone and it was different with splines on the shaft and did not work.
But if you get the right part number, they should get it.

Just be careful that you get everything bored perfectly, if that pulley wobbles just a little, it will vibrate.
But if you make the bushing, you can always do it again!
On that one since it does not move, a split sleeve is possible. But it would be very hard to get it to run true like that.
Also, don't solder it in, I would not put any heat on it at all.
Most ones that I have worked on had a bushing that could be pressed out, and then you just make a new one.

How are the other pulleys? How is the motor shaft?

I have to add, as mentioned before if you can get a new one, it is not cheap. That part should be about $400 from Sharp. I would try to repair it first, if you can't, then spend the money.

[ 09-26-2006, 11:22 PM: Message edited by: qualitymachinetools ]
 
If you really want to attach the new bushing into the pulley you can use a dutchman consisting of perhaps a 6-32 or 8-32 screw to secure the peices from rotating relative to each other or perhaps 2 of them 180 degrees apart to keep balance closer to original.
 
Here is a possibility which may or may not work.

Look up a QD (flanged taperlock) bushing in metric that corresponds to your motor shaft dia.

That will have the new keyway in it, you will machine a tapered bore of ~7 degrees per side. Then, just drill and tap the appropriate holes so you can tighten the flange.

The advantage of the QD hub is that there aren't the goofy half-tapped holes as in a standard tapered bushing, which can be difficult to produce without a drilling and tapping jig.

The taperlock will squeeze the shaft and the key and you should have few problems...I would recommend if the key is a loose fit to make a new one slightly larger that is a light drive fit with a hammer, as it will not fail the same way again.

Good luck with your repair.
 
Thanks for the suggestions.
I'm very inclined to go with the confirmation of option "b" from qmt. I'm not to keen on the solder idea because of the heat
All of the other parts in the head are in very good to excellent condition, although I did take the opportunity to replace all the bearings in the upper drive. Even the belts are in good shape.
I was expecting to find plastic or bronze inserts on the sliding sheaves, but Alliant used a serrated style bore on the cast iron sheaves. I'll see if I can get picture of the slider for the motor. When I took it apart I didn't notice any appreciable slop. They are very nice and tight sliding fits.The motor's shaft is hardened, the file just skated.
Harry
 
I was slightly wrong in my earlier post. The manual I bought from Alliant (REM Sales)is for a model RT2V, which is slightly newer than your (and mine) model 42VC. However, I used this manual to order a number of vari-head parts and they fit with no problems. Those parts included both movable pulleys and the upper spindle gear hub.

Having said that, my manual says the number for your part is V625 (Stationary motor varidisc). The key is # V725.

Alliant (REM) does not have a manual for the 42VC model, but I have verified that there is little to no difference between the 42VC and the later RT2V. Another PM member sent me a few scanned pages from his RT2V manual before I got mine. The page dates are from 1984. My mill has a mfg date of Nov 1984.

HQT is now referring people directly to Sharp on Alliant parts, as I found out about a week ago. Alliant gets their parts from Sharp and even if you order them from REM Sales, they will be drop shipped from Sharp in So Cal. According to a person I talked to at Sharp they are interchangeable, but from a post above that is not completely accurate. In any case it appears Sharp Industries is the only source for Alliant parts and they are not cheap.

The fit between the shafts and the vari-discs is very close. If there is too much clearance, they will rattle and only get worse. If the motor shaft is worn the only solution is to replace the entire motor, as the armature shaft is not available separately.

Hope this helps.

Dave
 
Dave,
Thanks for the information, I'll be calling Sharp tomorrow, and see if this is what I need. If so I'll order it.
There is no bushing in the sheave in the photo above, but today I bored and bushed the sheave, and I am waiting for a pulley tap to come in tomorrow before proceeding on with the repair. The bushing that was installed today is 1.3755" OD pressed into a bore of 1.3752". I'll probably install at least one extra screw from the side to act as a positive lock along with the set screw for the key. I'll bore the 25mm hole and shove a 1/4" broach through for the keyway. I'll have to make a broach bushing, nothing new there, and a special key to go from the 7mm keyway in the motor's shaft to the 1/4" in the sheave. Then I'll see if this head works.
Here's a picture of the sliding sheave bore for the motor. The minor diameter is 24MM and the major is 24.5mm approx. There are 6 splines? in the bore.
a3.jpg

Harry
 
Just an update. The sheave has been repaired with a steel bushing. The sheave was bored to 1.375, and the rough drilled bushing was pressed in. I drilled and tapped 3 holes, including the one over the keyway, 1/4-20, 2 that will bear against the motor shaft at 120 degree spacing. The hole was then finish bored and 1/4" broach used for the keyway, I had to make a 25mm broach bushing for this operation. I also had to make a stepped key. The sheave was installed on the motor, with some gentle persuassion, the set screws Lock-Tited. The motor was reinstalled and the mill tested. I have a very quiet running machine, just like the day I got it. Hopefully this repair will last a good long time.
One detail I paid attention to was to make the key full length of the sheave, and make it very tight fitting in the motor shaft. Let's just say that the key is going to be difficult to remove should the need arise, and it is not much looser in the sheave.
Here's a picture of the repaired sheave;
a4.jpg

Harry
 
Very nice repair - Should last a long time.

I never understood why the factory interrupts the splines in the moveable disc. On a new disc and shaft, there is really not enough clearance for a lubricant to protect against wear.
 
Vari drive pulleys need to be tight to be quiet. The "splines" are interupted with the grooves to reduce the area in contact so it can slide easier.I have fixed a dozen or so of these by sleeving them with linen based phenolic. You damn near have to have hard chrome on the shaft and go for .001 interference. Once they get a little loose they die quick.
 
Very nice fix, and sounds like it cured the machine's ills quite "soundly"


I took interest to your 3 setscrews...just for reference, a very common industrial power-transmission spec for ordering MTO (made-to-order) straight-bored hubs, sprockets, pulleys, and gears is:

"2 setscrews, @ 90 degrees, 1 over key"

But I think the 3 setscrews @ 120 deg is even better.
 
You wouldnt happen to still be running your alliant would ya? I have some noise in my head and im looking for some help.


Back
Top