What's new
What's new

Another Kurt vise ressurection KURT II PT600 - Warning, photo heavy

KC130Loadie

Aluminum
Joined
Oct 24, 2014
Location
San Diego, Bay Park
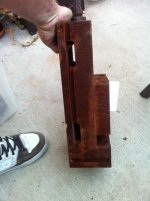
I'd thought I'd share an in progress vise rehab. Picked up this baby on the cheap. A Kurt II PT600. All rusted up and stuck together bigtime. Busted out the car battery charger and some baking soda and 1 week later these are the results. It probably took about an hour of light scrubbing with oil and a soft scotch brite pad to remove the converted rust. There are some tooling marks on the movable jaw; looks like a 3 fluted facemill was crashed into it, and there is about a .100-.150 cut in the top of the fixed jaw, but the rest looks good. Not any pitting that would impede function by any means. Most likely will stone the "ways" for any possible high spots.

The screw and bearings all look brand new, but the bearing retainer? had evidence of chips galling up between it and the casting. Might bore it a touch to clean out the marks...or not.
IMG_1545.jpgIMG_1551.jpgIMG_1162.jpgIMG_1570.jpgIMG_1155.jpg

http://i1290.photobucket.com/albums/b526/KC130Loadie/IMG_1545_zpscsj8uhft.jpg

http://i1290.photobucket.com/albums/b526/KC130Loadie/IMG_1543_zpsfcshv1lp.jpg

http://i1290.photobucket.com/albums/b526/KC130Loadie/IMG_1546_zpseolhtvlk.jpg

http://i1290.photobucket.com/albums/b526/KC130Loadie/IMG_1550_zpszpfbj2ds.jpg

http://i1290.photobucket.com/albums/b526/KC130Loadie/IMG_1551_zpslkgjnwcz.jpg

http://i1290.photobucket.com/albums/b526/KC130Loadie/IMG_1564_zpswfr8tjgw.jpg

http://i1290.photobucket.com/albums/b526/KC130Loadie/IMG_1566_zps4ddnwnfl.jpg

http://i1290.photobucket.com/albums/b526/KC130Loadie/IMG_1570_zpsawmjunqg.jpg

http://i1290.photobucket.com/albums/b526/KC130Loadie/IMG_1157%201_zpssqdk4buf.jpg

http://i1290.photobucket.com/albums/b526/KC130Loadie/IMG_1161_zps2zapexom.jpg

http://i1290.photobucket.com/albums/b526/KC130Loadie/IMG_1160_zpsuahycrao.jpg
 
You have more patience than I :) Especially for removing the black coating at the end....

...but the electrolysis process is pretty cool. My Dad has rescued some basket case pieces and parts with it as well, none that large.
 
Wow super nice job. I have two nice almost new double locks that we don't use much and the got stored in a bad place near our overhead doors. A rain storm soaked them more than once last summer and they sat unnoticed and rusted up pretty good in places. Nothing like yours but bad enough to make me sick. Please explain the process using the battery I would like to give it a shot and bring mine back to new looking as possible.

Thanks Ron
 
KC: Nice work on the cleanup. In addition to stoning the flat "ways", also check the flatness of the flat area's. I have seen some that had enjoyed a hard life that were bowed up, probably mostly from some ape using a twenty pound hammer on the handle. If bowed, it will be bowed up on the bottom as well. This will sometimes cause the fixed jaw to not be perpendicular. Good luck.

JH
 
Wow super nice job. I have two nice almost new double locks that we don't use much and the got stored in a bad place near our overhead doors. A rain storm soaked them more than once last summer and they sat unnoticed and rusted up pretty good in places. Nothing like yours but bad enough to make me sick. Please explain the process using the battery I would like to give it a shot and bring mine back to new looking as possible.

Thanks Ron

Thanks Ron!

Pretty much all you need is:
1. A standard car battery charger, preferably with amperage / charge rate selections. I would stay away from "smart" car battery chargers and go for the traditional Napa/Sears brand. In fact, any large enough DC power supply should work.
2. Some sacrificial scrap steel
3. Some wiring with terminals optional
4. A tank large enough to completely submerge the object and hold the sacrificial plates and keep the plates and work piece form touching
5. A Tablespoon of baking soda for every 1 gallon of water to act as an electrolytic

You hook up your positive cable to the sacrificial scrap steel, and the negative to the work piece. I just ran a bolt with a double up nut to clamp the wire to. I only had to make one connection as the moveable jaw, which I connected to was in good contact with the rest of the vise. The more amperage you can run, the faster the reaction happens. I have found that placing more than one sacrifical plate helps speed up the process also. Line of sight seems to be the ticket.

What is really nice about this is that while it isn't the fastest way to remove rust, you just set it and forget it. You can't over do anything, because you are only converting the rust itself. Then when it is satisfactory, just lightly scrub the magnetite (I think that's what the rust is converted to) off. On lightly rusted items, the magnetite will just wipe of with a paper towel. You end up not removing any underlying metal, which for this kind of thing is pretty important. Museums use this process for de-rusting artifacts from stuff that has been sitting on the bottom of the ocean for hundreds of years.

Other ways I have seen is to use Washing Soda instead of baking soda. Now I live in San Diego, and our tap water is H-A-R-D....I probably could get away with not even using baking soda, but haven't tried that yet.

The best explanation and demo I have seen of this is Keith Rucker. He brakes it all down step-by-step, and you can see that this works for any size item.
https://www.youtube.com/watch?v=NKZv14-K71g

A couple of notes to be aware of. A byproduct of the water being split is that you will be releasing Hydrogen. When you start seeing bubbles formed, you know its working. I let my science experiments run outside so the hydrogen is diffused. Another thing is that I make sure to keep my alligator clamps out of the water, and have wires to clip onto. You might inadvertently dissolved your clips (especially the positive) if left in the water.
You DO NOT want to use this or have any stainless steel involved. From my understanding, it produces Hexavalent chromate...poisonous stuff.

Here is a really good write-up of the procedure as well.
Rust removal by electrolysis
 
Nice job.
If you reduce the plating current you can reduce the black smuts to almost nothing and what little you get comes off easily. I just put a small sealed beam in series.
Have a good one, Mike
 
Nice job.
If you reduce the plating current you can reduce the black smuts to almost nothing and what little you get comes off easily. I just put a small sealed beam in series.
Have a good one, Mike

So reducing the current while increasing the conversion time equates to less elbow grease? I'll have to try that out.

> James Clark > I take it I'll need a straightedge and a surface plate to check the casting to see if has bowed? Was the main casting the only piece at issue, or does the movable jaw become deformed as well?
 
The one time I tried that, I got a hard black "shell" on the surface that was heck to remove.

You must have a better secret to the process than I did. I abandoned it for phosphoric acid treatment, which can have a similar end result.

So how did you avoid the hard shell of black stuff?
 
The folks not using electrolysis are truly missing out. I would strongly suggest that you simply try it for yourself; I assure you that you will be pleased. Use 1 tablespoon of Sodium Carbonate per gallon of water. If you use a low current, less than 1 amp on most parts, for a week, you will find your iron parts, rust, paint, oil, grease and crud free. The low amperage and extended time greatly reduces the black crud and turns this process into a great degreaser and paint remover. You can reduce the amperage of a battery charger by using light bulbs. I use a small headlight in series.
Of course, if you are in a hurry, you can always crank up the current. It still works great but your parts will have black smuts on them.
This process is line of sight, so better results can be had if you use sheet metal plates, or steel can, with all sides roughly equal distant from your parts.
When I started this I was using up to two battery chargers, 30 volts, 8 amps and it looked like a lobster pot boiling. It was great fun and fast, but I gave up on the process because the black crud on the parts was almost as hard to remove as the rust. A year or so later I started refining my process and I now use it all the time. Use the low amps, a lot slower but worth the wait. No need to pre clean the parts just wipe off the big stuff and have at it, you will be amazed. Remember that the part-cathode is connected to negative and the plates-anode is positive.
In case you are wondering, Sodium Carbonate, washing soda, and soda ash are different names for the same product. It is available at home centers, pool supply, and some markets. It is sold to control PH in swimming pools and is very inexpensive.
Have fun, Mike
 
Thread ressurection

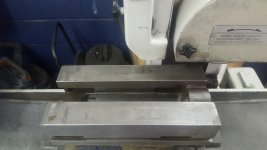
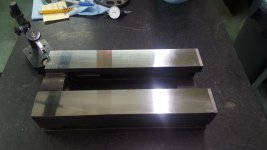
Hey everyone! Been awhile, 2016 has brought many changes for my life...all good. So good in fact, I have access to surface grinders now, and have been attacking the Kurt II vise finally. I needed the surface grinding reps, and I figured the vise was a great first project. From what I understand, usually newbies in the trade start with making 1-2-3 blocks or maybe a U-Grind? tool makers vise. Might as well go big. I have ground the main body flat within .0002 end to end. Next I have to use the BIG automatic grinder as just the body was maxing out the capacity of the little grinder I started on.

20170104_003045.jpg20170110_003839.jpg
 
Well, it only took over a year to get the chance to finish her off. Sorry about resurrecting an ancient thread.
I did notice that the back jaw likes to deflect a tad under a heavy load. Might be a drawback of not having the bolts draw the fixed jaw down into the body.

KURT II ON MILL B.jpg
KURT II ON MILL D.jpg
 
Beautiful looking vise! Thanks for the update.

The back jaw moving is just a fact of life if it's bolted on. I have the newer version of this vise where the fixed jaw carrier is part of the bed casting, it still moves a couple tenths as the jaw seats. If you are just using aluminum jaws their good for over a thou of movement alone. They are nice for small parts but I have had issues holding onto larger parts, 3"x3"x4", with aluminum jaws.


Back
Top