What's new
What's new

Bellmouthed 3Jaw Chuck Tool Post Grinder

Ralphxyz

Aluminum
Joined
Nov 22, 2015
Decided to start a new thread instead of continuing my older thread on Tool Post Grinder alignment.

This has been a very interesting exercise and I have learned a lot but I still have bellmouthed jaws.
[video]http://www.practicalmachinist.com/vb/general/how-align-tool-post-grinder-348245/[/video]

I have learned that the problem is not the tool post grinder alignment per se.

Even if the grinder is not aligned the leading edge of the grinding wheel will run in a straight line.

So why are my jaws bellmouthed @> 15 thou?
And how do I get them straightened out?

edwin dirnbeck in my previous thread advised me to not use the tool post grinder but to use a boring bar and carbide bit.

I tried that, interesting I have never used a boring bar on the lathe so I learned something even if it didn't work.

It seemed to reduce the bellmouthing but I still have a bit.

Thanks for all of your help and suggestions.

Ralph
 
Fifteen thousandths? Something is very wrong. Can this lathe turn an aluminum rod into a cylinder six inches long? Us a long enough stock piece that the bellmouth doesn't matter, or (if available) use a collet chuck in place of the 3-jaw chuck.
 
yeah sorry digger,

Joe here is a indicator setup, it is not very clear but you get the idea.

Second time trying to post the video.
Ralph
 
Take the jaws out of the chuck body and use the guide grooves as reference for a proper fix. For the life of me, I can not understand why people would elect to try to restore bellmouth due to wear while the jaws are still in the chuck body.

MEASUREMENT (even if only relative) is the answer to almost every issue.
 
One last time.First ,get rid of those long prongs sticking out of your chuck jaw ,they make it IMPOSIBLE to use a SHORT STIFF BORING BAR ,or if you insist,a short rigid grinding arbore. Second,tighen the gibs on your compound slide,so that you cant even move it. Third tighten up the gibs on your crosslide so that you can BARELY MOVE IT.Third,install a proper tensioning ring. Fouth you will recut you jaws by moving your cariadge back and forth and back and forth and back and forth,Got it? You probably have a well worn flat bed lathe so as you are moving your cariadge back and forth you must push on your handwheel to force the cariadge against the bed ways.For your final cut dykem up the jaws and the dykem will barely be removed. If you are grinding you will see anocasional spark the whole length ov the cut. Now put indicater on and go backand forth ,pushing hand wheel the same as when cutting . While your indicater is on the jaw try pushing the cariadge toward you and away from you to see if you have slop.WEW Edwin Dirnbeck. .
 
I’ve got to ask..

How did you check the headstock alignment to the bed of the lathe?

My reasoning....

A coworker went to U tube university and screwed a chuck up......
 
Greetings,

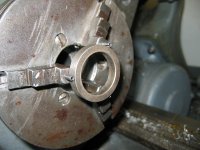
OK, step 1: what on *Earth* are those pins doing sticking out of your chuck? (Other than making your life totally miserable.)
For this, get rid of them. If you actually need them for something, put them back later. But it looks like they're sticking out of the inboard screw holes. So if the pins are in those holes, what happened to the screws that *should* be in those holes? That may be a good bit of your trouble right there.

Second, unplug your grinder, and sit it to the side. Right now the tool you need is a keyboard. I'm pretty concerned that you're making things worse by not understanding what you need to do.

The first thing you need for grinding those jaws is some sort of ring or presetter that you can tighten the jaws down against so that they're clamped 'in' while you grind. They need to think they're gripping something or you'll never get a solid grind. If they're loose, they'll jut flop around while grinding and then you are screwed.

That video was interesting, but so out of focus that it didn't really tell us anything except that you have huge, unexplained pins sticking out of your chuck for some reason.

So if you want help, the first thing is to tell us the situation.
A) What kind of lathe is it? (Size/make/age/condition)
B) what shape is the chuck in? (Size/make/condition)
Do the jaws rattle around when loose?
Can you rock them by hand?
Are they 2 piece? (Looks like.)
How *OLD* is the chuck?
If 2 piece, have you tried indicating the bottom sections independently of the jaw units? Are they out too?
What surfaces are you indicating?
Do you have a dead center for the headstock and/or a test bar?
Have you tried putting a center in the headstock, putting a straight bar on that (to the tailstock), and indicating along to see if the carriage is actually moving straight, relative to the bore of the lathe? If it isn't, you're done right there.
(Or, rather, the can of worms just became snakes. Big hissing snakes.)
You can try indicating of the inside of the spindle if you can rig some way to reach a straight concentric surface in there somewhere. (or on the OD of it, if you can find one you can reach.) All of this is done with the indicator base mag'd to the compound, and the compound cranked all the way in until it stops and locks up. You're testing the motion of the apron relative to the centerline of the lathe.
Next step is to see how the chuck jaws relate to the slots in the face of the chuck. Are they loose, or solid? Do they tilt under the load when you clamp something? If so, the chuck's done. (It can be saved, with a lot of work, but it's probably not worth it.)

If those pins were used for what I think they were, my guess is that the jaws will tilt in the slots under load. Meaning the slots are heavily worn, and the chuck's done for anything more than a weld positioner. Sorry, and I hope I'm wrong, but.....

Regards,
Brian
 
..I'm pretty concerned that you're making things worse by not understanding what you need to do.
.
.
.
Meaning the slots are heavily worn, and the chuck's done for anything more than a weld positioner. Sorry, and I hope I'm wrong, but.....

Regards,
Brian

Took a look at the chuck photos in the another thread and I think there is nothing to loose by practicing on that chuck. :eek:
(nothing to loose except time)
 
show a picture of how you preload the jaws. as has been said, you have to lose those poles sticking out for sure (1/4" is enough). if you want to experiment, put an indicator on the front of a jaw (axially), tigthten something in the chuck and see how much movement you get.
 
Take the jaws out of the chuck body and use the guide grooves as reference for a proper fix. For the life of me, I can not understand why people would elect to try to restore bellmouth due to wear while the jaws are still in the chuck body.

MEASUREMENT (even if only relative) is the answer to almost every issue.

so what do you suggest? grinding the jaws flat?
 
What i suggest is the OP learns how to grind, its not hard, its just slow, he from previous posts is spining the grind stone so slow he is just crush dressing it from the jaw impacts hence the taper.

Grinding out that 15 thou is going to take a while and he will only succeed in doing that once he learns how to grind and the percularities of grinding which are not anything like boring!

All the how too info is over in the abrasives section, he just has to read it and realise what he is doing wrong, rather than post new threads about his same flawed approach.

Equally hold the fucking phone side ways unless your on a VTL please!!!!!!
 
Thanks everyone.

I cut the pins back shorter, they didn't get in the way of the grinder but were in the way of the boring bar.

I believe the chuck is the original Craftsman 101.07403 12x36 lathe chuck. This is a well used lathe.

I am learning so much.

How would I check chuck alignment.

I'll get more answers when I go to my shop.

Ralph
 
Here is how I am putting tension on the jaws. oops Not my picture but I am doing it similarly.
Grinding ring.jpg

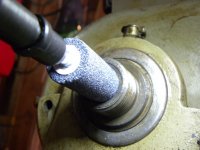
Now here is a interesting observation:
bottom.jpg
Top.jpg

I had previously aligned the grinder using a dead center in the headstock and tailstock.

The wheel is not aligned with the spindle.
I am going to look at headstock alignment.
I ordered a 3mt test bar.

Ralph
 
Ralph,
Why are you showing us pictures of a grinder point stuffed into your headstock taper??
Please, for the love of your lathe, whatever you do, do *NOT* grind your headstock taper.
Eventually, once you have a better sense of what you're doing, that's do-able, but the odds that it actually needs it are about zip, and the odds of ruining your spindle are much better than even right now. Trashing a chuck is one thing, trashing your headstock taper is entirely another.
There's no need to reference the spindle of the grinder to the spindle of the lathe, except roughly. The rotation of the chuck, and the motion of the carriage take care of that for you. Don't obsess about grinder alignment, it's really not a problem. What matters is the motion of the lathe carriage, and the lockup of the jaws of the chuck. (and how you *use* the grinder, and the nature of the wheels you use...)

For the moment, please put down the grinder. The tool you need right now is a keyboard.
Regards,
Brian
 
AND, throw away that ridiculous point that you showed threatening your spindle. There is no use on this earth for that POS.
 
You don’t necessarily need some fancy test bar to check your spindle alignment. Chuck up a piece of material and make a test cut. Measure both ends, then run an indicator along it. If the indicator and the micrometer agree, then your spindle is lined up. Also measure the diameter along the length of the shaft to check for an hour glass shape This will tell you if your spindle is pointing up or down and could also indicate issues with wear on the bed.
It is important to do a thorough inspection of your lathe to make sure you understand exactly where your problem/s are before you can correct them. Grinding and or cutting your machine should be a last step


Back
Top