What's new
What's new

Best method for securing CI patch into CI pocket?

awake

Titanium
Joined
Jan 24, 2006
Location
Angier, North Carolina
I recently acquired a 1970's vintage Series I BP that came with a Palmgren vise. I was under the impression that this was not all that good a brand of vise, but maybe this one was made in the good old days - it is very large (7" capacity), very heavy, very smooth, and clamps parts up very nicely indeed with very little tendency to rise up on clamping.

But sometime in its past, someone over-torqued the bolts holding the vice to its swivel base, and broke out a chunk from the inner rim of the swivel base circular T-slot. Not once, not twice, but three times - ! And of course, two of the breaks are right where I need to position the bolts for the vice to be parallel to the bed. Material is cast iron.

I have milled the broken areas to make pockets at the same depth as the bottom of the rim, and have machined pieces of cast iron to fit the pockets, with enough overhang that I can mill them to match the curve of the rest of the rim. My plan is to drill and tap screws to help secure the patches in place. Two questions:

1) Anyone care to recommend the optimal size of screw to use? I was thinking 8-32 ... would 10-32 be better? The pockets have a minimum of 1/2 inch of flat for the patches to sit on, into which the screws can be secured. (Plenty of thickness underneath, fortunately.)

2) I'm thinking it would be wise also to use some sort of adhesive. Currently the patches fit snugly in the pockets, but of course I can trim them to leave a little gap around the sides ... but I don't think there is any good way to leave a gap on the bottom - once I screw the patches in place, they will sit firmly on the bottom. So ... best choice for adhesive? I have some JB Weld on hand, but wasn't sure that it would do much good if it is all squeezed out on the bottom. Some sort of Loctite? I have some "red" threadlocker on hand, but I'm guessing that's not the best choice; I'd have to order anything else.

Incidentally, I did search before asking - found some interesting threads on various adhesive questions, but nothing that quite fit my situation, and I didn't succeed in finding anything regarding question 1.
 
In my humble opinion I'd skip the tiny bolts and glue and weld it instead you probably need to machine it flat anyway since they ripped the vice off of it a few times
 
In my humble opinion I'd skip the tiny bolts and glue and weld it instead you probably need to machine it flat anyway since they ripped the vice off of it a few times
This area of the vise is not a bearing surface, so just needs clearance. I've considered TIG brazing the patches in, but concerned about possible distortion. Weld plus glue? Wouldn't the weld heat pretty well destroy the glue?

Sent from my SM-T230NU using Tapatalk
 
2) I'm thinking it would be wise also to use some sort of adhesive. Currently the patches fit snugly in the pockets, but of course I can trim them to leave a little gap around the sides ... but I don't think there is any good way to leave a gap on the bottom - once I screw the patches in place, they will sit firmly on the bottom. So ... best choice for adhesive? I have some JB Weld on hand, but wasn't sure that it would do much good if it is all squeezed out on the bottom. Some sort of Loctite? I have some "red" threadlocker on hand, but I'm guessing that's not the best choice; I'd have to order anything else.

Hello Awake
Skip the red & get some green.
 
The cast iron broke, so you are replacing it with cast iron. And are talking about gluing it?

If I am reading this properly, you have a CI plug that will be stressed in the direction of pulling it out of the pocket. Have you machined anything like a dovetail to help hold it DOWN?

I would machine the pockets with dovetails or slots for the patch to be held UNDER. Then I would use some grade 8 or stronger screws to hold it in place. Even super glue is not up to this task.

Your avatar shows someone (you?) in a welding helmet. How about welding or brazing it in place? That may be the best "glue". Oh, and personally I would have made the new pieces from steel, not CI. The main advantage of CI is that it can be cast, producing a complicated shape with a greatly reduced amount machining. Steel is stronger.
 
Its the swivel base that got broke isn`t it
Well don`t use that anymore
I personely always remove the swivelbase and use the vice without one
More headclearance that way and you can set the vice to a angle anyway

Peter
 
Some really helpful ideas - thanks! Wish I'd asked and gotten the idea for dovetails before I already finished milling the pockets and patches. Yes, that's me in the helmet, but I'm not anything like an expert welder. I have done some TIG brazing on CI though, and the repeated suggestions to go that route have me rethinking it. Again, many thanks - as always, this forum is THE best resource of all!

Sent from my SM-T230NU using Tapatalk
 
Since I often find it frustrating when the OP never returns to give the final report ... here's the final report.

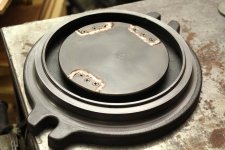
As noted, the patches and pockets were already milled and fitted. I went ahead and drilled and tapped for three 8-32 screws per patch - may add some strength, but at the least held the patches firmly in place for the brazing. I beveled around each patch/pocket to about half the depth. I put the base on my grill and let it pre-heat for 1-1/2 hours. Then I TIG-brazed each joint. As I said earlier, I don't TIG weld (or braze) often enough for overly pretty results ... but I think the results were decent.

The attached picture shows the results after the base had cooled (which took > 2-1/2 hours) and I had cleaned up the oxidation. As you can see, I have not (yet) cut the brazes down ... and may not need or want to. I'm thinking that it wouldn't make a big difference, but it might reduce the strength of the joints a bit if I cut them flush - ?? And as I noted in an earlier post, this is not a bearing surface - the outer rim is the bearing surface, and it is about .100 higher than the inner section. So at most I may have to skim the brazes down just a bit for clearance, but don't really need to cut them flush.

IMG_3107.JPG
 
Rather than do all that fitting of inlays, I would have machined the entire center section down maybe 1/4 to 3/8" depth and then machined up a disk out of steel and bolted it down with a bolt circle of maybe 8 quarter inch flathead screws.
 
How about first using adhesive to fasten the patch and then "stitching" the edge using threaded cast iron rods in tapped holes, again with adhesive?

I've heard of cracked engine blocks repaired this way decades ago.

Note: posted before reading about finished repair.
 
Rather than do all that fitting of inlays, I would have machined the entire center section down maybe 1/4 to 3/8" depth and then machined up a disk out of steel and bolted it down with a bolt circle of maybe 8 quarter inch flathead screws.
It didn't actually take that long to mill the pockets and fit the patches, but I did think about what you suggested along the way ... I decided to keep that as plan B if this doesn't hold up. :)

Sent from my SM-T230NU using Tapatalk
 
How about first using adhesive to fasten the patch and then "stitching" the edge using threaded cast iron rods in tapped holes, again with adhesive?

I've heard of cracked engine blocks repaired this way decades ago.

Note: posted before reading about finished repair.
Another great suggestion - and would have been easy to do, much easier than fitting dovetailed patches in (not what I did, but another good idea from an earlier post). Something to keep in mind for next time I have a repair like this ...

Sent from my SM-T230NU using Tapatalk
 
After all that heat I'd be surprised if it isn't warped.

I've only used a rotating base two or three times in all the years. I always figured clamping the vase down directly is fast enough and far more rigid. But some folk must like them or they wouldn't bother making them, and, "different strokes". :)
 
I like a swivel base for little stuff like gets done on a Bridgeport size mill (drilling small holes, very light milling, etc.). If doing something that needs rigidity though, off comes the swivel base for me. That repair should do fine for light duty stuff (which is all a swivel base is really intended for anyway IMO).
 
That repair should do fine for light duty stuff (which is all a swivel base is really intended for anyway IMO).

Reminds me of the question I've learned over the years to ask whenever I come across a broken part. "What caused this to break?"
There are two possibilities that come immediately to mind, one, it was poorly designed (It happens.) and two, something extraordinary exerted a much larger load or strain than it was designed to take.
Often questioning the customer brings to light that something out of the ordinary occurred, like someone trying to lift something off the mill with the crane and it was still bolted down, for instance.

You can't fix stupid, and while stupidity is democratic it seems to reside more in some careless people.

So the next question, are the stupid acts going to be repeated? If they are why waste time on fixing it, or replacing it! (Not that I'd say that to the customer, but I do try to make sure we both understand that fact.)
 
Reminds me of the question I've learned over the years to ask whenever I come across a broken part. "What caused this to break?"
There are two possibilities that come immediately to mind, one, it was poorly designed (It happens.) and two, something extraordinary exerted a much larger load or strain than it was designed to take.

It is answered already
Poor design

And as I noted in an earlier post, this is not a bearing surface - the outer rim is the bearing surface, and it is about .100 higher than the inner section. So at most I may have to skim the brazes down just a bit for clearance, but don't really need to cut them flush.

If for some unforseen reasson I needed a swivel base (always tos them) I would have turned down the innersection
Bolted on a new disk and made that flush with the outer rim

Peter


Back
Top