What's new
What's new

Broaching Question - 1/4" keyway width in a 1-5/8" diameter piece

Wade Keene

Plastic
Joined
Nov 4, 2007
Location
Homewood, IL
Hi Everyone,

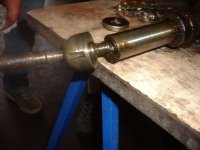
Hopefully someone can help. I need to make a tool to take apart the steering tie rods on an old MG. The piece I need to get a hold of to unscrew is 1-5/8" in diameter with three slots spaced 120deg apart. The slots are pretty shallow, 1/16" or so and 1/4" wide. The factory tool would look something like a lock nut socket you could find now but I haven't run across anything close or that could be modified.

I was thinking of turning the outer ring of the wrench to the 1-5/8" ID and cutting keyways to weld in lengths of hardened steel stock so they protrude the required distance and have enough meat in the keyway to be secure and transmit enough torque to do the job. These things are notoriously tough to loosen from the base of the tie rod. The base has two holes in the bottom and I was going to make something with two pins in a block of steel to hold in a bench vise to hold it - this would be the easy part. I'm certainly no machinist by trade, I restore old British cars so I've picked up a few things along the way. I have a lathe, drill press, arbor press, some other tools.

I looked around and think I can handle what looks to be basic broaching but the big problem seems to be getting the right setup. Finding 1/4" keyway broach, no problem. Finding 1-5/8" diameter bushing - easy. A 1-5/8" bushing that takes a 1/4" broach - no such thing?

Ideas, anyone? Or am I stuck using a hacksaw and files?
Thanks
 
the big problem seems to be getting the right setup. Finding 1/4" keyway broach, no problem. Finding 1-5/8" diameter bushing - easy. A 1-5/8" bushing that takes a 1/4" broach - no such thing?

Ideas, anyone? Or am I stuck using a hacksaw and files?
Just make your own. Simple lathe and mill job. While you are at it, if there's three slots in your part you can index the bushing and make a spot for a removable locating key at the same time you cut the slot for the broach. Then your three slots will be at 120*. Push the first keyway through, then put the pin in and do the next two.

btw, there are different sizes of push broaches - iirc they are sized as A, B, and C which is the same size cut but diffferent body sizes. One is sometimes more convenient than the others, depending on what you are doing.
 
Without a mill you are in deep trouble. Find a buddy with a mill, either cnc or manual with rotary table. You will still have to file a bit to remove corner radii, but at least not the whole base circle.
 
Here's a couple pictures.
Lazz, something like that could work, but these are tight enough that a wrench needs much better "purchase" as the Brits say to do the job. Some guys just use blue wrenches and pipe wrenches but I prefer not to mangle things people pay me to repair/restore.

I do not have a mill, but have a friend who might.

Thanks for the ideas so far
 

Attachments

  • 100_7777.jpg
    100_7777.jpg
    80.5 KB · Views: 175
  • 100_7776.jpg
    100_7776.jpg
    82.9 KB · Views: 163
Firstly try a proper C spanner, not an adjustable one. If this fails, contact the MG club in UK and see if they list a tool.
The last resort is to make one, you have limited equipment so try this, turn up a sleeve that just fits over the part, saw and file 3 slots as well as you can, cut 3 pieces of 1/4" tool steel to fit in the component and in the slots and the sleeve, hold the whole assembly together with wire and weld the three key steel parts in place.
Make up a handle to fit the end of the sleeve.
 
Do you have a welder? If so, I would bore a sleeve that was about .005 loose on the OD of the joint. I would weld three small projections in the sleeve 120° apart. I would then file the projections down to make the necessary drive lugs.
 
Peter's reply gave me an even better idea. Cut the three tabs like Peter suggested, only don't cut the tabs loose on the bottom. Bend the tabs to the inside of the part so the tab is projecting inside more than necessary. Weld up the those three slots/tabs on the outside. Then rebore the inside to give the tab the correct depth.
 
Please excuse the incomplete suggestion I made earlier. I grabbed the first spanner that came close to fitting. I should have dug around until found a better example.

Like this one.

DSCN4605.jpg

Or if finding a spanner the proper size is hard you could try an adjustable spanner. Or file/grind down the pin in a pin spanner to work.

Like these examples

DSCN4606.jpg


Then again you could find a pipe with an inside diameter close to your OD.
Cut a length,then cut it in half or thirds as your time allows. weld on a tab or drill and slip in a pin... then a pipe wrench could be used to turn accordingly.

Kinda like this


DSCN4607.jpg
 
I like lazz’s 3rd option with the pipe, a cog and a pipe wrench, although I would just cut a gap for the cog only - not in two pieces (easier to manage)
 
I'm a British car guy and appreciate the do it yourself route. But don't the replacement tie rod ends come as a complete unit?

Any way, if you have access to the standard inner tie rod end removal tool it looks like you could take the largest insert, 1 1/2", and grind the right contour onto it and use it.

Tie rod tool.jpg
 
Looking at Lazz's 3rd picture, you could do a similar arrangement with 3 pieces of key stock. Slip the pipe over your part, engage the key stock into the key ways, weld them in place and you will have it without the hassle of broaching your sleeve.
 
72bwhite - Yes, the proper MG tool is like that, only with 2 tabs and (judging by the drawings in the factory book)sized to fit over the part with little to no slop - part no. T.114 in the TD-TF manual. Its also pretty thick, so the tabs grab a good amount of material. That wrench is made to work with a vise mounted fixture that holds the base of the tie rod against rotating with two pins - part no. T.122. I've been in the trade for a while and don't know anyone with these tools, they are hen's teeth of hen's teeth. I'd show pix but I can't find a way to cut and paste just a page of a my factory book of 230+ pages.

Mixdenny - there are no replacement tie rods available. There are new shims available, and a couple other parts so originals can be reconditioned to as good as new. I'm not comfortable grinding up an original part to fit a new tool rather than making a tool to fit.

Gbent, Peter, lazz, Spruewell - I like your ideas and I do have a welder. I think the key is to make a wrench that's beefy enough to minimize tool flex and maximize engagement in the slots. Those slots are shallow enough that if something gets a chance to slip and mangle up that piece it will. I was also thinking I could get a D style broach bushing and build up each side of the slot with 3/32" bar stock to make the c style broach fit. I imagine I'd need to use bar stock behind it to bring the broach out far enough.

I attached another picture I found that shows the tie rod and how it fits to the rack. As you can see, the same tool is used to loosen or tighten the tie rod assembly to the gear rack. Its usually MUCH easier to loosen the tie rod from the rack than it is to disassemble the tie rod itself.

Thanks
 

Attachments

  • MGA Inner Tie Rod.jpg
    MGA Inner Tie Rod.jpg
    29.8 KB · Views: 93
After looking at the label on the picture it all came together.

About 45 years ago I too had an MGA and I can recall having trouble with a tie rod.... As you might notice I tried several different methods :)
 
Another way to make the tool is to start with a piece of 1 1/2" standard briggs pipe. I dunno what you have in UK that is close, but the idea is a piece of tube with fairly heavy wall that fits closely over the OD of your part.

Hacksaw sections out of it, longitudianlly, to cover the UNslotted portions of the circumference of your part....three pieces, if three slots. Then cur pieces of key stock to fit in the slots or notches. Hold it all together with a hose-clamp ir bit or wire, and weld...six longitudinal welds to tie it all together, then more weld if you want to thicken the walls.It will shrink as you weld it, so you may have to press it off. Weld a nice handle on, or grab it in a pipe-wrench. No machining or fancy filing rerquired.


Back
Top