What's new
What's new

How to be accurate with a Center Punch? Possible???

nicksorenson

Plastic
Joined
Oct 15, 2009
Location
Missouri
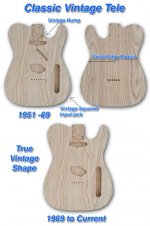
I build guitars for a living. I am trying to make a drilling jig (with drill bushings) for drilling the string holes in Telecaster style guitar bodies.

I have a cheap spring loaded one hand center-punch for metal. I am having the hardest time getting it to hit "Dead On" with my crosshairs on the piece I'm drilling. Am I using the wrong tool? I can get it within .010" to .020" or so but that's not accurate enough. I want it to be right where I want it.

I think part of the problem is that the point isn't fine enough. Is there a similar tool or the equivalent of what AWL is to wood but that can be used for metal?

Or am I overlooking something. I'd think that a person with some simple tools (the right centerpunch, a drill press, etc) could get this done.

thanks!!
Nick
 

Attachments

  • TELE.HDR.ART1.jpg
    TELE.HDR.ART1.jpg
    55.5 KB · Views: 989
If you scribed the lines on your workpiece, you can use what's called a prick punch to feel where the lines cross. A prick punch has a very sharp tip, and will make a tiny dimple. Once you've made the dimple, you can use that to guide in your regular center punch.
 
A small machine shop with a fair bridgeport should be able to make one quite cheaply.
Make a drawing showing the locations, maybe even include a surface to help line things up to the neck.
 
A quality spring-loaded centerpunch should work well. Draw your intersecting lines, hold the punch at an angle to better see the intersection and place the tip accurately. With the tip accurately placed, make a light punch mark. Now examine the punch mark - it's probably going to still be a little off. You can move the punch mark where it needs to go by tipping the punch so it points in the direction you want the mark to move and lightly punching it again. Repeat until your mark is dead on, then place a heavier punch in the light mark and give it a medium punch vertically and you should have a properly located mark.

All this is for naught if you then drill the hole with an improperly ground drill bit, so don't use a junk drill either. (Also, drill undersize, then step up in size).

An alternative is to make a poor mans jig bore by drilling a slug for your drill jig, then using some external means (micrometer heads, screws, gage blocks) to position the jig correctly.

GsT
 
I am not in the wood business but the method I use to drill a hole in location is to use a prick punch, lightly dimple the location then check with a magnifying glass. In most cases I have to adjust the punch location. When satisfied I follow up with a center punch then spotting drill. I can usually hold within .005" linear of the layout location.

I would imagine an optical center punch would do the same with less steps but have never owned one.

Walter A.
 
Make a fixture picking up the neck attach holes, extending down to where the bridge string holes are. Remove the fret board from a section of a scrap neck, attach a steel plate long enough to cover the area where the bridge is, and drill pilot holes, say #40 as accurately as you can. I realize this doesn't answer your original question, but at least it won't be a struggle with every project.

the optical center punch really does work, here's the cheapest one I've seen.
http://www.garrettwade.com/product.asp?splid=SPLID02&pn=83R03.03&bhcd2=1255799071
 
The truth is you'll be lucky getting any closer than .010"-.020" with a center punch. If you want it within a couple thousandths you need to use calipers to scribe the cross hairs and then use a wiggler to align the cross hairs and then us a small stub drill or center drill to get the hole exactly where you want it. All the drilling is best done on a turret head mill but you can use a very good drill press.
 
Carl hit on my question...

You can have the punch mark within .0005 and still be way off if the drill wanders. what kind of drills are you using and what kind of press. Wood is actually harder to locate a hole precisely in (especially ash and other desirable guitar woods) due to the variations in hardness of the grain. The drill wants to wander off the location towards the softer area. If you can get stub length drills, that will be of great help in preventing flex. Shorter and stiffer is better.

Are you using good forstener type bits or typical metal cutting twist drills? A forstner bit is going to be a lot more accurate than a twist drill because it cleanly cuts the wood instead of pushing it out of the way. The cutting angles are too blunt to cut wood well with a twist drill.

If you stil have trouble, you might even want to try to make a metal drill guide that locates to the neck pocket and secures with screws. This guide will have tubes to keep the drill from wandering. In fact, this may be the best solution to the probem. It'll be a lot faster than trying to lay out by hand and it'll certainly be more accurate.
 
You can hit the mark within a thou every time IF you follow the rules:

1) blue the part.

2) scribe the lines.

3) use a sharp scriber to create a dimple at the line intersections
USING SOME KIND OF MAGNIFICATION. I use a stereo microscope
for this but a loupe will work as well. Just not as easy.

4) LOOK at the prick mark you just made. Not at the center of the
scribed marks intersetion? Then use the scriber to move the mark so
it is.

5) do NOT punch until (4) above is met.

6) using the same magnification as above, line up the SHARP centerpunch
with the prick mark. Later on you can feel it "drop in" to the mark. But for
now watch it happen, not feel it.

7) punch the mark LIGHTLY.

8) again *inspect* how well you've achived your goal - a deep centerpunch
mark at the exact intersection. Impossible without magnification of some kind.

9) when you are satisfied the mark is prefect, then and ONLY THEN do you go on
to:

10) drill the hole.

Jim
 
Machine a piece of metal with the six holes all in a straight line and accurately
spaced. Then clamp it to the guitar body. I think the guitar body is flat in that
area you are talking about.

I have a spring loaded punch and they are not accurate because of the spring
action. The point always skips a bit from where you first placed it. A standard
punch with a magnifying lens works much better. But it is too hard to locate a
accurate hole in wood grain. If the guitar body is painted it is much easier. Since
you build guitars then I think the six hole jig I described would work best.

Just looked at your pictures. Telecasters are flat on the top so use the jig idea.
 
I have always favored the Esquire and Telecaster guitars, that being said, one thing that really needs to be right on, is those string ferrels. Not so much technically, but visually. If they are off just a few thou, it shows.
I would have some one with a mill space those jig holes, it wouldnt cost much.
 
Nick,

This is the perfect place for a 'On-Mark' optical center punch. McMaster-Carr has them as well as MSC.

They are inexpensive and are extremely accurate. Lay your holes out with some blueing and a digital caliper then punch the intersections of your scribe lines with the optical center punch. The little divot is followed up with a sharp center punch and center drilled before drilling with the final size bit.

Stuart
 
Hy,
I agree with Jim Rozen and would like to add a few points. In case you have a lathe on hand, mount your center punch in the lathe and mount a grinder, a dremel will do, to regrind the centre punch.
Some of them come off center from the factory, even good ones. In case you hit them with the hammer, they always wander off center. Be careful, there are two types, one more shallow, one more steep. Some come blunt, some are wrecked by coworkers or family members.

It pays to buy punches whenver you run across them at garage sales so you can grind a few more and always have a fresh one at hand in case someone messed your good one up.

Now, with the steep one, blue up the part, scribe it and drag the centre punch until it catches in the crosshair. Give it a light punch, take a look, correct and deepen it. If you have a four facet ground drill,you can plunge right in. If not, use the other to widen the hole so a standard drill can start without catching the edge before it catches the punched hole ground.
Another thing, don´t drill to full diameter immediately, go in steps.
Never use a battery drill, these are meant to fasten screws and easily wobble 0,01" or worse. Use a drill stand or a drill press. Put some aluminum or steel plate behind your part to avoid catching the drill on the exit.

Or set up the part on the x-y table and use a center drill in the drill press and start drill the holes corresponding to your print. Center drills usually ask for a good squirt of oil and high RPM. Nice thing about this approach: No scribe marks. With a deep centre drilled hole, the drill to reach the final diameter won´t wander off anymore.

Cheers,
Johann
 
You start with a prick punch which is a light punch like a center punch but the point is ground 45 degree conical. Grind with the punch axis in a radial plane with the grinding wheel (like eating a hot dog). The wheel turns "onto" the point to reduce the burr. The vertical striations left in the work are brilliantly visible. It aint rocket science. Free hand grind is plenty good enough provided the point is a fairly accurate (hollow ground) cone but it takes good eyes.

Do not grind a prick punch or a center pinch with the punch axis in plane with the wheels axis (like eating corn off the cob). This make the punch short lived and the mark hard to see.

I've been known to dress a prick punch point with a slip stone to ensure a sharp point.

OK. The work has been laid out with a scribe. The scribe makes a little groove that can be deteted by gently feeling for it with the punch tip. Find the scribe line with the point of the punch and gently drag it to the intersetcion of the two layout lines. Whn you hit the intersection your punch will stop. Without moving the point straighten up the punch and tap it to make a mark about 1/64" diameter. I use a little brass hammer I made when I was an apprentice for this kind of work.

If you need a bigger punch mark to guide a drill to center you can enlarge it with a regular center punch. The prick punh mark is eaxy to find with a center punch provided its sharp and properly ground. A dull, abused, chipped, soft, whatever punch will put you in to soup.

Once a group of us lay-out types were challenged by an engineer. Each of us scribed a grid on a small plate of machined steel and then punched the intersections. We all were consistent within 0.002" measured with a toolmakers microscope. So simple technique can get you pretty accurate but it starts with sharp tools.
 
Last edited:
Yup, somehow missed that he is making the exact drill guide I mentioned. In this case, I'm willing to be that he is not centerdrilling the holes and probably using a dull bit at too low a spindle speed and too much pressure (typical error). That'll make a dull drill bit walk all over the place.
 
Punching locations goes in steps as Jim R. has outlined.

layout, prick (I only use hand pressure for the first mark at the cross lines), a magnified look see to confirm the desired location of the bottom of the crater, correction by pushing at prick punch to move the center, another look, then a deeper prick, Another look? then a center punch.

Grinding punches "with the grain" is important!

To hope for .003 is about right based on scribe lines. (how wide is a visible scribe line?!")

If you need greater accuracy, that is what tooling buttons are for!

CalG


Back
Top