What's new
What's new

Help with a Dumore tool post grinder spindle--pictures

craqus

Plastic
Joined
Aug 13, 2011
Location
seattle
Hello,

Long time lurker and avid reader of Practical Machinist here. 99.9% of the time, I've been able to figure stuff out from the collective posted wisdom of the board, but this time I need some help.


I was lucky/unfortunate to get a Dumore 44-011 at a reasonable cost. Better yet, it was pretty complete. However, after carefully dressing a couple of wheels, setting center height, and carefully testing out the grinder, the surface finish indicates perhaps I did not get a stupendous deal. I'm thinking there's a problem in the spindle bearings. They feel a just a tiny bit sticky when rotating by hand, there's just a touch of tightness occasionally. Multiply that by 20,000+ RPM though, and perhaps that's my issue. I have done a bunch of reading, and it sounds like there's a variety of opinions on what the correct replacement bearings are. Ideally a matched set of $200+ class 7 deep groove angular contact bearings seem to be the answer, but people also seem to get by ok on class 3.

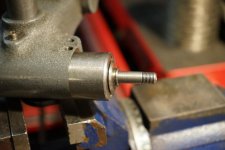
My initial question however, is how do I get the darn thing apart? (!) I've successfully loosened both caps with pin vise. getting the cap closest to the belt off is no problem, and it allows you to see the bearing itself, the wave washers, and the knurled gizmo to adjust the pre-load. however, the threaded cap at the grinding wheel end is a different story. I can get it loose, but when I turn the cap seats up against the vaguely flying saucer shaped washer on the quill at the grinding wheel end. Some pictures might better illustrate the description.

DSC00461.jpg
DSC00459.jpg
DSC00460.jpg

I suspect the bearings are original to the grinder, it does not appear that anyone has been monkeying around inside the spindle with aftermarket bearings. I'm hesitant to try and force anything, but do I need to press the spindle out of the bearings somehow? All of the diagrams I can find online of this grinder seem to be of a newer model that has a slightly different part arrangement. I'm hoping to find someone who's replaced bearings in a similar model who can offer a little guidance. Thank you in advance.
 
geez... 200 views but no replies? I thought for sure someone would know how to take this thing apart! Please let me know if you need additional information to understand this problem. Thanks!
 
Agree.. a setting for a time spindle should be hand turned a number of times, then turned at slow RPM (perhaps 200) to get all the hardened grease or dry oil loose. If it has oil fill places they should be filled... even flooded to push out any or some of the whatever might be in the bearings. Often with this action an old bearing might be saved.

For tear down that small hub on the left end slides off and the spanner nut off.. I have the same spindle but have not had it apart..very often you take apart until you can see both side bearings (right end and left) then knock one end and then the other to see if it favors going one way easier than the other... *But wait for advice from one that has taken one down before you proceed. Drop-Knock or hammer tap on the board to the end(not metal to metal) of a 4x4 is good or a careful press with an arbor press... but it should not take much push so if more than reasonable.. not even 100 pounds. Not moving you better stop and check for why it does not move.

http://www.dumorecorp.com/uploads/PDFs/Series14ToolPostGrinder-OperatingInstructions.pdf
 
I have a manual PDF for the model 8473, which is at least very like that one.... Has the oil wick, etc.

If you PM an email address, I can send it, but I warn you it's a big file. 10 meg compressed.

Definitely a good idea to check out the machine before jumping in, but I don't knw that I would condemn you for it... depends on the sale... sold working, is one thing, sold in a dusty old box is another. If you believe the seller.
 
thanks for all the info everyone. JST, I'll PM you an email address, though I'm not sure the spindle is the same.

For those wondering, I did oil it and hand rotate it before I fired it up, but was unsure what it should feel like... it didn't feel like there was obviously something wrong with it, but I had no basis for comparison. in retrospect there was likely more drag in the bearings than you'd expect, but it's hard to know. And of course, I bought it used and have no idea how it was cared for. Judging by the paint, it was fairly heavily used.

Michiganbuck, your advise sounds good. I'm able to get the leftmost spindle cap off, but the right side one presses up against a large shoulder on the spindle itself once unscrewed. basically, it seems the spindle is captured on the right side by a wide part of the spindle, and on the left side it can't go through because of the knurled pre-load nut.

also, there is a manual online for the 44 series grinders: http://igor.chudov.com/manuals/Dumore-Series-44-Tool-Post-Toolpost-Grinder-Manual.pdf
however, it shows a slightly different spindle arrangement, (in the picture) which does not seem to be the same as the parts on mine. (and of course it says nothing about how it comes apart)

dumore.jpg

it's parts 29 and 30 that are suspicious to me. those look like they MAY press off of the left side of my spindle somehow, to allow the bearing to be pressed off, and the spindle to be removed from the right hand side of the assembly. however, there's no obvious way to grab the part, and I don't want to start pressing on something i'm not sure will come off!
 
It is common to have bugs on the shaft..Use the hard side of a hone tell where the bug is, then with care the coarse side is used to just remove the bug but not take any stock from the original surface. No sand paper is not used , only a like new flat hone.

Bad bearings feel gritty or loose and perhaps sound dry as the obvious sign of going out... With feeling smooth they should be tried to see if they give a good grind. Some are whinnie for years before they loose ability to give a good grind.

You should see the bearing on both sides IMHO before you try to push out the shaft (with the one side bearing (S) coming out with the shaft).
 
My bet is a little localized heat applied to the collars..#29 & 30 will let them fall right off if you hold the assembly vertical. They are a real light press fit..almost a hand press fit...or, don't 'press' any bearing off, pull it off with a bearing puller. This will pull those two small collars off. There should be centers drilled in the ends of the shaft in which to position the bearing puller.

Stuart
 
What's different? What I see looks like yours, except for 2 not 3 springs.

it's similar, but different. In the diagram part 28 is just a flat washer, however on my grinder there's a cup shaped piece with a hole in the bottom the spindle passed through instead of just a flat washer. Part #29 extends about halfway through the cup, in fact you can see a little scuff mark where the cup fits over. On mine, the bearings seat in the cup itself. in the diagram, I'm not sure where the bearings locate , maybe in part #41.

Anyway, I will try a little heat and gently pulling off part number 29 to see if that does it. Thanks for all the advice, I'll post up my results!
 
tried alternating heat and Kroil several times, with zero results. I finally made what was basically a washer with a slit in it that could properly fit in the groove of part#29, and a 5" disc to go behind it for my gear puller to grab. With a LOT of force from the gear puller, it finally broke loose! So now I've got one part off, but still need to get the washer and the bearing off to get the spindle out. I think it's going to require a split-type bearing puller that I don't own, but I'll be darned if i'm going to let this thing get the better of me after all the work I've put into it!
 
High force is often not needed as parts are most often a very close but slip fit. *Be sure to check bugs with a smooth hard stone.. High spots show up with a hard stone (new) feel to the surface of the shaft.

[With a LOT of force from the gear puller, it finally broke loose!] you don't want to damage it putting back together.
 
Sopko had bearings as of a few years back. They are the source for most Dumore stuff.

But it's really a question of having stock. I don't recall the bearings themselves being an unusual and special type.

I also do not recall having any trouble getting the thing apart, and I have the virtually identical grinder.
 
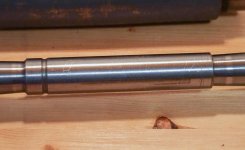
I did manage to get the rest of it apart. When I say it took a "LOT" of force to get it apart, maybe I exaggerated. it was a lot more than I expected. More than a light slip fit as suggested, anyway! there appears to be no damage to the shaft, I couldn't find any high spots, perhaps there was just a bit of grit or dirt in there that the force needed to overcome. anyway, it's apart now, pictures below. Yes, the spring washer is damaged... I did that accidentally and will get a replacement.
DSC00667.jpg
DSC00668.jpg

Now that it's disassembled, it's obvious that one of the bearings turns smoother than the other. The plan from here is to fully flush/rinse the bearing and see if the crud will come out. It may just be that dirt got in there while I was opening it up, but I think it worth a shot to methodically clean these bearings and retry them. As has been suggested elsewhere, there's a variety of bearings to try as replacements including the very expensive OEM versions or ABCE class 3, which everyone seems to deem sufficient.

I found it curious that there's two markings engraved on the spindle itself. One appears to be a W, the other a D. Perhaps they stand for "Wheel" and "Drive" ends respectively? The orientation of the groove on the spindle does match the diagram, so it appears that if it was ever disassembled before, it was at least reassembled correctly.
 
Why mess with the old bearings at this point?

Put some new ones in and be done with it!

that's a good point, but I figure that 10 minutes of cleaning, and 10 minutes of reassembly will at least let me evaluate how much better the surface finish is than before I started this whole process. It may still require new bearings, but I can easily test it without waiting around for new bearing to ship.

edit: Probably making a mountain out of a molehill with the blow-by-blow, but the bearings are at least part of the problem. I gave them a good cleaning in kerosene and they still feel a bit suspect. I also spun them up with air and there's definitely more vibration that I would expect, one kind of stutters at high speed (sounds a lot like a car shifting gears as it drops in RPM and then spools up again). So yeah... I'm going to order some relatively inexpensive replacement bearings and see what happens.

Also, there was more pieces of, well, something in the felt pads than I thought acceptable for the inside of a spindle, so I blew them out with air as well. If I'm going to rebuild this thing, I might as well make it last another 50 years. I rebuilt the motor on it already, so why not go all the way? Whomever winds up with the equipment out of my shop long after I'm gone will be a happy man; I don't always buy new equipment, but I always rebuild stuff to a very high standard, even if you can't tell from the outside.
 
Last edited:
[I also spun them up with air ]

This is and old thread but still spinning up a bearing with air is very. very bad for a bearing.
When they are in-set the balls roll smoothly on the race but spinning with air they are free to bounce and crash all over the place. Dip in new cleaner and shake is the proper way to clean, perhaps three or four times, then dip in spindle oil and set on a clean towel with a clean towel on top. A grease bearing should set to drip dry over night IMHO. If any reason to think it can not drain then turn over for a time. Then It should not get a air hose blow.

The stuff in the sealed package is rust preventer, not lube oil so it should be cleaned.

The first thing to do with an oil spindle is to oil it. Any spindle that feels dry is dry and should be oiled even if it is to become a greased spindle. Oil may or may not save it. I like to grease a spindle rebuild with about 1/4 to 1/3 fill of good bearing grease.
 
Here's a new rule: " BLAME THE SPINDLE LAST"

You say "poor finish" but you do not characterize it. Instead you immediately the spindle. Yours is an older, long idle grinder and the bearing grease may have segregated forming lumps. It might be a good idea to dismantle the spindle and inspect, clean, and re-grease but that is a clean room job that can be accomplished in an open shop provided fairly strict cleanliness precautions are taken.

Dumore tool post grinder spindles are well-designed and made of the right materials to close tolerances. They come apart without much drama provided you follow the reverse order of assembly - which in the absence of instructions you may have to determine yourself.. You apparently have the assembly drawing and parts breakdown illustration and list for that specific spindle. That is excellent..

OK, finish. You show no images of the finish. How is it bad? Is the finish rough? Does is have facets, streaks? What ever problems your lathe may have will be magnified in the finish and geometry of the surfaces you grind so the condition and operating characteristics of your lathe are important. Good ground finishes can be attained only on a machine free of vibration. Have you tried the T-Rex test (think the famous Jurassic Park scene) where you set a cup of water on top of the headstock and observe the surface with the headstock spindle running? No ripples is good: your machine may be a good candidate for tool post grinding. Ripples = bad in proportion to their magnitude.

There are a lot of variables to control when tool post grinding on a lathe and a good headstock spindle and smooth running while important are only a fraction of them. What wheel speed? How did you dress? What's the condition of your dresser diamond? How worn is your machine? If you mount two dial indicators to sense the front and back wings of the carriage do both wings move at the same time as you move the carriage handwheel or does one lead the other by a few thousandths? Are the cross-slide and compound slides tight and in good condition? Does the cross-slide move smoothly and stay put when dialed in very small increments? What material? What grinding wheel? How much did you dial in per cut? Did you spark it out?

These and a hundred other small factors affect tool post grinding.

I'm a machinist of long experience. I assert it's orders of magnitude more difficult to achieve good ground finishes and close tolerances on the usual tool post grinder lathe combination than on a cylindrical grinder. If you can't get good results from your tool post grinder on your lathe don't be dismayed: you're in distinguished company.

You will find the combination. The trick is to practice on samples to get your technique down. Do NOT put hours of work into a part then grind it expecting to learn a zillion tricks for running a tool post grinder as you go..

Good luck with your spindle. I hope you didn't screw anything up. Those are sensitive expensive bearings that probably cost $180 to replace. Work clean.
 
Wow, I'm surprised to find this thread has been suddenly resuscitated!

For a little closure: I did get it all re-assembled with new bearings and did some test grinding. The tests looked sufficient, so I used it to re-grind the jaws of a 3 jaw chuck (pre-loaded with a washer, of course). Surface finish on that looked pretty good too, so once complete I boxed the Dumore back up, and haven't thought anymore about it in the past year! I never did replace the washer I broke... I can't remember exactly why, it was either too expensive or too hard to find at the time. I really should go back and figure that out. A picture is attached of the 3 jaw that I groundDSC00766.jpg

Thanks for weighing in Forrest. I'm not sure what my expectations of surface finish are, but with the limited grinding I've done, I think I've gotten my money's worth out of the grinder.

Inskeep: I don't have easy access to the grinder at the moment, but as I recall there were 2 strings hanging down from the cups that simply went behind a felt pad. the felt pad was just loosely inserted into the spindle bearing housing, kind of like a tortilla wrapped around a burrito.


Back
Top