What's new
What's new

Excel tool and cutter grinder re-manufacturing (Similar to K.O Lee A600)

Andrew Wilding

Aluminum
Joined
Jan 3, 2009
Location
nottinghamshire, uk
A few months ago I picked up an Excel tool and cutter grinder that I plan to use for tool grinding, small surface grinding jobs and possibly poor mans cylindrical grinding.

The machine was £50 (about $75) so I was not expecting great things. The machine was rust free, seemed to come with most of the standard accessories but on inspection had 0.010" wear in places.

After successful remanufacturing of a Centec mill http://www.practicalmachinist.com/vb/general/small-mill-reconditioning-conversion-234739/
I decided to have a go at re-scraping this machine and giving it a general overhaul.

The machine is an Excel which appears to be a copy of the K.O Lee A600 like Lane's ex machine (THIS IS NOT MY MACHINE!)

KOLeecuttergrinder001.jpg


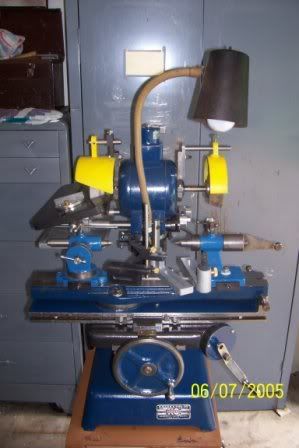
Here is a link to the brochure:
KO Lee A600 Brochure

I will post pictures of my machine shortly and progress made so far as well as update as further progress is made. Hopefully I will learn a bit more about the art of scraping and end up with a usable machine at the end. I will try to pass on any lessons I learn.

Any people who have info specifically on the Excel version of this grinder then I would be interested. Thanks
 
I picked up a bit more alignment gear. The straight edges were a bargain at £16 for the 30" one and £30 for the 48" one. I also picked up a german 0.001"/10" box level and unknown make 0.0002"/10" box level.

211.jpg


212.jpg


I calibrated the 0.0002"/10" level on the surface plate. The bench is flat when measured with a carpenters level but was sloping when measured using the more sensitive levels. A level plane was found by moving the level about and then fixed by pisitioning 2-4-6 blocks. The level was then adjusted until it read the same in 180 deg directions.

193.jpg
 
The grinder was stripped down, the z axis column removed. Measurements showed 0.03mm wear along the axis and also ovality. a plug was made for the 'nut' and and a few thou was taken off on the lathe. The column was then honed to 0.005mm paralelism. Pre correction shown below
082.jpg


The clearance was taken up on the bore using a brass shim. This produced a smooth shake free action but I am not sure how it will wear. I may have to look at increasing the bore diameter (and so clearance) and using something like moglice depending how it performs.

The grinder was then leveled with the column as the datum. Note the 1-2-3 block bolted to the column to provide a surface a level could be used against. Mocked up picture showing method. In reality a used a wookworking clamp to hold the level in this position until the bubble settled (enough force to hold the level but not enought to distort the setup significantly)

187.jpg


186.jpg

I found aluminium foil was handy for fine adjustment shims. It is a fairly consistently 0.001" thick. The remaining 0.0005" could be taken out by tightening the fasteners that hold the top part of the grinder to the base.
 
Last edited:
Th top surface of the y way was first filed to remove a 0.003" step. Note that I am resting the smooth part of the file on the way without the step
189.jpg

192.jpg


The corners of the ways (with black marker next to them) were scraped approx level (spotted to a 10" straight edge I scraped from durabar) to each other, measured with the level and 0.004" shim in each corner to raise the level above the rest of the way. Once these areas where in the correct plane the rest of the surface was scraped to < 0.0002"/10" to the datum surfaces.

213.jpg
 
Last edited:
Sorry for the lack of updates this project has been put on hold for a bit while we try to move to a bigger workshop (er sorry I mean house!)

I will hopefully have some further info and a big new workshop to show you soon!
 
I have finished the house 'tarting up' so I am back in the shed.

I have made a alignment tool to measure paralelism of the external dovetail parts

132.jpg


133.jpg


131.jpg


The too has two point contact on the two left hand dovetail faces and single point contact on the right. The indicator then measures the second right hand surface. A bit like a simplified kingway tool. The tool showed that the two faces were out of paralell by about 0.004"! and was very consistent. I have a lot of scraping to do:Yawn:
 
assembly of the z axis and a splash of paint

The base was filled sanded and painted. The z axis was fully assembled.

046.jpg


047.jpg


048.jpg


045.jpg


I checked accuracy of the z screw with a 2" 0.001" indicator and over that range the error was less than 0.001" which is better than required when you consider that less than 0.001" will be taken off between passes (and so between measurements)
 
The swivelling table was measured and showed a huge 0.010" droop at one end, possibly due to stress relieving of the casting over its 60 year life.

The table was flycut on the mill

004.jpg


The large straight edge was checked against the shorter one and the spotting was sufficiently even

005.jpg


The table was scraped against the straight edge and the locating points on the component were scraped to the surface plate.

049.jpg


The component below is blued (not shown in pic) and the surfaces on the bottom of the swivelling part scraped. The distance from the top and bottom surface checked with a mic to ensure the two planes are paralell.

050.jpg
 
Who copied whom ?

I have a Union Tool & Cutter grinder made in England by Boxford decades ago AND i have all of the accessories
Here is the french version of the sales catalog - do the pictures look familiar ? They should as one is a clone of the other (or they both copies another)
Do you want the full English manual ? I have it as a pdf

PS I also have an Excel Die Filing machine
regards
Paul Churchill
G25 02.jpgG25 01.jpgG25 03.jpgG25 04.jpg
 
Thanks Paul, That would be useful. I will PM you my email The two designs are very similar but I think that my grinder is older than most of the Unions I have seen, although I have never seen another excel grinder like mine.

I have a good number of the accessories like the work head, centers etc and I picked up a small eclipse mag chuck of the bay for £20. I have to admit that when the grinder is complete it will be mainly used for grinding small flat things such as washers etc and possibly cleaning up the end of the odd end mill or slitting saw, nothing too fancy.

Do you have a picture of your haul of add ons? I would be keen to see if there are any ideas of potential future projects I can steal! Do you use yours for anything other than tool grinding?
 
The manual [that I cleaned up] is a 4mb pdf
send me a PM if you want it as its too large to post as an attachment here in the forum
As for pics of what I have, its everything in the manual except for the little Vee clamp that goes on the small Magnetic table [which I do have] to grind Coventry die head jaws

I recently acquired the motorised workhead - I never thought I'd actually see one other than in a picture, now I have one !

A few spares are still available from Boxford [Union] Halifax UK
the G200 cutter grinder moved the design on but a few bits are still common such as the Micro-Adjust finger; the setting gauge; the height gauge etc
see
http://www.boxford-software.com/spares/G200menu.html

My Union must be a late model as it has metric dials and the casting is more square and flat where the older ones are completely round where the switch is mounted at the base of the column.


PS: Its nice to see that someone has retained the art of hand scraping - I've got a Sandvik carbide scraper like yours!
Regards
Paul
 
youngest 'scraper hand' on the forum?

PS: Its nice to see that someone has retained the art of hand scraping - I've got a Sandvik carbide scraper like yours!
Regards
Paul

I am less than 30 and so I wonder if that makes me the youngest 'scraper hand' on the forum?


Back
Top