What's new
What's new

Help! Machining a curved stair tread

ProfH

Plastic
Joined
Apr 27, 2017
Hi,

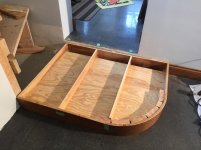
I've two stairs that are a bit odd in shape. I did a quick 3D draw for them:
Stairs_Render.jpg

There used to be carpet on them but we want to replace it with hardwood... I was wondering if somebody can help guide me through the process to machine these treads?
I use Fusion 360 to model and CAM.. I've access to a shopbot desktop and have used it a few times already.. but I'm not an expert...
I've left over hardwood interlocking panels from when I did the floor...

What I've in mind right now is:
1) Get the right measurements, the above is just an approximation... and transfer that into a model. Any ideas for how to accurately transfer the curve?
2) I interlock enough panels to form a continuous panel big enough to cover the curve maybe staple them into a flat MDF or something
3) Cut both treads from the same panel because if it's big enough for the lower step, I should have enough?
4) Figure out what to do with the nose? maybe get a couple of these: http://ljsmith.com/assets/files/pdf/BendingLandingTread.pdf if you think it's a good idea..

ideas?
 
This is WOOD: Machining not Needed.

ProfH

With all due respect, you are approaching this job from the wrong perspective. This is WOOD, correct? No machining is needed. The tolerances just aren't that fine! +/- 0.125 is overkill.

The shape is not all that unusual. Older homes often have the bottom two steps in that configuration. This is especially so if the newel post at the base of the balustrade is round. (My own childhood home had a square newel post, so only the very bottom step had the rounded end.)

You need to set up a wood router with a radius attachment. The name of the profile bit is a "bullnose cutter" or "stair nose cutter".

You have the freedom to use sandpaper on a form-fitting block for the final smoothing.

Keep in mind that craftsmen were building this sort of steps back in Colonial days using 100% hand tools. Back then, they had "molding planes", including molding planes with curved soles. Look at a wooden carriage made with raised panels surrounded by curved stiles and rails.

John Ruth
"A carpenter works to the nearest eighth, a cabinetmaker works to the nearest sixteenth, and a boatbuilder works to the nearest boat."
 
I use Fusion 360 to model and CAM.. I've access to a shopbot desktop and have used it a few times already.. but I'm not an expert...

Worth considering - since you did post on a forum with PRACTICAL in its name

The person that did the original certainly had none of what you mention. I expect he could hand sketch a suitable curve and saw it out several weeks ahead of you laboring to master a cad program. If its rounded over, a rasp and hand sanding did an entirely acceptable job. After all, its something to WALK ON
 
Just to answer your question, use a tape measure to get an approximate radius for the ends. Draw it at 1:1 scale, print it at 1:1 scale, then compare the 'paper doll' cut out from the paper to your sample. Adjust radius and try again.
 
When I get back to computer I'll post some pics.
The treads are all you're doing?
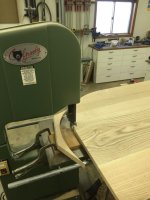
I cut them on a bandsaw by setting the correct radius on wooden jig and pivoting as I cut.
 

This is great advice. You don't have a design for stair treads yet, you have a 3D sketch. You need to flesh out the details of the construction before you proceed. Your shape is not difficult to deal with in stairbuilding terms, but the devil is in the details.
 
First that "Bending Landing Thread" you are looking at is specified for a 48" radius. I can't be sure, but I suspect if your stairs are not for giants that your radius will be more like 8 or 12 inches. In other words, it ain't gonna work.

I don't know how these things are usually made, but I would cut the main part of the thread with the proper radius on that corner first, leaving an allowance for the edging. Sand it down to a good, smooth curve, ready for gluing. Then I would use thin strips of the edging material, perhaps 1/8" thick to build up the edge to the needed thickness. I would soak them in hot water to soften them, form them around the curve and let them dry. Then glue them in place. Finally I would use my router to form the shape I wanted on those glued pieces. This would take some time, but would produce a nice looking edge.

You might check on a wood working forum about the gluing. There may be some adhesives that can be applied to the wet wood to save the drying time.
 
I would look into steam bending a edge piece or that lamination of multiple thin strips looks good. On my two stairs I made the tread solid wood stained to match. The vertical part was laminate trapped behind the tread glued onto the back vertical part. My edges are covered by a piece of wood angle. So there is a lip on the side. I would be surprised if you ca n not buy premade treads with one end curved. Of course that curve wood show end grain. and probably not too many species of wood available.
It might look good to make these two steps a totally different wood then the main floor. even stainless steel or bronze might look good. Marble or granite as well.
Bill D

ON Edit search for "starting steps"

Starting steps for stairway, Curved Starting Steps | Stair Supplies
 
For a one off job it is probably easier to make it using more wood then veneer the visible part. I would carve it from a railroad tie size piece of wood then nail/glue some good wood where it will show.
Bill D
 
For a one off job it is probably easier to make it using more wood then veneer the visible part. I would carve it from a railroad tie size piece of wood then nail/glue some good wood where it will show.
Bill D

I think that would be way too likely to check and split over time. The kerf bent is probably the most stable, especially if you glue it to a shaped block behind. Of course, you could always glue a veneer stack, but that would take a form, lots of very heavy clamps, and at least one failure to get the springback correct.
 
This was for a landing by the stairs in oak:
Kerf cut on backside, wetted and steam ironed the as I clamped it to fixture:
IMG_2458.jpg


Cutting the radius on the tread:
IMG_2518.jpg


Installed base:

IMG_2535.jpg
 
I would not use the left over panels. Get two boards longer than needed to do the straight length, plus the radius. Kerf the radius portion leaving 3/32"
The kerfs should be about 1/4" wide and evenly spaced. The depth and the spacing must be exact as possible. Space between kerfs no more than 1/8". Approximate the amount needed to be kerfed and add 1-1/2" to insure there is enough kerfed for the bend. Rout the dado into the bottom of the tread about 1/2" deep and 1/4" wider than the riser. . Fill bathtub with hot water and add one bottle of water softener like Downy.Place the kerfed portion into the water and leave it there til the water becomes just warm. Remove the board and install it into the routed tread. Don't worry if the board is long at either end. Let it dry. Coat the back of the kerfed area with yellow glue and apply a veneer to it. The veneer can be a piece similar to the wood used for the riser. Usually any cheap veneer can be used but be aware that because the kerf is deep the show part may be translucent.
Without a backing you may be able to see the kerf from the front.
After the veneer is dry you can remove the riser and put glue in the dado. install the riser , you may need an extra pair of hands for this because of spring back on the curve. Pry the riser forward into the dado and add 1/4" shims between the dado and the back of riser. This works for the straight portion, various thicknesses may be needed for the curve.
Trim excess from each end after the glue is dry. Use a straight edge clamped to the riser height and cut with a circular saw or a router .
Now you can install the unit.
mike
 
Routers. Hand tools. Shaper, maybe. I usually laminate the riser bends, it is much stronger. But as mentioned, it takes a pre-made form. Kerf bending works and is traditional in that style old work. If I kerf bend, I usually add another veneer over it all for extra strength. Kerf bending a riser takes a form as well, but it usually becomes part of the installation. IOW, a perfect inside shape plywood at the top and at the bottom of the bend to shape and control it. Hold the 2 pieces of ply apart with blocking or plywood framing. Basically you build a plywood box with rounded end(s) that is hollow or cut out in the back.

smt_chiselmiter2.jpg


The return nosings (not set yet) are T & G'd on. The skirt is mitered to the risers. The skirt miter is hand cut with a slick as the stair progresses up. Guide block is used to partially guide the slick.

smt_chiselmiter3.jpg


smt_chiselmiter4.jpg


smt_chiselmiter1.jpg


Risers for large work are usually bent-laminated for strength. The treads are shaped with forms on a shaper after pre-bandsawing.

smt_chisel_miter5.jpg


smt
 
You have two issues here that you are calling one thing.
The TREAD needs to be cut from solid wood. It will show endgrain on the curved end.
The RISER is the problem with many possible answers.
Bill D
 
You have two issues here that you are calling one thing.
The TREAD needs to be cut from solid wood. It will show endgrain on the curved end.
The RISER is the problem with many possible answers.
Bill D

You could laminate strips to the outside curve of the tread then shape the bullnose. I also had laminated mounlded shapes but that is trully a pain, you need two pieces of moulding and cut strips alternatively from both, for one lamination, alignment is iffy at best.

dee
;-D
 
Yeah, I agree. Likely easiest to laminate stock for the whole nosing, straight and curved; that will let you stagger the joints. After the base curve is cut on the tread, take a piece of stock with straight and rather bland and featureless grain (highly figured grain is just going to break) and cut a couple test strips to see what is the thickest strip you can get to bend around the curve, then slice up more than you need, keeping them in order. Laminate them in order, and when the molding is run, it will mostly look like solid wood.

Dennis


Back
Top