What's new
What's new

Loctite not holding--need better idea to sieze knob onto threaded stud

Alberic

Cast Iron
Joined
Jan 15, 2011
Location
SF Bay
Hi guys,

I have a problem. Actually, I have a knob. Which has become a problem.
It's a little tension clamping knob, 8-32 set screw backed into a custom 6061 ************************.
Class 2 ano, Class 3B threads, that check as in band with a plug guage. (rollformed, balex taps.)
Locked up with loctite 263 at assembly.

Or at least they should be. Lately we've been having issues with them breaking loose as users go to unclamp the knobs from their tight position. Failure is that the knob unscrews off the back of the setscrew rather than the whole thing unscrewing out of the clamp body.

History: we've made them for years, and for years, they've worked fine.
Then we had a batch of screws come in oiled with something that the normal red loctite *really* didn't like.
So we started washing the screws off in the parts washer, and switched to loctite 263 red, because if its oil tolerance.
So that way even if they weren't *perfectly* degreased, they were good enough.

Or maybe not. They do check as OK. We've run them up against a torque screwdriver to get some sense for how many inch pounds it takes to get the glue to fail, and it's regularly up north of 40+ in/lb. For a hand tightened knob, that's plenty. It's equivalent to existing old stock parts.

We figured out about the loctite not playing nice with the oil about 3-4 months ago, and started washing the screws at that point. So I *think* we've got the problem licked.
Except we keep getting reports of failures in the field. I think most of those are old stock that got shipped before we figured out about the oiled screws. But I'm not sure that *all* of them are. (There were probably 6 months of production shipped with the oiled screws before we figured out what was going on, so there are a lot of them out there to be causing problems.)

So, I'm looking for ideas of how to be damned sure the problem's dead. I have a swiss, and can machine the knobs any way I like, but we do these things by the thousands, so I'd prefer not to do anything that requires massive extra time, or hand assembly. We have enough of that as it is. Frankly, I'd like it if the loctite just worked dependably. (I'm going to call their engineering people Monday AM.)

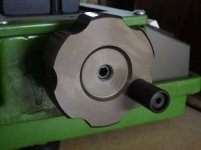
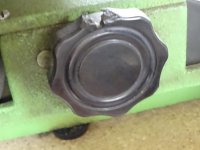
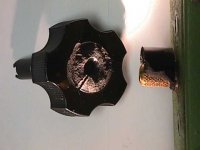
I'll attach a picture of the knobs to the end of this.
My only ideas for making *sure* it's dead are to rig a jig on the grinder, and grind a flatspot on the tail end of the screw.
Assemble with loctite as normal, then stick them into a press that has a female cone die in it, and coin the upper end of the spud on the rear of the knob to force it to deform into the flatspot. Which is one manual load/strike/unload cycle per part, nevermind loading the grinding jig, and doing the grinding. Not something I want to do if I have a choice. The setscrews are grade 8, so drilling them isn't much of an idea either.
My other idea is to smack the mouth of the threaded hole in the nut with a dull (rounded) cold chisel, to upset the mouth of the thread. So it's tight as you back the screw in. Except that (A) it'll make it hard to start the thread, and (B) the whole depth of the seated screw will have to roll past that point, so it'll deform back to a tight thread fit, rather than seizing up solid.

Anybody got any suggestions?

Thanks,
Brian
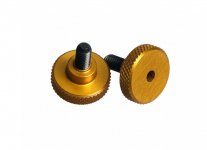
knobs.jpg
 
Well, I'd make the design such that the screw backs into a non-threaded reduced diameter (if not already done), and use LocTite primer on the screws before assembly. Other than that, you probably need to get a handle on how many "bad" screws are actually out there. (Easy to say;-)
 
You should be asking a Loctite Applications Engineer. Your situation is what they solve for a living.

My other thought was use primer, but that's a WAG.
 
Can you see if the glue fails at aluminium side or screw side?
Are the leftovers of glue stuck to one or another?

Are the threads in 6061 also anodized?

Specfab's idea of forcing the screw to unthreaded portion of hole sounds good. I'd start experimenting with hole size just slightly bigger than forming tap hole.
 
HI guys,

Thanks for the replies. The thread backs up into the tapered 'nose' of the tapped hole, where the tapered end of the tap cut a subsized thread. So it is jammed into the end. The inside's ano'd too.

I'm definitely going to call loctite Monday AM, and see what they can suggest.

But the more I think about it, the more I suspect it may be a case of excess loctite getting onto the main thread, and then seizing the knob into the clamp. Because the one common factor in the recent reports is that people broke the knobs loose while trying to open the clamp on a brand new saw, where they said the knob was jammed in unbelievably tight. And while our assembly guy is an enthusiastic young lad, I don't think even he's *that* revved up.

Thanks for the suggestions so far.
Regards,
Brian
 
Have you tried baking the assembled screw/knob for a few minutes to help cure the Loctite? I'd warm them to maybe 140 degrees F, that way there is no way that the Loctite will creep out of that joint and get farther up the assembly.
 
HI guys,

Thanks for the replies. The thread backs up into the tapered 'nose' of the tapped hole, where the tapered end of the tap cut a subsized thread. So it is jammed into the end. The inside's ano'd too.

I'm definitely going to call loctite Monday AM, and see what they can suggest.

But the more I think about it, the more I suspect it may be a case of excess loctite getting onto the main thread, and then seizing the knob into the clamp. Because the one common factor in the recent reports is that people broke the knobs loose while trying to open the clamp on a brand new saw, where they said the knob was jammed in unbelievably tight. And while our assembly guy is an enthusiastic young lad, I don't think even he's *that* revved up.

Thanks for the suggestions so far.
Regards,
Brian

process process process. I think you are looking in the right direction, you had a problem and changed several things to fix it. Any one of those things, or one that is not obvious could be causing a problem.
For instance, you added time by adding the cleaning step, perhaps the assembly guy altered the process because of this, causing a different problem
 
HI guys,

Thanks for the replies. The thread backs up into the tapered 'nose' of the tapped hole, where the tapered end of the tap cut a subsized thread. So it is jammed into the end. The inside's ano'd too.

I'm definitely going to call loctite Monday AM, and see what they can suggest.

But the more I think about it, the more I suspect it may be a case of excess loctite getting onto the main thread, and then seizing the knob into the clamp. Because the one common factor in the recent reports is that people broke the knobs loose while trying to open the clamp on a brand new saw, where they said the knob was jammed in unbelievably tight. And while our assembly guy is an enthusiastic young lad, I don't think even he's *that* revved up.

Thanks for the suggestions so far.
Regards,
Brian

Sounds like you are on the right track there. You could alter your assembly process by a) utilizing a dosing (metering) set up to give a precise amount to each screw, and b) give curing time to the loctite before final assembly (i.e. a pre-assembly of the knobs step). I am ASSuming right now the set-screws are loctite'd, put in the knob and the knob immediately assembled to the saw. So you assemble the knobs for tomorrows builds today and give them 24 hrs to cure before final assembly.

Shouldn't really have an effect on efficiency as the same amount of man-hours would be required for the step, but it would be a disruption for a few days as the new process is ironed out.
 
How much time elapses from screwing the stud into the knurled knob until that assembly is screwed into the saw? It sounds like the interval could be short and thus result in the squeeze-out you suggested. If your assembly lad puts together, say, a hundred knobs as a batch and then proceeds to screw those knobs into a batch of 100 the saws it could be that Loctite is still liquid in just a few of the knobs that were at the end of their assembly cycle. Maybe a simple solution like separating the knob assembly from subsequent assembly by an hour or two would guarantee that the Loctite would have set in all the knobs prior to subsequent assembly.

Good sleuthing on the sgueeze-out possibility. It sure sounds like a more plausible solution than simple knob joint failure given the extreme break-loose torque requirement reported by customers. It would be great if one of them could send back a failure with the stud left in situ. A little careful sawing, polishing, and a 10x magnifier might reveal Loctite in the threads of the saw---smoking gun revealed and candidate for making a wall plaque for your office!

Denis

Added: Looks like Tony and I were typing similar ideas simultaneously.
 
usually use a socket head cap screw and the bigger dia head has a straight knurl which when pressed in acts like keyways

For fixtures used in the shop and similar applications it is a quick and dirty solution.

I've made quite a few knobs in that fashion and they seem to work well enough. But:
1) you do have to be sure to leave the shoulder of the capscrew is just a little proud of the added knurled disc as the clamping action of the knob tends to draw the screw out.
2) the head of the screw shows when the assembly is removed and looks a bit improvised for a commercial product
3) the ratio of the inserted head height to diameter of the head is only about 1.5:1 or less so that it does not resist loading (a hit for instance) on the edge of the added disc and can lead to failure=unhappy customer.

Objections 1 and 3 above can be eliminated by drilling a stepped ole and pressing in the screw from the top of the added knob and that does leave the socket exposed for breaking the knob loose if needed. But, again, I don't care for the look of such a solution.

Denis
 
I have made similar knobs. My design was to tap clear through the knob. Then I installed the stud as you would expect, but put a short set screw in from the opposite end. With the short set screw flush with the knob, tighten the two screws against each other with two L-wrenches. No Loctite needed.

I had to make these knobs to replace two different type OEM knobs, both made of phenolic, that are usually broken when I buy a used machine. The oldest machines had aluminum knobs.

Larry

TDR Knob 1.JPGTDR Knob 4.jpgTDR Knob 5.jpgSRD 82B1030 crank.JPG
 
I presume you tighten the set screw into the knob using a hex key thru the hole in the knob? Maybe somebody hadn't been diligent when tightening the set screw?
 
Update from the next day:

A) 20x microscope inspection reveals loctite 263 creeping its way along the root of the thread, out into where it can make mischief.
The normal red (?262?) is a bit thicker, so it didn't creep down the thread. But it also can't deal with oil the way 263 can, so we fixed one problem, and caused the next. Joy.

B) conversation with very helpful woman at loctite tech support yields a few suggestions,
1) stay with 263, not the sticks, but put the loctite in the hole, not on the tail of the thread (assembly guy had changed procedure on me).
2) let them sit overnight before assembly. So build tomorrow's knobs today, and use yesterday's. Not a problem.
3) if necessary, organic solvents like acetone or isopropl will kill uncured loctite remnants on the exposed stud. (after the good section has cured.)
C) Ano in the hole is no problem, per loctite.

We'll try that, and see how it works out. I'm going to keep back a few test saws every so often, to test.

Thanks for all the help guys,
Brian
 
Last edited:
Interesting they claim anodizing does not affect adhesion and holding strength of crystal structure. When I worked for General Dynamic’s our testing was thought to have proved otherwise.

We always pre-coated all bare surfaces with alodine (Chem Coating) to prevent oxidation but tapped holes were plugged to prevent anodized coating of threaded surfaces.

Our argument was that during vibration and load testing we noted that the microscopic crystals in shear were more inclined to conform to the breakaway torques of the spec. sheets with a natural alodined surface than the with the hard few tenths of a anodized surface. This was thought to be because the when the first few crystals sheared they pierced and locked in to the softer surface stalling the propagation the shear fracture to a higher load level.

If their recommendations fixed your problem then I would stick with that. Most likely as you said a process assembly failure problem. Our usage was at a whole different level than yours as we were building components that were subject to huge shock and G forces.

However, if you continue to have problems down the road I would consider plugging as a test.

On a side note, if you have not already I would consider writing step by step process documents with pictures. A pain in the arse I know but it seems the time has come if an assembler has decided "his" way was better than "your" way. It avoids, most of the time, these kind of problems and if one does occure it is easier to track it dowm and come up with solution.

I use to think it was a waste of time until I got into assemblies with a dozen to hundereds of parts. They make life much easier.
 
Last edited:
That procedure sounds like a winner (letting it dry first) but I have used the short interference fit solution and it works well too. A couple tenths interference fit at the end of the male thread/entrance of the female thread even 1/16" long will do wonders at holding that stuff in tight, even without Loctite.
 
Hi guys,

I have a problem. Actually, I have a knob. Which has become a problem.
It's a little tension clamping knob, 8-32 set screw backed into a custom 6061 ************************.
Class 2 ano, Class 3B threads, that check as in band with a plug guage. (rollformed, balex taps.)
Locked up with loctite 263 at assembly.

Or at least they should be. Lately we've been having issues with them breaking loose as users go to unclamp the knobs from their tight position. Failure is that the knob unscrews off the back of the setscrew rather than the whole thing unscrewing out of the clamp body.

History: we've made them for years, and for years, they've worked fine.
Then we had a batch of screws come in oiled with something that the normal red loctite *really* didn't like.
So we started washing the screws off in the parts washer, and switched to loctite 263 red, because if its oil tolerance.
So that way even if they weren't *perfectly* degreased, they were good enough.

Or maybe not. They do check as OK. We've run them up against a torque screwdriver to get some sense for how many inch pounds it takes to get the glue to fail, and it's regularly up north of 40+ in/lb. For a hand tightened knob, that's plenty. It's equivalent to existing old stock parts.

We figured out about the loctite not playing nice with the oil about 3-4 months ago, and started washing the screws at that point. So I *think* we've got the problem licked.
Except we keep getting reports of failures in the field. I think most of those are old stock that got shipped before we figured out about the oiled screws. But I'm not sure that *all* of them are. (There were probably 6 months of production shipped with the oiled screws before we figured out what was going on, so there are a lot of them out there to be causing problems.)

So, I'm looking for ideas of how to be damned sure the problem's dead. I have a swiss, and can machine the knobs any way I like, but we do these things by the thousands, so I'd prefer not to do anything that requires massive extra time, or hand assembly. We have enough of that as it is. Frankly, I'd like it if the loctite just worked dependably. (I'm going to call their engineering people Monday AM.)

I'll attach a picture of the knobs to the end of this.
My only ideas for making *sure* it's dead are to rig a jig on the grinder, and grind a flatspot on the tail end of the screw.
Assemble with loctite as normal, then stick them into a press that has a female cone die in it, and coin the upper end of the spud on the rear of the knob to force it to deform into the flatspot. Which is one manual load/strike/unload cycle per part, nevermind loading the grinding jig, and doing the grinding. Not something I want to do if I have a choice. The setscrews are grade 8, so drilling them isn't much of an idea either.
My other idea is to smack the mouth of the threaded hole in the nut with a dull (rounded) cold chisel, to upset the mouth of the thread. So it's tight as you back the screw in. Except that (A) it'll make it hard to start the thread, and (B) the whole depth of the seated screw will have to roll past that point, so it'll deform back to a tight thread fit, rather than seizing up solid.

Anybody got any suggestions?

Thanks,
Brian
View attachment 212005

We have been very successful with final de-greasing by using a solution of 50% alcohol and water to completely de-grease parts. The alcohol should be at least 70% alcohol.
 
I've made a lot of stuff with setscrews or threaded rod permanently into threaded holes with Loctite.

I'm always fanatical about getting rid of all oil, I remove excess Loctite with 90% Isopropyl, and always allow at least a 12 hour cure. Never had a failure yet.
 
For good adhesion I clean and sandblast the thread or the shaft end. Improves the bonding with Loctite type adhesives as well as with epoxy, polyurethane, etc. At one time when I was doing a lot of this type of work, I was using a little blaster that was originally designed to sandblast spark plugs (old timers may still remember the days when spark plugs were cleaned, sandblasted, adjusted, tested and reused) by plugging the end of the thread in the device's little chamber and blasting it for a few seconds.


Back
Top