JamesYanco
Plastic
- Joined
- Nov 26, 2017
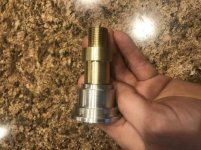
Morning everybody I am working on a small project and would like some thoughts and ideas on how best to get parts lined up. I hopefully uploaded an image of the part I am working on. The aluminum piece has external threads(3/4 by 16) and the bronze piece has internal threading. When I screw the 2 pieces together the bronze piece has an obvious slight deflection. My question is am I able to do anything to better get the 2 pieces aligned and save the items?
SouthBend 14 1/2 lathe(only had for about a month now)
I am not a machinist nor have I ever taken machining
Threading was done with taps and dies using the tailstock. I am by no means going to try using the lathe to thread, from what I have read that is above my present skill set.
Try not to beat me up to bad