What's new
What's new

Polishing acrylic to within 0.01 mm on the mill

ilovethevalley

Plastic
Joined
Jul 11, 2011
Location
Illinois, USA
Hi all,

I am cutting square channels into acrylic to create a microfluidic device. The channel depths vary from 0.800 mm to 0.200 mm. I solvent well this piece to a blank piece of acrylic to create the tops of the channels. Before the pieces are solvent welded together, I polish them (on a polishing wheel)to remove the tool marks from face milling. However, I have a tendency to round the corners and edges when polishing. This creates pieces that are less flat and do not bond completely toward the edge.

I would like to polish these while they are still clamped on the mill. I was thinking I could adhere fine sand paper to the bottom of a flat tool:
polishingtoolschematic4.png

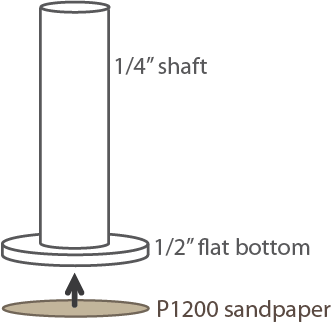
(Note: 1/4" is the largest shaft that can fit in my mill.)

I would use a low spindle speed (1000 RPM or 250 RPM if I use a reducing gear) and plenty of water and do a serpentine pass across the surface. My goal is to polish away the tool marks while still maintaining a flat surface. I'd like to have the flatness be within 0.10 mm (this is within the capabilities of my machine).

If the sand paper is stuck on even enough,the tool is flat enough and the machine's positional accuracy is good enough, do you think this will work?

I'm about a month away from actually trying this. But if anyone has tried this or has tips/concerns I'd like to hear about it. I post my results, good or bad.
 
IMO / IME stuck on paper discs and 0.01mm tolerances don't mix.

I'd look for an ultra fine cup grindstone, which once dressed and run with lots of coolant should hold the tol and need minimal redressing.

Just my 2 cents
 
Is it .10mm or .01mm? That makes a hell of a difference. What quantities are you looking at? Is this a CNC mill (serpentine path...)? If it's very low quantities then I'd just touch them up by hand with emery boards (not the ones for nails, the ones jewelers use; can be had from coarse as hell to fine as f*ck), otherwise for large quantities my first thought was diamond tooling. Works great in my experience on softer metals for a superb finish with no burrs but I'd have to ask an expert if it works on acrylic. That can be a bitchy material.
 
otherwise for large quantities my first thought was diamond tooling. Works great in my experience on softer metals for a superb finish with no burrs but I'd have to ask an expert if it works on acrylic. That can be a bitchy material.

We turn it in our diamond machines at times and it's a great turning material, though you have to use at least some coolant (water works) to discourage electrical discharging, which will eventually destroy the diamond. FWIW
 
Get a better faceing tool. It should be easy enough to get a finish that will dissapear upon solvent welding. If its steps caused by tramming errors its a even bigger issue and a diffrent cuter won't help. Look at some of exkennas or mari tools high feed alu cutters.
 
If it is a tramming error (not easy to fix in a cnc mill sometimes) using a smaller cutter may help. A plate milled with a 1/4" cutter that covers the whole surface will be flatter than one cut with a 2" cutter.

And you did not say how large these items are, but if they are fairly small what about using a lapping plate to flatten them ?? A flat metal plate loaded with abrasive ??
 
There is absolutely no reason to polish the surface before bonding, in fact, that works against getting good planarity for the solvent bond process. I would lean toward lapping the surface produced by a single-point flycutter, using 600 grit SiC wet/dry paper (wet) on a surface plate, and POSSIBLY making the parts oversize so you can bond larger joint areas with a bit of soak time for the cement, then machine the excess away.
 
If it is a tramming error (not easy to fix in a cnc mill sometimes) using a smaller cutter may help...

And you did not say how large these items are, but if they are fairly small what about using a lapping plate to flatten them ?? A flat metal plate loaded with abrasive ??

My mill is about 0.1 degrees out of tram in the XZ plane. I plan on fixing this before I would attempt this polishing-on-the-mill operation.

The parts are 35 mm x 75 mm rectangles (approx 8 mm deep).

How many of these are you looking to make?

I've made about two dozen so far and I'll be making many more.

There is absolutely no reason to polish the surface before bonding, in fact, that works against getting good planarity for the solvent bond process. I would lean toward lapping the surface produced by a single-point flycutter, using 600 grit SiC wet/dry paper (wet) on a surface plate, and POSSIBLY making the parts oversize so you can bond larger joint areas with a bit of soak time for the cement, then machine the excess away.

I originally agreed with your statement that polishing before solvent welding is not necessary. However, the tool marks leave a surface roughness of around 10 microns (as I measured with optical profilometry). When two 10 micron rough faces are in contact, the seperation between the two can be as great as 20 microns and this may not be enough to form a perfect bond. Also, I noticed that crazes eminating from tool marks were very prominent after solvent welding. Making the parts oversize is a good idea! I just began doing this several weeks ago and it certainly helps. I made the bottom (-Y) edge about 2 mm too long and then cut it off. However, the debonding (due to non-flatness on the width, i.e. -X and +X edges) is much larger (maybe 1 cm).


Welcome to the world of optics.
Lose the sandpaper.
Use loose abrasive(600grit) on hard lap, then polish on a hard pad.
Polish before turning final od... that wil get rid of the round over that always occurs.

SM

I'm machining this on a 3 axis CNC mill, but I think I may need to use a lapping machining to get the flatness and also ideally parallism of what I want (0.010 mm).


Thanks for your helpful replies. I'm beginning to think that the real problem is that the machined work piece is not flat enough to begin with prior to polishing. I believe that it is being deformed by my work holding method.

I rest a block of acrylic on two 1/8" wide parallels that are 1/2" high. They are spaced about 100 mm apart. I'm using two standard clamps with stepped blocks to hold them against the parallels. I may be tightening the clamps too much, causing the workpiece to bend.

I'm going to try using thicker material (1/2" vs 3/8"). Also, I think the deformation may be worsened by two slots I cut on the surface of the piece. I use an 1/8" ball nose endmill to cut an 1/8" semicircular channel in the Y direction (parallel to the parallels) at about 1/3 and 2/3 of the width of the piece. I think these allow the piece to bend even more.
 
Send the prints to me, attach a blank check, and I will provide you parts without any crazing or stress cracking at all, perfectly solvent bonded, and save you some work :D ;)

In all honesty, there are many learned techniques from many years of machining plastics that you may never be able to access as they're stored in brains of a small group of individuals spread across the world :eek:
 
According to your post you are polishing "to remove the tool marks from face milling". Why are we face milling? It seems to me your initial goal should be to make the channeled surface flat prior to making the channels. To do this you want to be lapping. The lapped surface should be suitable for direct welding to the cover.

I would think you could produce the part more accurately and much faster by making a die. Grind the pattern into a steel die. Warm the die to the deformation temperature of acrylic (150C I think) using a cartridge heater. Then use an arbor press to press the acrylic block onto the die and let it cool. If done right you should get a perfect impression.
 
(Follow up to previous post). Above I kind of just say, "Grind the pattern into a steel die." but this is a very tricky step. Once you have the die you are golden, but making this die, that is the hard part. There are various ways to do this, but probably the best for the type of die you need is to make what is called a "block dresser". To make the dresser make two similar blocks of bronze or mild steel of the width of your pattern and lap them flat. The length of the blocks should be narrow, perhaps a centimeter. Next, cut the positive pattern in one of the blocks, roughing with a mill, and then grinding to a finish each channel. Use gauge blocks to ensure the channels are perfect and exact. The depth and sides of the channel do not matter, obviously, only the perfection of the top bearing surface. Now impregnate diamond onto the dresser by evenly dusting the flat block (you can use an oil suspension if you want to be fussy about it), then rubbing the dressing block on its mate. This dresser can then be used to put your die form on a grinding wheel. Note that you need two such dressers, one for a roughing grind and a second for the finish grind. Finally you grind the die, and, voila you are in the micro-fluidized channel business big time.
 
According to your post you are polishing "to remove the tool marks from face milling". Why are we face milling? It seems to me your initial goal should be to make the channeled surface flat prior to making the channels. To do this you want to be lapping. The lapped surface should be suitable for direct welding to the cover.

I would think you could produce the part more accurately and much faster by making a die. Grind the pattern into a steel die. Warm the die to the deformation temperature of acrylic (150C I think) using a cartridge heater. Then use an arbor press to press the acrylic block onto the die and let it cool. If done right you should get a perfect impression.

(Follow up to previous post). Above I kind of just say, "Grind the pattern into a steel die." but this is a very tricky step. Once you have the die you are golden, but making this die, that is the hard part. There are various ways to do this, but probably the best for the type of die you need is to make what is called a "block dresser". To make the dresser make two similar blocks of bronze or mild steel of the width of your pattern and lap them flat. The length of the blocks should be narrow, perhaps a centimeter. Next, cut the positive pattern in one of the blocks, roughing with a mill, and then grinding to a finish each channel. Use gauge blocks to ensure the channels are perfect and exact. The depth and sides of the channel do not matter, obviously, only the perfection of the top bearing surface. Now impregnate diamond onto the dresser by evenly dusting the flat block (you can use an oil suspension if you want to be fussy about it), then rubbing the dressing block on its mate. This dresser can then be used to put your die form on a grinding wheel. Note that you need two such dressers, one for a roughing grind and a second for the finish grind. Finally you grind the die, and, voila you are in the micro-fluidized channel business big time.


You do that, Ill do them my way. Let's see who can make and ship 10 pcs first =) Oh, and cheaper. Oh, and if they want to decrease the channels from .015 to .010, you can regrind the die. But then, maybe the next order they want them back at .015 :eek: Going to make another die again, charge the customer tooling again? I just buy another endmill ;)
 
RoboDriller: I offered a method of solving the problem, not a service.

Obviously a die-based solution depends on what quantity you need to produce, nevertheless, for someone working regularly with plastics should, I think, learn to make forming dies, because ultimately that knowledge, experience and tooling will be useful in future projects.
 
Send the prints to me, attach a blank check, and I will provide you parts without any crazing or stress cracking at all, perfectly solvent bonded, and save you some work :D ;)

In all honesty, there are many learned techniques from many years of machining plastics that you may never be able to access as they're stored in brains of a small group of individuals spread across the world :eek:

Thanks for the offer, but fabricating this piece is only part of the process and I want to be in control of everything.

I agree, I've found very little information on machining plastics (a few web pages, some research articles and one book from 1967) and I'm sure there are many who have much exeperience locked in their heads, but I want to become one of those people. :)

Ultimately, I'd like to share this knoweldge in the form of a "Practical guide to machining plastics." How in depth or broad this will be, I'm not sure, but it seems like at this point any additional public knowledge on the subject would be useful to many.


According to your post you are polishing "to remove the tool marks from face milling". Why are we face milling? It seems to me your initial goal should be to make the channeled surface flat prior to making the channels. To do this you want to be lapping. The lapped surface should be suitable for direct welding to the cover.

I would think you could produce the part more accurately and much faster by making a die. Grind the pattern into a steel die. Warm the die to the deformation temperature of acrylic (150C I think) using a cartridge heater. Then use an arbor press to press the acrylic block onto the die and let it cool. If done right you should get a perfect impression.

The stock piece of acrylic is not very flat. It can vary by around 300 microns (0.012"). So I face mill it to make the surface flat with respect to the machine XY plane. This works well enough in the approximately square inch that my features are located in, but it varies more across the whole workpiece (~3 inches wide). I agree, lapping is the more professional way to go.

Also, we considered using a die and hot pressing the acrylic. However, as you said, making the die is difficult and the acrylic block will be severely deformed. It is essential that the block have precise dimensions (at least in the width and height). Also, the design of the channels changes from time to time (like a month or so) so making a die every time might not be the best for keeping our design flexible.

I am currently looking into lapping machines. Specifically, the Lapmaster 15, the Kemet 15 and the Engis 15" model. Does anyone have any experience with these or recommendations?
 
One idea, a little bit wacky, but more flexible than a die would be to use a broach. Grind the channel pattern into a blade that has parallel bearing rails on each side. Then you just draw the blade across the workpiece. Very fast, no lapping.

Of course, you would have to grind a new broach every time the design changed but that would probably be less work than lapping and hand milling the whole surface. Also, with the broach your channels will be more consistent than if they were milled.

I imagine if you are milling the channels you are probably getting little tiny particles of plastic contaminating the channels. This does not occur with a broach.


Back
Top