I've installed a few stretches of pallet Racks over the years but I'm sure some of you have developed techniques that would save me time when I install a 32' stretch of 16' high 42" deep Racks this weekend. Sometimes I have helpers but have only had near-injury accidents when using help, never had one of those scary accidents when doing it myself. Have already marked the uprights for where each beam goes. Tools I plan to use include Forklift with mancage, large plastic mallet, electric walkie-stacker, lifting straps, ladder, flashlight, and level. So if you've installed pallet Racks, what neat tricks did you develop that other people wouldn't always think of? Controlling the Forklift mast remotely with ropes and pulleys with an engine kill switch for safety has occurred to me each time I've had to do Racks but the "what ifs" have always overruled that so far.
How to install the app on iOS
Follow along with the video below to see how to install our site as a web app on your home screen.
Note: This feature may not be available in some browsers.
Largest Manufacturing Technology Community on the Web
Stay Connected:
You are using an out of date browser. It may not display this or other websites correctly.
You should upgrade or use an alternative browser.
You should upgrade or use an alternative browser.
Pallet Racks installation tips?
- Thread starter Cannonmn
- Start date
- Replies 17
- Views 5,914
tnmgcarbide
Diamond
- Joined
- Jul 6, 2004
- Location
- N. GA- 33.992N , -83.72W usa
4# drilling hammer .
Bill D
Diamond
- Joined
- Apr 1, 2004
- Location
- Modesto, CA USA
Hilti SDS+ hammer drill. Also make sure the safety bolts or clips are installed and engaged.
Bill D
Bill D
Thanks, sure the SDS for anchor holes. I've done that in buildings where floor holes are allowed, but in present rental location we have to get written permission from landlord who has to get same from owner, a long PITA process. I've safety-chained the tops of Racks to exposed steel beams under the roof before and that works fine and takes no more time, so does anyone see a problem with that? I think if you tested floor way vs. overhead chain-way, the latter would provide more resistance to the Racks being accidentally pulled or pushed over. Btw the Racks stand against a cinder block wall so they could only be pulled over, not pushed.
cvairwerks
Cast Iron
- Joined
- Apr 28, 2010
- Location
- Justin, Texas
If you are setting them where there is access from one side only, then set all the backside beams first. No reaching deep to hang a beam then.I usually set my lowest beam first and then set the highest beam I can reach comfortably, while standing on the floor. Do this for the entire length of the run, then come back and set the rest of the beams from the top down on that side. Come back and install the isle side from the top down in each bay. Install the decking last thing.
Chip Chester
Diamond
- Joined
- Dec 13, 2007
- Location
- Central Ohio USA
Don't do the remote forklift thing.
So three segments, right? Total of four uprights?
Snap layout lines on the floor so you know what 'straight' is.
Do consider building at least the back side all at once, on the ground (resting on the 'front' side), and bolting every beam in. (Or is this the stuff you bought recently that didn't have bolt holes?) Then lift just a little, block, and install two highest front beams on each. Use forklift to tip up the rest of the way, then align and chain off. Finish with remaining front beams, wire inserts, etc.
Or, build a level, floor it, then build another. That will get old quick, though.
If you bolt them in they probably become a lease hold improvement, and hence the owner's property when you leave...
Chip
All pallet racks are NOT equal by any means.
O.P. has not indicated which brand/style they are erecting.
Having only put up Ridg-u-rack (it's made nearby) I can sneek by
with just myself to put up 12' high uprights, lean it against a wall,
hook in a cross beam about 4' up, carefully balance it to go grab the second upright.
You can take out that temp 4' high cross beam when you get some more in the proper place.
Thanks, good ideas. These Racks have three flat-head studs on each beam-end, which fit into holes on front and back-sides of uprights. 5 uprights=4 bays. The holes in uprights look like a pair of commas facing each oother. They are called "teardrop shape" in the rack industry.
Last edited:
When I have to do it without a helper, I place the two uprights close to finished position and temporarily install two beams at about 15" high (one end resting on a five gallon bucket) to stabilize the uprights. My next beam set is usually at ≈7-8 ft. so not hard to work off a 6ft. ladder. I complete that deck including temporary lumber/plywood for working platform. Load next level components onto forklift and position for easy access from existing deck. Climb back up to existing deck and build next higher deck. Repeat process for third deck, etc. Easy enough to place/shim assembled bay into final alignment/plumb.
If only I had a scissor lift.
If only I had a scissor lift.
And if you have lots of extra time and love playing with nuts and bolts, you can buy these un-assembled uprights and have lots of fun!
Storage Platforms,Pallet Rack Installation, Storage Shelving and Racks,Used Discount Storage Racks - YouTube
Watching that makes me really appreciate my welded uprights!
Storage Platforms,Pallet Rack Installation, Storage Shelving and Racks,Used Discount Storage Racks - YouTube
Watching that makes me really appreciate my welded uprights!
Ahhh Teardrop racking....helped a buddy put up a bit of it.Thanks, good ideas. These Racks have three flat-head studs on each beam-end, which fit into holes on front and back-sides of uprights. 5 uprights=4 bays. The holes in uprights look like a pair of commas facing each oother. They are called "teardrop shape" in the rack industry.
Do not follow my instructions up top. Rid-u-rack is a bit more stiff
in the connection (and safe from coming out), and you can hang a single cross beam on one side only, while you go to the other end to put that end on,
(so you can do them solo) teardrop, not so much.
Chip Chester
Diamond
- Joined
- Dec 13, 2007
- Location
- Central Ohio USA
The key with helpers on jobs like this is to have only one. Less temptation to have them off doing one thing while you're doing something else. The one is always with you, and you're always directly supervising. Also known as 'tools with legs'. As in: get me this, bring me that, etc. while you're up on the ladder. And think twice about having them drive the forklift while you're in the manbox. Maybe have them carry around a cup of water out on the raised fork without spilling it before you go up there...
Chip
Chip
surplusjohn
Diamond
- Joined
- Apr 11, 2002
- Location
- Syracuse, NY USA
take a couple of 2 x 4s and screw on cross blocks at each height position, then you can rest your beam on it while inserting in other end.
SteveBausch
Stainless
- Joined
- Jan 11, 2010
- Location
- Indianapolis
For future reference:
Don't predill any floor anchors , don't trust your tape measure or your ability to add fractions in your head, or the consistency of the uprights.
Have the cross beams installed, perhaps temporarily, down at the floor, and at the highest point, before drilling for each floor anchor.
Math might be wrong, uprights may be inconsistent with hole placement, floor aggregate may move the drll/hole, etc.
Then, placing the beams will require a heavy hammer and a come a long or two...
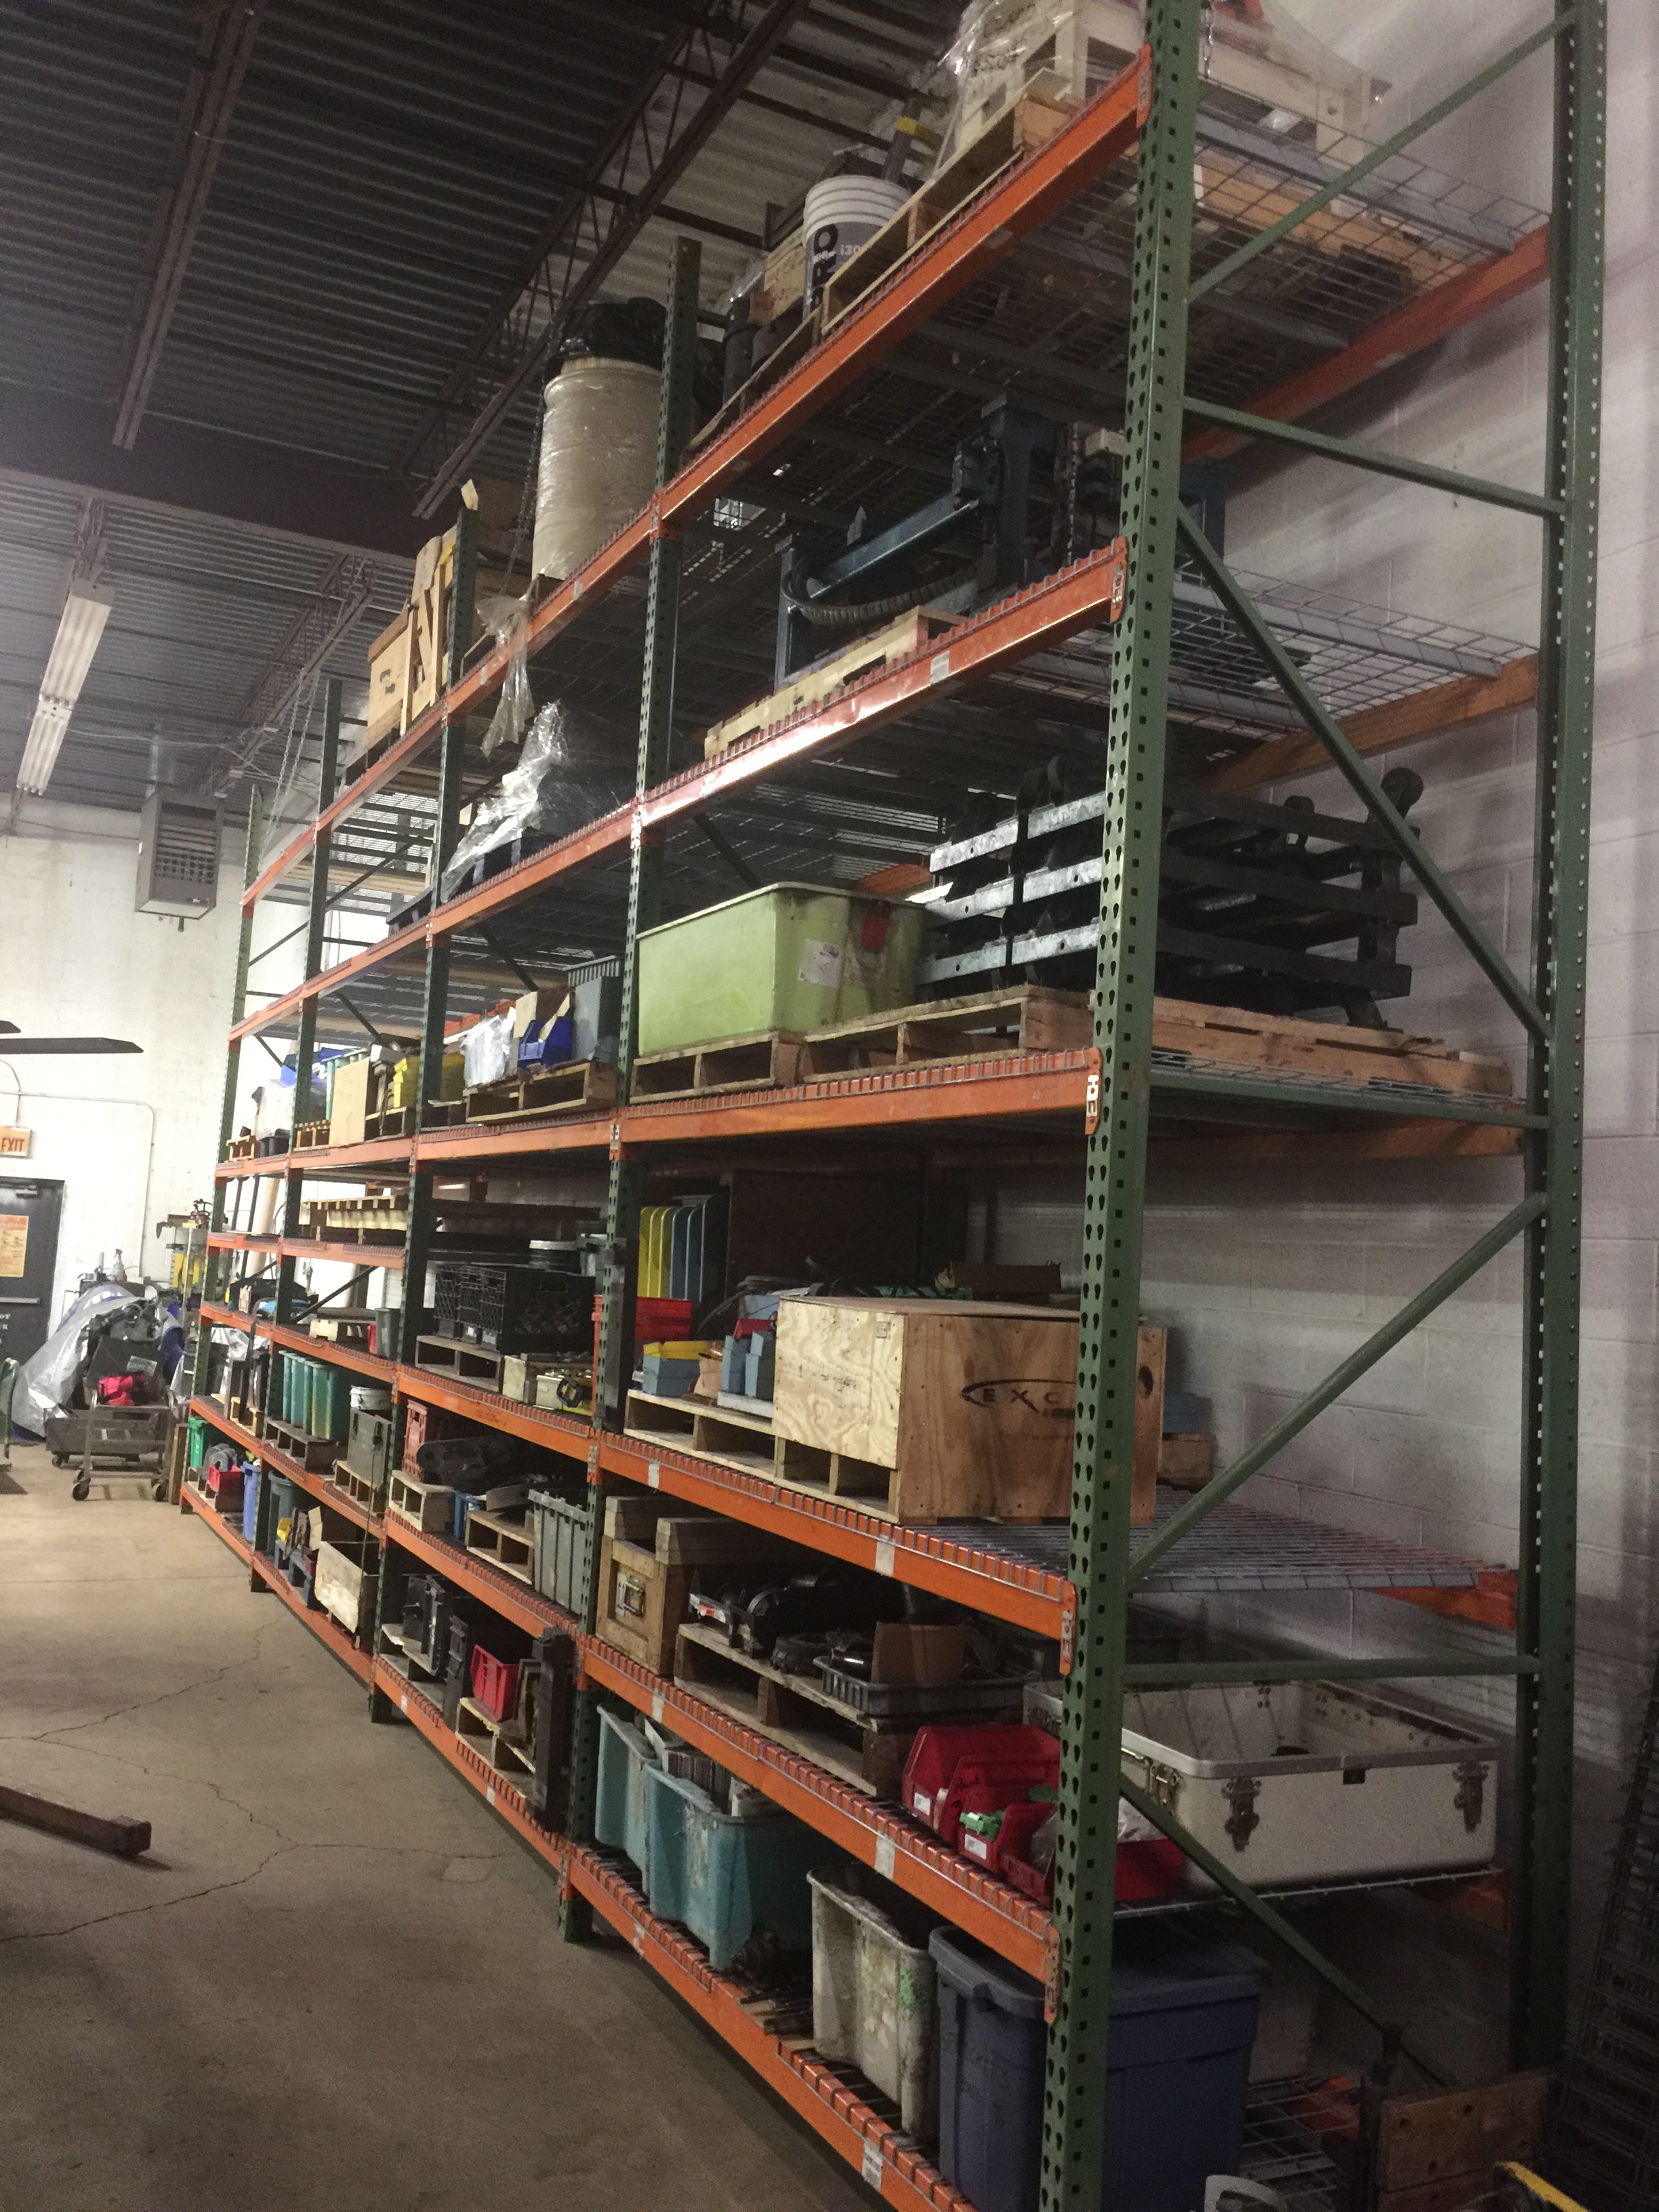
Thanks, good suggestions, I was able to use some and except for anchoring and screens, is done. I couldn't lay the 16' uprights down for that method because a steel column was in the way, but the "install all rear beams first" worked fine. Last night when I was sweating over how to install the top beams at the 16' level, I remembered a mistake I made once before and started up the Forklift to see how high it'd reach and found that it'd reach the 12' beams plus a little more, but that was it (yes Duh! On me for not having memorized my max fork height.). I started installing beams the laborious one-end-at-a-time way, using a C-clamp to support the free end while working opposite end. However later I borrowed the Cotterman rolling ladder shown and was able to stand holding the center of the beam and get both ends seated in quick succession most of the time. Sometimes the studs just won't go into those teardrop holes, so I'd disengage and get the opposite end seated first, worked every time. The little spring safety clips are valuable during install because when you hear that little snap-sound of the locking stud or ears hitting home, you instantly know you're done with that one, no point in hammering, nothing can move any further. The Cotterman ladder let me install all the beams without the forklift or anything else. For the top beam where I had to lean back a little to reach up, I Jerry-rigged a safety strap so I couldn't fall backwards as could happen when using both hands on the beam while pushing and pulling to seat both ends. All it was was a 6' lifting strap and a large shackle, with another shackle holding the strap onto my belt so the lifting strap couldn't drop down. 3" depth beams in foreground are for light pallets and 4" beams on right are for heavier pallets. The uprights are 42" deep and the screens are the type that are "folded over" to fit tightly over front and back beams, and have a few front-to-back half-pipes for stiffness.

Last edited:

Now they are chained to the roof joist, and about 80% filled, by volume. As soon as we start using the stuff on them, it will look like the rest of our Racks, like there was an earthquake. When we get the stuff organized better we'll hang barcode plaques so we can find things once I forget where I put what. I looked up the weight loading capacity of the beams and the 14 Ga., 3 x 3" uprights and we're way under the rated loading, which as you probably know decreases with increasing vertical spacing of the beams.
Last edited:
Similar threads
- Replies
- 54
- Views
- 5K
- Replies
- 16
- Views
- 3K