What's new
What's new

Shop-made tool score & how to grind V-blocks

Conrad Hoffman

Diamond
Joined
May 10, 2009
Location
Canandaigua, NY, USA
Picked up some things at a garage sale and realized that all but the little Starrett V-block on the far right were shop-made. Maybe a school project, maybe apprentice training, maybe just slow in the shop that week, but it always makes me happy to see people still making their own tools. Yes, it only makes sense if your time is worth a nickel an hour, but what can I say.

Now, I want to clean up the large V-blocks, as they were never ground. I've never ground a V-block, but it seems the main trick is holding them at a 45 degree angle. I don't have a sine plate, so am limited to a vise. Just wondered if there were some tricks to getting them as perfect and matched as possible.
 

Attachments

  • garage_sale_score.jpg
    garage_sale_score.jpg
    93.7 KB · Views: 826
Provided both V blocks in a pair are ground to the same angle and height, it doesn't really matter what the exact angle is. A round piece of work will rest parallel in then whatever its diameter (if it fits).
 
Hi Conrad:
You have a couple of problems to overcome to make these as accurate as possible.
Since you don't have an accurate sine plate to help you , here's how I would go about it.

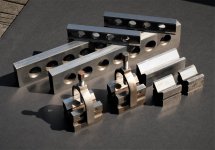
First I'd grind the ends of both blocks flat and parallel so I can clamp them accurately in the vise.
Next I'd rough grind the sides, top and bottom leaving some stock for later.
Third, I'd tip them up in the vise on 45 degrees pinching them on the ground ends and tramming them in using an indicator and the "rise over run" method of determining when they're accurately tilted.

Next I'd grind the vees, rough sidewheeling the vertical flank and finish conventional grinding the horizontal flank but plunging down at the beginning of the traverse and then traversing away from the junction of the vee to eliminate wheel wear on the flat surface near the root of the vee.

Without removing the part from the vise I'd flip the vise on its side and finish grind the second side of the vee with the bottom of the wheel using the same plunge and traverse method.
I'd pay no attention to how well it was centered at this point; that can come later.

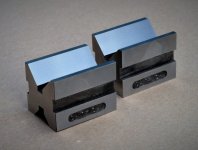
Once the vee surfaces are done, I'd drop in a gauge pin and clock over both ends on a surface plate, then grind the bottom perfectly parallel to the vee, then grind the top parallel to the bottom.

To check how close I got the angle, the best way I've found is to make a 45 x 45 x 90 prism out of a scrap piece, grind the two 90 degree legs accurately square then drop it into the vee and surface grind the hypotenuse.
Flip it around and clock it on the surface plate; the deviation across the hypotenuse will of course be twice the error of the angle.
Correct that by lapping or grinding and then deal with the sides.

Clock in a bar clamped in the vee with the block laying down sideways then set it parallel and kiss the side face.
Flip the block and grind the second side parallel, then measure the amount that needs to come off the high side to get the vee centered in the block and grind that away.
Last check and re-grind the ends orthogonal to the axis of the vees.
Check everything for squareness and parallelism then correct as needed by lapping.

That's it; simple really but a lot of quite fussy work if you want them really accurate, so expect to spend some quality time with them.

Or you can use them for rough stuff as others have suggested, and go to someone like Suburban Tool and get some proper blocks...pricey but still cheaper than rolling your own unless you're willing to work cheap!!:D
When you do, get the kind with the clamps that are fastened from the top, not those stupid Starrett style that don't let you flip the blocks sideways.
(Sorry, pet peeve of mine!!)

Cheers

Marcus
Implant Mechanix • Design & Innovation > HOME
www.vancouverwireedm.com
 
Makes sense Marcus. It all comes down to order of operations and how accurately one can do it. That video was good, but I can dust a surface without significant wheel wear and the blocks have a bottom groove, so no need to dress a wheel at 45 degrees if I can hold them in the correct alignment. I can see it if producing V-blocks for a living, but tuning these up is just education and entertainment. BTW, the blocks are hardened, but only milling machine accurate, so they just cry out for having the job finished. Thanks!
 
I have a set of V magnetic transfer blocks that are pretty close.. Best part of grinding V's is that as long as both sides are the same, square and parallel, you have some room to play to get things perfect. One tip... Try to keep the relief groove in the center as narrow as possible. Make grinding tiny pins possible.
 
I would stay away from sidewheeling, and grind both flanks of the V using the face of the wheel.

Sent from my XT1053 using Tapatalk
 
No need or desire to grind on the side of the wheel. Yeah, if I had a medium size magnetic transfer V, this would be real easy. Didn't think of that. I should ask my local friends and see if maybe I can borrow one.

BTW, the one commercial block in the bunch was a Starrett 271. Why in the world do they have a big radius at the bottom of the large V?
 
BTW, the one commercial block in the bunch was a Starrett 271. Why in the world do they have a big radius at the bottom of the large V?

So they could sell a smaller Vee block set as well as larger ones, of course.

"Selling" after all, is wot Starrett DO. Not USING.

:D

FWIW-not-much-department.. I'd not grind these blocks you have AT ALL.

"Vet" them and mark their foibles, rather. Use as-is for whatever they are already good enough for. Or not.

Cheaper by far to go and get a better set. If even you need such and do not already HAVE.

They don't eat THAT much storage space, Vee blocks, and "many" are a better thing to have handy than "few", regardless.
 
Ha, you have no appreciation of the "If it ain't broke, you haven't screwed with it enough." mindset. At work we buy V-blocks and complain if a 2" pin has a rise/fall of a couple microns. It's interesting to read manufacturer's specs. A really sub-micron metrology grade V-block isn't a common thing. I don't need quite that level of performance, but I still want it. I have no time and no money, but a lot less of the latter. Unless I run out of the former, then the latter won't matter.
 
I like to make a block dead square. Dress the 45* on my wheel. grind Vs off the back rail to almost desired size of V. flipping part to rail to maintain center. Then set in a true V block and tickle last true-up. The dead on 45* angle in important because often a square part is held in a v block with using the hold down clamp or high touch block in on the go side or holding with a C or parallel clamp..

Down feed grinding part solid on the chuck is often the best way to grind for taking stock then the set-up for tickle finish.

Good to hold all aspects of a finish V block to .0002 or better..near zero is best perhaps 6 to 8 millionths..
and then use the finish v block for close work only. I like to Gun Blue my finish v blocks so they are not used for rough work.

The dressed wheel and even step grinding to a grease marker for having a wide wheel should get you .0005 (even .0002 on a good day) the same and dead center with turning both on the rail for final skim..

The true 45* wheel dress can be checked with cross and down feed to an indicator feed to the numbers of length and height. Yes having one true square part in the shop one can eyeball test to find true fit to .0001.

Lay a true V block to its side and C-clamp in a part is a good way to square the 5th side of square and rectangular parts.
 
Well, here's what I did. First, borrowed some magnetic transfer v-blocks from a friend. They were well used, so I stoned as necessary, then put in a known good Starrett v-block. Indicated it for each face of the transfer blocks and chose the best one. Did the flat work on mine, side by side, then each v-face in turn on the magnetic block, changing nothing for the final dusting. I was a bit dubious about not doing them in the same pass, but they came out within 2 tenths and flipping them insured the V is dead center. Photo has my big fat thumb print and I should probably stone the edges. The original maker stamped them "CATFISH".
 

Attachments

  • v_blocks_sm.jpg
    v_blocks_sm.jpg
    72.5 KB · Views: 292


Back
Top