What's new
What's new

Square Reamer

billzweig

Stainless
Joined
Jun 4, 2015
Location
BC
This is from "Modern Shop Practice", by Howard Monroe Raymond. 1916.

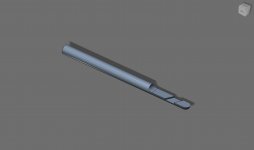
"Reamers used for finishing a long hole that must be very smooth, are often made of the form shown in Fig. 74. This reamer is drawn through the hole by means of the shank B, the cutting portion being at A. It should cut but a very small amount at each passage through the hole. A piece of hardwood is placed on one side of the reamer, as shown at C. After the reamer has passed once through the hole, a piece of tissue paper is placed between the reamer and the chip, and another cut is taken, this being repeated each time the reamer passes through. Several passages of the reamer and repeated blocking between the chip and reamer, result in a beautifully finished hole of the desired size."


JST have mentioned this a few years ago, but I am wondering if anybody have actually used this process. I need to accurately enlarge (by under 0.1mm, .004") the bore of a heavy wall steel tubes and this could be a good way of doing it. The tubes are about 11mm (0.43") ID and 500mm (20") long. The original bore is quite accurate, as measured with an air gauge.
I'll have no difficulty making a reamer like this in steel or carbide.

Square-Reamer-for-Finishing-Long-Hole.jpg
 
To be honest, I'm not at all sure what that illustration is supposed to be showing, as it doesn't look like that tool and process would uniformly enlarge a bore.

For your needs, either a push or pull conventional broach, or honing is what I'd go for. If the tubes are short, boring (with care), if long reaming might work.
 
Not sure about expanding the diameter of a circular bore through a long hole with this technique- but the concept of drawing a cutting tool down the length of a bore and then adding a chip of wood backed by multiple pieces of paper (to increase the depth of cut with each successive pass) is exactly how early rifling was accomplished IIRC.
 
This is from "Modern Shop Practice", by Howard Monroe Raymond. 1916.

"Reamers used for finishing a long hole that must be very smooth, are often made of the form shown in Fig. 74. This reamer is drawn through the hole by means of the shank B, the cutting portion being at A. It should cut but a very small amount at each passage through the hole. A piece of hardwood is placed on one side of the reamer, as shown at C. After the reamer has passed once through the hole, a piece of tissue paper is placed between the reamer and the chip, and another cut is taken, this being repeated each time the reamer passes through. Several passages of the reamer and repeated blocking between the chip and reamer, result in a beautifully finished hole of the desired size."


JST have mentioned this a few years ago, but I am wondering if anybody have actually used this process. I need to accurately enlarge (by under 0.1mm, .004") the bore of a heavy wall steel tubes and this could be a good way of doing it. The tubes are about 11mm (0.43") ID and 500mm (20") long. The original bore is quite accurate, as measured with an air gauge.
I'll have no difficulty making a reamer like this in steel or carbide.

View attachment 209687

same concept here....

Spare Parts #3 - Making A Simple Reamer From Blued Pivot Steel - YouTube

dee
;-D
 
Be wary on the first pass with such a tool, as it's very prone to lobing, which may be difficult to remove in subsequent passes. Once you insert the wedge, this tendency is drastically reduced as it's become essentially a asymmetric two-flute tool with a contact pad. Do not use a round piece of wood like a dowel. You want maximum surface area in contact with both the reamer and the work for best stability.
 
The "long hole that must be very smooth" sounds a lot like a gun barrel.

For what it may be worth, I recall reading a book about 60 years ago on the early 19th century gunmaker E. Remington. After forging and hammer welding and straightening the rough barrel, he used square reamers to get a smooth bore, first using a short reamer and then a long one. I think the long reamer was twisted. I do not recall the wood and paper trick, but it may have been mentioned. Once the bore was smooth, he rifled it.

That welded wrought iron barrel construction was eventually replaced by using solid "cast steel" (crucible steel) bars once steel making got industrialized. Remington made steel barrels and sold them to other gunmakers and urged the US Government to adopt steel barrels for military arms. I had a mid-19th century percussion target rifle made by E. W. Cook of Lockport, NY that had a barrel stamped, "Remington Cast Steel." Solid bar barrels required the invention of gun drills, but the square reamers may still have been used.

Larry
 
The way that is used sounds a lot like the description of what used to be known as an "armorer's reamer". AFAIK those were a round piece of wood close to bore size with a slot for a rectangular blade. Paper shims were added after each pass to increase the cutting diameter.
 
The process, as I understand it, is rather akin to scraping, rather than reaming. As such, it would be a long job to take out 0.004" that way. The "edges" are not like a normal reamer, instead they are not relieved much oif at all, and rely on a roughly 90 deg angle to scrape out material as they are rotated and drawn through.

I have not yet had any reason to use the method, but it has promise for taking out SMALL amounts of material with a low tool cost. The actual cost per hole might not be low.

For 4 thou, I'd suspect a piloted expanding reamer, the type with the screw down the middle, might be better. Possibly followed by a square reamer if you want to be "old school".

Why would a piloted reamer followed by machine honing not work? That seems far more "modern" and productive. The reamer might not be needed.
 

This form of a reamer shown in the video works little differently. I am using similar reamers and D-bits, in fact the single bevel works better than the triangular shown in the video, but none allow increasing the bore diameter and do not work that well in a deep hole. I know I can do the job using a different tool, but what I like about the square reamer idea - provided it works as described:

1. Is easy to make and dimensions are not critical
2. Allows to increase the bore in small steps
3. Provides a good clearance for the chips and/or coolant

I am tempted to make the reamer and to try it.

D-bits.jpg
 
This form of a reamer shown in the video works little differently. I am using similar reamers and D-bits, in fact the single bevel works better than the triangular shown in the video, but none allow increasing the bore diameter and do not work that well in a deep hole. I know I can do the job using a different tool, but what I like about the square reamer idea - provided it works as described:

1. Is easy to make and dimensions are not critical
2. Allows to increase the bore in small steps
3. Provides a good clearance for the chips and/or coolant

I am tempted to make the reamer and to try it.

View attachment 209703

I have made some D bits to drill 1/8" deep holes they looked more like your large ones except i filed a relief behind the nose and the cutting edge to collect some of the chips. Don't have a picture handy, but here is a rough model, but you get the picture...

Image 10-9-17 at 10.34 PM.jpg

dee
;-D
 
I agree that the action is more like scraping. The problem is that it is an odd dimension bore and I would need a custom reamer. It is one of those odd jobs that I agreed to do for a friend and there are only three or four tubes.


The process, as I understand it, is rather akin to scraping, rather than reaming. As such, it would be a long job to take out 0.004" that way. The "edges" are not like a normal reamer, instead they are not relieved much oif at all, and rely on a roughly 90 deg angle to scrape out material as they are rotated and drawn through.

I have not yet had any reason to use the method, but it has promise for taking out SMALL amounts of material with a low tool cost. The actual cost per hole might not be low.

For 4 thou, I'd suspect a piloted expanding reamer, the type with the screw down the middle, might be better. Possibly followed by a square reamer if you want to be "old school".

Why would a piloted reamer followed by machine honing not work? That seems far more "modern" and productive. The reamer might not be needed.
 
I have made some D bits to drill 1/8" deep holes they looked more like your large ones except i filed a relief behind the nose and the cutting edge to collect some of the chips. Don't have a picture handy, but here is a rough model, but you get the picture...

View attachment 209704

dee
;-D

Thank you, an interesting idea.
 
Thank you, an interesting idea.

got it from a wooden flute making article, of course i was not making a flute but a wooden tone arm for a turntable. needed to drill a 10" deep 1/8" dia hole for the wires. Tons of pecking involved :crazy: completely retracting the bit every 1/4" of progress. :leaving:

But these bits drill straight not like twist bits.

dee
;-D
 
I would think a standard straight or helical flute reamer would be a lot better than a shop made tool for this. Either would be a lot more resistant to creating lobes than that four flute, shop made tool. You can put that wood block in one of the flutes to increase the cutting diameter and add paper or other shims under it for successive passes. Or just get a larger reamer: they do come in steps of 0.001" and even less around nominal values like 1/2", 3/4", etc.


Be wary on the first pass with such a tool, as it's very prone to lobing, which may be difficult to remove in subsequent passes. Once you insert the wedge, this tendency is drastically reduced as it's become essentially a asymmetric two-flute tool with a contact pad. Do not use a round piece of wood like a dowel. You want maximum surface area in contact with both the reamer and the work for best stability.
 
Let’s not forget that straightness will be better when pulling the tool instead of pushing it. First drill, then pull turn and pull ream, if possible
 
Thank you all for the interesting ideas and comments. I'll this time probably use a different approach than the square reamer, but I still will like to see how it works and - when I have the time - will try it on a piece of tube. I am always interested in old techniques and historical technology and many of the forgotten ideas provide unique solutions to tricky jobs.
 
This is from "Modern Shop Practice", by Howard Monroe Raymond. 1916.

"Reamers used for finishing a long hole that must be very smooth, are often made of the form shown in Fig. 74. This reamer is drawn through the hole by means of the shank B, the cutting portion being at A. It should cut but a very small amount at each passage through the hole. A piece of hardwood is placed on one side of the reamer, as shown at C. After the reamer has passed once through the hole, a piece of tissue paper is placed between the reamer and the chip, and another cut is taken, this being repeated each time the reamer passes through. Several passages of the reamer and repeated blocking between the chip and reamer, result in a beautifully finished hole of the desired size."


JST have mentioned this a few years ago, but I am wondering if anybody have actually used this process. I need to accurately enlarge (by under 0.1mm, .004") the bore of a heavy wall steel tubes and this could be a good way of doing it. The tubes are about 11mm (0.43") ID and 500mm (20") long. The original bore is quite accurate, as measured with an air gauge.
I'll have no difficulty making a reamer like this in steel or carbide.

View attachment 209687


..
before expanding abrasive laps a reamer with paper shims was common. rifle making the spiral groove a device that spiraled a cutter as it was pulled through rifle barrel was common and paper shims used to make groove deeper. Colonial Williamsburg video on making a flint lock rifle use similar thing


Back
Top