What's new
What's new

Welding Or Soldering Pot Metal

Scott R

Hot Rolled
Joined
Jul 8, 2005
Location
NE Ohio
Hey All
Can pot metal be tig welded or soldered.
My dad sent me an antique car part that the end with the threads are corroded. I can make a new end but the problem is how to attach it to the casting. This part will also have to be re chromed so I can't attach the repair with any kind of fastners.

Thanks
 
Sometimes, if you are lucky

It is possible to tig weld some types of pot metal but it is tricky. If the part is not replaceable I would suggest taking a mold of it before starting. The reason pot metal is used for injection molding parts is that is is so very fluid when melted. When you weld it, if you take too long and you build up too much heat in the part the whole thing can just go bloop and it is a puddle on your bench. If the broken part is thicker than the surrounding material it becomes extra tricky. Somethimes the stuff just won't weld. Good luck.
Todd
 
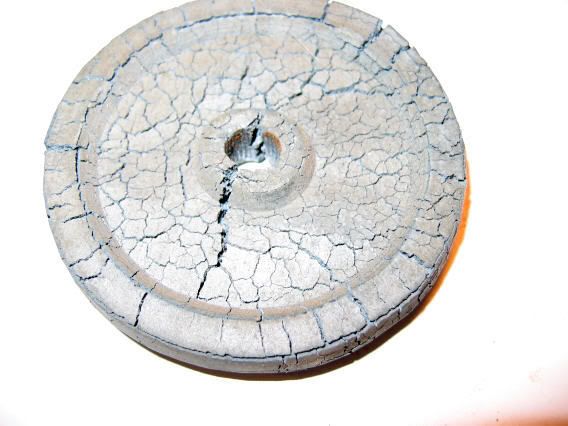
Most likely a zinc alloy, will have a melting point between 700 and 900 degrees F.
T.Jost is right about the puddle effect. Best to try avoid welding with heat if possible.
I suspect epoxies will have a time of it during any plating processes but I leave that to others that are more learned with the process.

Best solution is to simply replace the handle altogether. If a replacement cannot be had you may want to look for someone who offers Spin Casting services for zinc alloys. They may offer a one-off service for a replacement handle. Can't give a professional price but if I had to give an estimate, I would say the price would be around 200 bucks or so for 1 piece but then again I only make parts for models I build. On the face of it that seems high but then again it really not especially for a one-off part that can't be had anywhere else.

The cost of a mold will depend upon type of mold material, thickness of mold and prep time. Also the amount of alloy needed and labor to throw the part.

Nice thing is that a part such as this could be cast from start to finish in a couple or three hours if need be. Once the rubber mold is complete, a part can be cast every few minutes or so. The mold itself maybe good for as little as 5 to 10 large parts such as a door handle or as many as a hundred or better. Many factors vary the process but in the end the mold will lose detail and begin to burn out.

Oh by the way, any epoxy most likely will not hold together during the vulcanizing process of the mold material. But there are ways around that but will be more expense as another mold will be needed to a make a new master for the main mold.

Just a few ideas...

Rusty
 
Last edited:
It may also depend on the year of manufacture. If it was made in the late twenties or earlier it might not be repairable due to intergranular corrosion. Has to do with the way it was alloyed. Here is a picture of an oil pump from my 1927 Oldsmobile.
intergranularcorrosion005.jpg
 
if it has lead in the mix it apparently does it badly. If made right will last a long time.....

here's a bad case, a tuning shaft flywheel from the 1950s.....:

zamac.jpg
 
I seem to recall Eastwood has a kit for this. It has filler rod and high temp clay to use as a "form". Never tried it and you could probably find it cheaper elsewhere.
 
Those one offs can be cast in oil bounded sand sometimes if you know how to
and the shape permits
That gives a rather smooth texture on the surface
The sand can be used several times and much cheaper as rubber moulds

Peter
 
Last edited:
My son was rebuilding an antique tractor and needed some emblems and fancy latch knobs repaired/replaced. I took the old ones which none of which were bigger then 2 or 3 inches long and squeezed each one between two pieces of cuttlefish. I then wired the molds together and poured in aluminum melted in my forge. They turned out great and I was even able to cast in the steel fasteners on the back side so re-installing them was very easy. For small fairly intricate items you just can't beat this process. I had them all done in about three hours counting melting the aluminum.
 
I had never heard of cuttlefish being used for molding. I was picturing two fish tied together ;) . So I looked it up, ...interesting. I found this brief description:

"Because a cuttlebone is able to withstand high temperatures and also be easily carved, it makes for an ideal mold making material for small metal casting and this means that jewelry and small sculptural objects can be produced quickly and economically.

"Jewelers prepare the cuttlebone for use as a mold by cutting it in half and rubbing the two sides together until they fit flush against one another. Then the casting can be done by carving a design into the cuttlebone, adding the necessary sprue, melting the metal in a separate pouring crucible, and pouring the molten metal into the mold through the sprue. Finally, the sprue is sawed off and the finished piece is polished."
 
I haven't seen anyone mention cuttlefish moulding in many, many years! It's good to know that the process isn't forgotten. Where did you get the cuttlefish??

Pete
 
If he uses the existing part to make the mold, won't the new cast part be smaller?

Steve.


Before taking out the model from the sand you need to stick a pin in the part and knock on the sides on that pin with a piece of bar to loosen the part from the sand and give it some space
That way the mold gets a bit bigger
That will compensate for the schrinkage enough with small parts
Also on the parts of the model that need to be machined you have to put some filler on
Things get more complicated if you need cores


Peter
 
Any good jewelry supply house will be able to sell you cuttlefish. I have been using it for years as it is so easy to reproduce simple shapes such as emblems, logos, fancy catches like on tractor glove boxes and things like that. If you have a broken piece of pot metal or simply something that is worn out you can epoxy or super glue it back together just to get the original shape. You cut the cuttlefish in half (I buy it already split but it cuts with a pocket knife) and center the piece to be duplicated in the cuttlefish. You then squeeze the cuttlfish together either with you hands or if it is a large item with intricate design you have to squeeze the cuttlefish in a vise. Protect the back side of the cuttlefish from the jaws of the vise with several layers of folded toweling or very dense foam rubber. After the two halves are fully crushed together you take them apart. Pull your piece to be copied out and cut a "sprue" with a pocket knife all the way to the edge. Then you wire the two pieces together with whatever wire you have handy and clamp it gently in a vise by the forge. You can then pour molten aluminum into the "sprue" and you are done. The trick to all this is the cuttlefish crushes very easily and it will take the shape of the positive exactly. I just did this last week. I had a sawsall that the fairly intricate mechanism for holding the blade to the end of the shaft was broken. It was held onto the shaft with a roll pin. I took it off and cast another one using the pieces from the broken one super glued together. It took me about an hour to make another one and it works perfect.
 
Your link worked just fine. Thanks! I haven't done anything in that line for over 40 years and was pleasantly surprised to see Otto Frei still in business! Great place to wander around in.

Pete
 
Can someone explain what the texture of cuttlefish is. I don't understand how the pattern can be pressed into something that sounds like it is a hard material. Does the cuttlefish have be soaked in water to make it soft? It sounds like it is hard like plaster if it is rubbed together after cutting. As you can see I am confused.
 
I've been welding pot metal for quite a while. And i can tell you welding is far better than soldering it. Problem is, if you don't have a solid grasp of what it needs to make it happy, you'll destroy your part. I've been at it for quite some time and I can tell you that welding pot metal isn't something you're learn over night. But it can definitely be done.


Back
Top