What's new
What's new

Ar lower from bar stock betterway

72bwhite

Titanium
Joined
Sep 26, 2012
Location
California, Ventura county
It seems the traditional way to do an AR lower from bar stock is to
start on one of the sides using 3d tool paths and then do the other,
then do the pockets, and extension tube threading.

Well that is the hard way to do it.
it can be done with no time consuming 3d tool paths, and with only
one set of soft jaws.

Simply use a 4th axis to index as shown it also eliminates the need for very long
end mill for the mag well.
You simply cut it for 2 sides.
This can be done with a 4 axis program if you have a 4th axis,
or a manual indexer could be used.
There are 7 index angles used

and a little thought needs to go into your 3d model so corner radius cutters can be used
for the traditional 3d path spots.
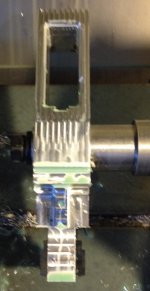
this is an AR308 lower

ar10pic11.jpg
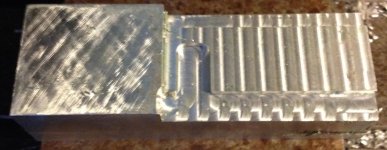
This is side one completed with the corner radius labeled

ar10pic1.jpg

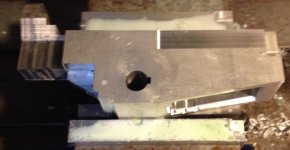
one way to do the RT

ar10pic2.jpgar10pic3.jpg

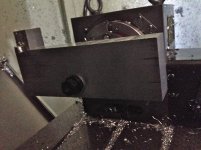
Setting A axis to 0

this one happens to be an AR308 but the same principals can be used on the AR15 lower
 

Attachments

  • ar10pic4.jpg
    ar10pic4.jpg
    98.2 KB · Views: 421
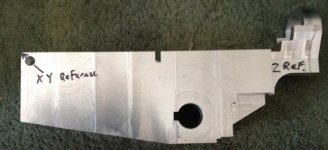
Here is what it looks like when the 7 steps are done

ar10pic5.jpgar10pic6.jpgar10pic7.jpgar10pic7.jpg

No need for pesky 3d paths around the buffer tube attachment point.

ar10pic8.jpg

No need for soft jaws on side 1 just parallels

ar10pic9.jpg

and side 1 is done

side 2 and finished to come latter need to work on the engraving paths
 
I want to try something very similar, using a dividing head, the next time I decide to complete a 0% forging. I should be able to do it all in 3 setups. Left side, right side, then all the edges.

Question- is that receiver Armalite AR10 pattern or DPMS .308 pattern? I'm looking for DPMS pattern prints to complete an 80%.

-Cole
 
Wow... I love it!

It seems the traditional way to do an AR lower from bar stock is to
start on one of the sides using 3d tool paths and then do the other,
then do the pockets, and extension tube threading.

Well that is the hard way to do it.
it can be done with no time consuming 3d tool paths, and with only
one set of soft jaws.

Simply use a 4th axis to index as shown it also eliminates the need for very long
end mill for the mag well.
You simply cut it for 2 sides.
This can be done with a 4 axis program if you have a 4th axis,
or a manual indexer could be used.
There are 7 index angles used

and a little thought needs to go into your 3d model so corner radius cutters can be used
for the traditional 3d path spots.
this is an AR308 lower

View attachment 174150
This is side one completed with the corner radius labeled

View attachment 174151

one way to do the RT

View attachment 174152View attachment 174153

Setting A axis to 0

this one happens to be an AR308 but the same principals can be used on the AR15 lower
 
The level is used to establish the reference A 0,
instead cutting all the material for the top face on the rotary table,
I roughed most of it out clamped in the vise with a face mill.
it started out as a 1.75X 4.5 X9.1 inch bar.

Y0,Z0 is the center of the 0.750 hole with a .250 in key way.

the next 5 pics are what it looks like when done.

the main points are it's a different more efficient way approach fixturing,
and to think when making your model.
use of the 3 corner rounding cutters saves a great deal of time.

ar10pic12.jpg

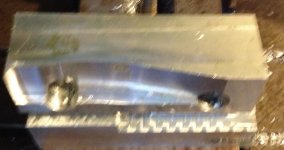
This is what it looks like before it's attached to the rt.

ar10pic13.jpg

What it looks like before machining on the rotary table.
ignore the missing chunks in the upper left portion that was a oops.

It's up to the individual to work out the index angles and tool paths.
The idea is that a guy with say a Tormach and a rotary table could apply the ideas and
save a bunch of machine and set up time.
 
It's a DPMS pattern aka AR 308 the main problem applying
this to a raw forging is you have to be very accurate on you placement
of the rotational axis hole.
and forgings tend to vary a bit dimensionaly.

as far as plans or drawings I used purchased lower and measured,
a great deal of work went into it so not something I'm giving away.
 
I'ld like to build an ar-10, wood stocked, I picked up one of the "you weld it" plasma cut steel lower kits.

Can't say when i'll get to it...
 
Personally if I were going to machine a lower from solid and I had access to a 4th axis I would be fixturing the part with one of these: Raptor Workholding Products

There are other manufacturers but I've been very happy with their products. I would feel confident swinging it by the front of the mag well with the larger sizes.

and how were you planing on drilling the odd angled holes?
and who said it has to be a proper 4th axis one could use a manual RT.
 
OP up there is showing the setup on a real 4th, why would I be concerned with what someone does on a manual rotary? Though I suppose you could adapt it to the platter of it as well.

The mag well comment was aimed more at rigidity than the actual machining process I would use.
 
Lets say that ARs are not my cup of tea, I have never even handled one or its major components. That said your solution to doing all the major operations in one "chucking" is really something. I have been doing production machining for years and found out the more operations you can do in one chucking the better the result.
WELL DONE!
 
That is a very cool and well executed solution!

Looking at the RT setup, is there a reason the shaft is so long? Looks like you may be loosing some rigidity. Was tool clearance the issue? Or maybe you repurposed some existing tooling for it?

Sent from my SM-G930P using Tapatalk
 
Way out of my range of parts.....
( I mostly work in car engines, transmissions and such in very high quantities. In house is toolholders and cutter bodies so that is similar and small batches)
Just out of curiosity seeing this very nice post of information.
What is the estimated total machine time here from solid block to ready for deburr?
Guessing volume is also one offs or maybe 50s on the high end??? Carbide and HSS tooling rather than PCD?
Bob
 
Takes about 10 min to get it ready to broach the key way.
then about an hour on the rotary, running carbide 3 flute end mills some ZrN coated some uncoated
at 9200 rpm fpt appropriate for the size, 5/8 is the largest .125 the smallest dia.
drills are hss.
0.0625 r, and .125 r corner rounding are carbide, the .375 r is hss.
side 1 takes around 1/2 hour, side 2 20 min.
tool life hasn't been an issue, breakage from trying to over feed accounted for tool loses.

tool paths aren't maximized there is some time to be shaved off.
and it is a relatively slow machine Fadal VMC40 so you can age a bit between tool changes.

it started out as a feasibility study on making 80% 308 lowers from bar stock.
there is a little money to be made but not really a market.
more trouble then it is worth.

given that a 308 lower retails for around $200.00 in these parts
it's about a wash cost wise for one.


Back
Top