What's new
What's new

Rifling Pistol Barrel Inserts - Minimal Rifling

Max Weber

Aluminum
Joined
Jun 15, 2017
Greetings,

Long time lurker, first time poster. We sell compliance parts for the firearms industry. One of our products is an extended length pistol barrel insert for California residents (we have lots of gun laws in California). We have a machine shop locally that makes other products for us, but they had a difficult time adding rifling to these inserts. We supplied them with a push button, but it has 4 lands/grooves which is kind of excessive for compliance use. It appears to be too aggressive for this application. We're looking for the simplest method to cut some very basic rifling into these inserts. It can be as simple as a single shallow cut (just deep enough to visually confirm) with a 1 in 9 twist.

What could be some ways to accomplish this?

I'll attach a picture of what the insert looks like. Its made from stainless steel (I believe they used 304 since these are single shot in 25acp)so its pretty soft and workable.
Total View.jpg

Thanks for any suggestions
-Max
 

Attachments

  • Chamber Exterior.jpg
    Chamber Exterior.jpg
    8.3 KB · Views: 439
  • Chamberings.jpg
    Chamberings.jpg
    7 KB · Views: 468
  • Inner Chamber.jpg
    Inner Chamber.jpg
    7.7 KB · Views: 480
Well, it'll take a little tooling, but it need not be complicated. In a quick search this is the best picture I could find of the concept I'd consider: rifling machine – orro.net . Modern versions of that concept have used a piece of twisted bar or square stock to provide the twist rate. Simply drawing that through a 'form' shaped hole creates the rotation along length that you need. Look at rifling heads - I imagine yours could be rather crude.

GsT
 
what about purchasing a barrel liner already in that configuration and cutting it up into the required lengths you need.
 
Had a dumb idea about making a 28 ga barrel for a Contender many many years ago. Same issue, gotta be 'rifled'. I was thinking of trying to drag a spiral flute reamer thru it to make some scratches. Idea came from having seen a chatter pattern from reaming that had a twist to it
 
I profess no knowledge of the CA. laws or your requirements, Nor of barrel making. (But I did stay...)

But I did READ that in the days of Dueling Pistols, rifling was recognized as an accuracy aid, but was not accepted in the "gentleman's code".

Crafty gunsmiths would produce near "invisible" rifling by the methodical application of abrasives.

Perhaps your four groove button could be reduced to something that held a charge of clover compound and was run buy machine down bore several times to accentuate the effect. Certainly the appearance of a "lapped" surface would differ from a smooth bore. Mind the timing so as not to muddy the appearance.
 
Good news! I managed to put rifling on an insert using $20 worth of materials from Home Depot! I wouldn't use this method for performance... but for compliance it works great. I test fired this afternoon and even with such a minimal amount of rifling, it put a twist on the bullet! No keyholing etc.

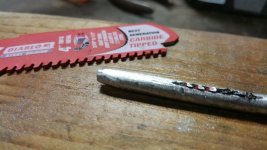
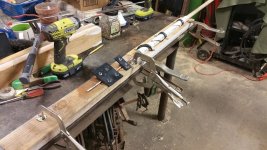
I adapted the design from a guy on Youtube who constructed a very rudimentary hand rifling tool with simple materials. I upgraded the cutting implement by using a 1/4 inch aluminum rod embedded into a 1 inch dowel that slides inside a 1 inch pvc pipe. I tapped the end of the embedded aluminum rod and put a machine screw through the wood+rod for added strength. I cut a 1 in 9 twist into the PVC pipe using a dremel. I took 3 carbide tipped teeth off a sawzall blade and embedded it into a slit at the other end of the aluminum rod. I didn't even have to expoxy or weld the cutter to the rod! I ground the back of the sawzall piece to get the height flush with the rod, then shimmed them up slowly to get them to cut as they were pulled through the barrel insert. The rubber pieces with screws and washers that you see in one of the pictures is used to secure the barrel insert in place during cutting.

I did maybe 3 depth adjustments and was able to visually confirm the rifling. Aside from the time it take to assemble and calibrate the rifling tool, it will take maybe 15 minutes to put rifling on each insert! Here's the youtube video that inspired me and some pictures of my version (with finished result) the barrel is dirty from test firing.


Cutting Tip.jpgComplete View.jpgMandrel.jpgSawzall Carbide Tipped Blade.jpg1 in 9 Programming.jpg
 
Good news! I managed to put rifling on an insert using $20 worth of materials from Home Depot! I wouldn't use this method for performance... but for compliance it works great. I test fired this afternoon and even with such a minimal amount of rifling, it put a twist on the bullet! No keyholing etc.

I adapted the design from a guy on Youtube who constructed a very rudimentary hand rifling tool with simple materials. I upgraded the cutting implement by using a 1/4 inch aluminum rod embedded into a 1 inch dowel that slides inside a 1 inch pvc pipe. I tapped the end of the embedded aluminum rod and put a machine screw through the wood+rod for added strength. I cut a 1 in 9 twist into the PVC pipe using a dremel. I took 3 carbide tipped teeth off a sawzall blade and embedded it into a slit at the other end of the aluminum rod. I didn't even have to expoxy or weld the cutter to the rod! I ground the back of the sawzall piece to get the height flush with the rod, then shimmed them up slowly to get them to cut as they were pulled through the barrel insert. The rubber pieces with screws and washers that you see in one of the pictures is used to secure the barrel insert in place during cutting.

I did maybe 3 depth adjustments and was able to visually confirm the rifling. Aside from the time it took to assemble and calibrate the rifling tool, it will take maybe 15 minutes to put rifling on each insert! Here's the youtube video that inspired me and some pictures of my version (with finished result) the barrel is dirty from test firing.

1 in 9 Programming.jpgMandrel.jpgComplete View.jpg20170616_232631.jpgRifled2.jpg
 
1: Get a real rule-a STEEL machinist's rule if you ever decide to do really ACCURATE measurements.That blackboard rule is also very thick,allowing for plenty of parallax
error.

Get some proper HSS SAWS for that Dremel . Then,at least you will not have to BURN your way along everything you cut. That abrasive saw was not made for sawing wood and plastic.

Did you learn how to use tools from nomadic Bedouin tribesmen in Saudi Arabia?

I think you meant to direct your comments to the gentleman in the youtube video. I adapted the basic concepts he uses in the video, but I upgraded several aspects of the device (one of them being carbide cutters, another being proper dremel attachments) I have also invested in a 1/4 inch reamer, so the inserts are looking really nice!
 
Somehow, This information makes me feel sad.........;-(

In the world of precision micron level machining yes.
In the world of Rube Goldberg and Get e'r done maybe the video is not so bad. I've probably "MacGyvered" worse things.
Add the disclaimer that other than really high dollar big things that have to hit stuff many,many miles away I do not do guns so much of this gunsmith stuff I am dirt stupid in.
All about accuracy and repeatably, I really like this section of the forum as it is so far out of my boathouse and one can never be too rich, too fit, or learn too much.

I know that short pistols can't hit the side of a barn at any distance from my match shooting friends.
Is the point of such an add on added accuracy or just smaller? If accuracy would not the rifling be critical and linked to velocity?
From a dummy standpoint seems you leak some gas pressure here too which would make me think you have to get this just right and a hack is maybe lucky, maybe not.
Again, not my world so :dopeslap: and :nono: as needed.

Bob the :dunce:


Back
Top