What's new
What's new

The Application of Moglice to the Saddle on a Lathe

4GSR

Diamond
Joined
Jan 25, 2005
Location
Victoria, Texas, USA
I like to share my experience using Moglice to repair the wear to the underside of a saddle to my 20" Model X Lodge & Shipley Gap Bed Lathe.

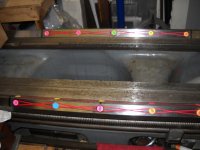
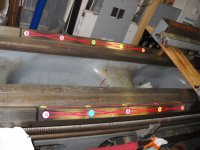
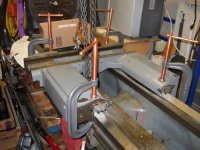
First thing I had to do was build some "levelers" to position the saddle on the bed so it is "square" and "level" or "parallel" to the bed. The levelers will also allow you to get the rack pinion in proper mesh with rack. This is assuming the bed is in good shape by re-grinding, planning, or scraping for proper alignment. In my case, the bed on my lathe was re-ground. Once this was done, you must determine how much gap there is between the bed ways and the saddle ways. In my case, about .045" max. The least was around .038".

From this I figured out how much cubic inches of area is needed to fill in to take up this gap. The measurements I came up with on my setup was .045" x 1.375" x 26" per way x 4 for a total of 6.435 cu. in. Next was to call the nice Moglice people, Devitt Machinery Co. and talk to their techinical advisory on what you are wanting to do. His recommendation to me was to use the "Putty Hard" for my application. He said I will need just a little under 350 grams of the stuff. Well that made me feel better that I didn't need to build up dams for the liquid stuff.
More write up to come....

[FONT=Open Sans, sans-serif]Edit:[/FONT]


[FONT=Open Sans, sans-serif]Ifyou go to Devitt Machinery Co. wedsite, and look at the downloads,there is a pdf file called “Machine Tool Way Rebuilding” Download it and take a look at it. Lots of good information on theapplication of Moglice.[/FONT]
 

Attachments

  • DSCN1895.jpg
    DSCN1895.jpg
    93.8 KB · Views: 3,768
  • DSCN1915.jpg
    DSCN1915.jpg
    86.8 KB · Views: 2,069
Last edited:
Did you spin the test bar 180 deg to be sure it is running true to the spindle bearings? Turn the bar 180 degs. and it should be the same on both sides. I have found many times i need to shim one side to get it to run true. I also clamp a precision blade square on the bar and indicate the blade at horizontal and vertical position to be sure the head is setting parallel to the bed. Remember the head spindle side alignment would be + toward the operator .0002" TS end in 8" and high on TS end the same amount.

I am a big believer in Moglice accept you really need to be careful not to get air pockets in the putty. I also like Turcite, Rulon and phenolics. I prefer to use the Moglice 1/2 liquid, 1/2 putty mix or the liquid. Vette Bob used the putty on his EE Monarch and he got a few voids on one end due to bubbles.

I used to be a rep for Devitt and know Drew quit well. Cody is the new Tech. Have to be super careful to mix it a lot, empty the hardener to the last drop and mix it a lot as the directions tell you too. Rich
Rich
 
Richard,

Yes, I did rotate the face plate several times before taking readings around the FP. Total indicator readout was 2-1/2 thousandths. From the readings I determined the place where the reading read the same on both sides of the FP at 180 degrees from each other. This is where I made my adjusts from. The FP is dead flat from outer edge to the center of the plate, checking with a straight edge in the process.
Ken
 
Part 2, Getting things ready for applying Moglice.


The surface the Moglice is applied to must be rough and have some means to attach itself to. Devitt doesn't recommend holes, unless they go all the way through the slide. Blind holes trap air, or could push out air into the way area causing a void in the surface. (I wound up with a few voids when it was said and done. Not caused from holes though.) The saddle had the old oil grooves still in the way surfaces and are fairly and wide and deep. Once this was done, I did a through cleaning using the cleaner Devitt sent me. (Did this several times before applying Moglice)
I did the step of laying out oil grooves on the bed like Becky did on one of his rebuilds several years ago. I used a masking tape that map makers used to use for map work. I used it many years ago for some presentation I did. It comes in two different widths and several colors. I purchased my stuff from Hobby Lobby nearby to me. Any place that sells arts and crafts stuff should carry it, too. As shown in the pictures is a pattern I used. I also used some dot type stickers to create a reservoir pocket for oil to gather in. I picked up on this from a previous thread here on PM talking about oil grooves. I give credits if I could recall the thread. Anyways, I build up the tape in three layers which makes it about 0.020” high. Sure felt higher than that by feel. Before the tape is applied, I used the cleaner that Devitt sold me to clean the surfaces with to remove any oil and crud. Next I drew black lines with a Sharpie as shown in the pictures. Use a carpenters square to get the front and rear ways in line for the marks. This way, it makes things easier to layout the tape.
Draw out the pattern on all surfaces so you have a guide for the tape to follow close to. Apply the tape and dots if you like. Devitt does make a wax that can be used on larger slides for creating oil grooves, but it is too big to use here.
 

Attachments

  • DSCN2059.jpg
    DSCN2059.jpg
    91.8 KB · Views: 1,375
  • DSCN2676.jpg
    DSCN2676.jpg
    86.9 KB · Views: 1,338
  • DSCN2677.jpg
    DSCN2677.jpg
    85.9 KB · Views: 1,236
  • DSCN2678.jpg
    DSCN2678.jpg
    94.1 KB · Views: 1,259
  • DSCN2679.jpg
    DSCN2679.jpg
    89 KB · Views: 1,494
Part 3, Applying the Moglice


Before application of Moglice, at least two layers of wax spray (mold release) must be applied to the bed ways of the machine. (I used three.) It must fully dry before application. Next comes the mixing of the Putty Hard I bought. The contents of each can must be mixed fully to get the consistency of “hot tar”. Looks like cat pu coming out of the can but when mixed has the consistency of hot tar. I used a mixing board for body work and a plastic trim removing tool for mixing. The mixing process is kinda like mixing bread dough. It doesn't stir very well. Just have to fold it like dough, and do this until the hot tar like consistency appears. And once done, mix for another 2 to 3 minutes. At this point, it is ready for applying. For my application, Devitt Machinery Co. recommends applying a thin coat of Moglice to the ways on the saddle. Then apply the bulk of the Moglice to the bed , leaving a hump of it running the length of the ways being applied to. (And I forgot to take a picture of the Moglice applied to the bed) Once you get it spread out, make sure it is humped up in the middle as the show in their book. (BTW, Devitt will send you a copy of the book for first time users. They sent me one. The same one as on the internet website.) Don't be afraid to apply too much! You just don't want to apply too little! You can't go back and apply more after the fact. You have to go in, rip out the bad and start all over! This stuff is not cheap to be starting over. You have one shot at this and you want it to be good.


Once you have the Moglice applied and ready to flip the saddle over on to the ways, take a big breath and go for it! The levelers on the saddle will guide it into place. Be sure to put you some kind of“stop block” clamped to the bed to give a place for the saddle to locate off of when positioned. Apply C- clamps as I have done on my saddle. Pull all four down gently and gradually apply pressure toeach until firmly in place. Let set for a day or longer before removing clamps.
 

Attachments

  • DSCN2715.jpg
    DSCN2715.jpg
    90.7 KB · Views: 1,389
  • DSCN2718.jpg
    DSCN2718.jpg
    87.2 KB · Views: 999
  • DSCN2719.jpg
    DSCN2719.jpg
    88 KB · Views: 1,047
  • DSCN2720.jpg
    DSCN2720.jpg
    96 KB · Views: 980
  • DSCN2721.jpg
    DSCN2721.jpg
    92.1 KB · Views: 1,332
Here's some more pictures....
Part 4 will be next.
 

Attachments

  • DSCN2722.jpg
    DSCN2722.jpg
    90.9 KB · Views: 1,250
  • DSCN2723.jpg
    DSCN2723.jpg
    94.4 KB · Views: 1,549
  • DSCN2724.jpg
    DSCN2724.jpg
    90 KB · Views: 2,121
  • DSCN2725.jpg
    DSCN2725.jpg
    84.6 KB · Views: 1,156
  • DSCN2726.jpg
    DSCN2726.jpg
    91.8 KB · Views: 1,572
Part4, The after-mat....


Once the Moglice has dried thoroughly, remove the C-clamps and take a rubber mallet or dead blow hammer and beat around on the saddle. Nothard, but good steady even blows. Next take a pry bar and startwiggling the wings of the saddle to break the bond to the bed ways. If you are lucky like me, the saddle came free almost immediately. Flip the saddle over and inspect the good job for voids. Hopefully,if correctly, there should be none or just a few small places as I found on my Moglice job. In fact, I was quite impressed with the outcome!


Next comes the fun of trimming of all of the over spill of Moglice. If you don't have one, get you a Dremel style die grinder and some abrasive cut off wheels. The ones that are about 3/4” in diameter and about .020” thick. Get about a dozen of them. You may need them all or get lucky like me and only need about six of them. Start trimming the ends as I did first. Do this before removing the levelers. If you don't, you may break off more Moglice than you want if not damage the bond of the insert to the saddle. The black dust gets on every thing when doing the trimming, so be sure to not inhale too much of the stuff!


Once all of the trimming is done, start working on the oil passages. This may require drilling new holes or locating the old ones as I did. I installed a short piece of pipe cleaner into each hole, sticking out enough to allow recovery of the hole and prevent crud from getting in the holes while applying Moglice. After this is done, the saddle isready for mounting.


After the carriage is put back together, some type of automatic lubrication system needs to be installed to provide lubrication oil to the ways. The Lodge & Shipley is installed with a cam operated oil pump in the apron that was originally designed to provide lubrication for the entire carriage. Over time, this pump has deteriorated to the point that it is not as efficient as it was as new. All of the oil conduits were stopped up with crud from lack of lubrication and maintenance over the 60 years of use. So what I have done is installed a oil pump that will provide a shot of oil about one time every three or four minutes. Each shot can be adjusted from about 3to 6 cc's. Might be a little too much, but the Moglice has to have good lubrication for it to last!


Thisis it for me on this subject. I hope it helps for anyone that wants to use Devitt Putty Hard product. I was really sweating this being a difficult task to do, but turned out not to be bad at all! A lot easier than I thought it would be! The Putty Hard product has a very low VOC, hardly no smell at all. But still need to ventilate to be on the safe side!:)

Ken
 

Attachments

  • DSCN2737.jpg
    DSCN2737.jpg
    90.1 KB · Views: 1,688
  • DSCN2739.jpg
    DSCN2739.jpg
    90.7 KB · Views: 1,660
  • DSCN2742.jpg
    DSCN2742.jpg
    89.7 KB · Views: 1,275
  • DSCN2744.jpg
    DSCN2744.jpg
    77.8 KB · Views: 1,100
  • DSCN2746.jpg
    DSCN2746.jpg
    95.9 KB · Views: 1,204
Ken Nice job and I love the $$ sign on the stickers...lol

Did you scrape oil pockets or 1/2 moon flake it after ? Did you put the release agent or masking tape on the saddle surfaces that you didn't want the Moglice to stick to prior doing it?

I used to take a old long stem Allen wrench to mix it up on a drill press and then spread it on the sheet to remove the air. I would suggest you wear a dust mask or respirator when grinding it and have a vacuum cleaner suction hose next to where your doing that. I also measure and mark the oil hole location and clean out the crud prior too. Devitt used to use the corner of a power scraper blade to scratch the surfaces or sand blast it for the bond to stick to. Drew used to say scratch it until your eye ball bleed.

Ken did you scrape the center 40% low, or put on a piece of masking tape?
Rich
 
Great write up and showing the pics that go along with it.

I think for this application Moglice is a good idea as int he lathe bed environment. Turcite would get torn up much easier.
 
Looks good Don't forget to cut back the moglice from the center of the v . This allows the apron to wear properly in relationship to the bed ways. I also scraped the moglice for oil pockets relieving the center 3rd back 3 tenths. It will eliminate slip sticking of the apron. Bob
 
Thanks for that. It's a really interesting series of posts. I always shied away from using " Moglice " on small lathe saddles, mill saddles etc. I considered it was too messy so I always used " Shamban, Turcite, Rulon " etc for these sort of jobs. I've used the " Moglice " liquid on big jobs and it's always worked well. Normally I'd set the job up level so I could inject the liquid into the gap to be filled. I've used " Moglice " putty to repair way scores, that works well if your preparation is good.

Regards Tyrone.
 
Doing some casual reading in preparation of doing this myself and found your thread. Thank you for such a well done and thoughtfully written description of the process. It is much clearer in my head now. Of course, I'll likely still murder it, but at least I now understand it. Cheers.
 
I like the idea of the leveler plates. On my lathe the carriage is like a South Bend. Someone on another forum many years ago drilled and tapped holes in the carriage and used set screws level. I think mounting the blocks on the end is a better idea than drilling extra holes in the carriage. It will a lot easier to level than using shims. My carriage is much lighter the L&S so I may use nylon or brass screws to keep from damaging the ways.
Ben
 
I'm in the middle of the exact same thing myself and I had trouble finding brass tipped set screws for the levelers until I scored a large bag of them on eBay. They are 1/4-28x.375. 1/2" long with the tip. If anybody needs some, pm me an address and I'll mail some out.
 
Find a piece of brass all thread, it works too!

If your bed is harden and ground, just use socket head cap screws as I did. They won't damage the bed. I started some screws made from a piece of steel all thread and at the last moment stumbled across some socket head cap screws.

Ken
 
One thing you will find after you moglice or use turcite and there is nothing you can do about it anyway, but that is as the epoxy is that slippery, the saddle lock will no longer be as effective at locking the carriage as it was with cast on cast.


Back
Top