What's new
What's new

Balls dont move in

priitm

Aluminum
Joined
Dec 28, 2014
Location
Estonia
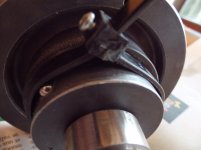
During reconditioning process of grinding machine I have accidentally removed marking ring from handwheel. Marking ring has groove inside where balls (3pcs) have room. Balls are tensioned by springs in holes of handwheel.
Does anyone have a good idea, how to get balls back to holes ? This seems impossible without special device as springs are strong.:nutter:
 

Attachments

  • PC130535.jpg
    PC130535.jpg
    87.8 KB · Views: 382
Could you use a hose clamp to compress the springs while sliding the ring over to hold them in?
 
Hose clamp is good idea. I will try.
I am curious how they do this operation in factory?

I'm guessing here but probably 3 thin plates like shallow chuck jaws that push the balls in and hold them until the other piece is pushed down enough to keep them in. At that point the plates would be retracted and the hub would push the balls in completely as it was pushed further down.

Such a device could be made by attaching thin plates to soft jaws on a 3-jaw chuck.
 
A thin zip tie may work too. Cut it out when the piece is partly over the balls.

Or an old wire twist tie, like those used for garbage bags.
 
A thin zip tie may work too. Cut it out when the piece is partly over the balls.

Or an old wire twist tie, like those used for garbage bags.

Springs are strong and long-reach out from holes, trouble is to get the balls into right position. They fly like bullets if spring is released. Probably I drill 3 small holes for balls into hose clamp to get preliminary positioning.
 
I had the same problem with my Beaver milling machine, but that was only one spring and ball. I used a screwdriver to push the ball in until the part overlapped the ball. I think you may need to use a cable tie that is about 3/4 the width of the balls. If you cannot find one or it is too difficult to hold all three balls in, you may need to make a steel clamp in two halves that you can close with screws to clamp the springs and balls in place. This can be pushed out of the way by the part as is slides over the balls.

Good luck. It took me several hours the first time I did it with only a single spring and ball!
 
Make a ring to fit over the axial similar to a hose clamp the can be removed. Drill one hole in it big enough for a spring and ball to go through. Clamp over the axial and align the hole with one of the pockets. Insert a spring and ball. Press until the ball is below the clamping ring. Rotate the ring to the next pocket. Repeat. Carefully slide the marking ring over the balls, moving the clamp ring to the side. Once the balls are secured, remove the clamping ring.

Your welcome.

Tom
 
This one is more challenging than usual. The length of spring stick-out, the use of three balls instead of one, and the rather limited space "inboard" of the balls to slide a temporary ring out of the way as the dial goes on hamper the usual assembly tricks.

If I were stuck with it, I would take a piece of cheap plate thin enough to slide out of the way, and make a wide flange in the style of a narrow two-piece clamping collar out of it. I would mount a screw-fastened tab for each of the ball positions, so that I could compress manually the ball+spring for each position independently then rotate the tab to hold the ball in position and fasten the screw. Once I got all three balls in position, I'd slide up the dial and push the flange out of the way, then disassemble the flange.

If I had a bunch of these to do, I would mill cam recesses into the flange face instead of using tabs. The max diameter of the cam recess would just hold a ball+spring snugly at (near) full extension, and the min diameter of the cam recess would compress the ball+spring enough for the dial to move over the ball. Install all three balls+springs, rotate the flange, push it out of the way with the dial.

The cam recess idea suggests an alternative to the screw-fastened tabs. Mill a radial groove for each ball position deep enough to hold the ball+spring in (near) full extension. Drill a hole through the face of the flange sized for a dowel pin, positioned to hold the ball+spring compressed. Install each ball+spring, compress manually each position independently, inserting a dowel to hold that position compressed. I'd probably grind a flat on the ball end of each dowel, maybe with a very slight tilt to hold the ball toward the flange, and a chamfer on the end to ramp onto the ball while my finger is holding it down.

Added in edit: I like Tom's idea, posted just above, too!
 
I always use grease to hold the ball detent. Just any kind of grease to make the ball sticky. That will hold it in the right spot so you can push on it with your collar or whatever method you use.
 
Or just the old fashion way of two or more guys, three screwdrivers or punches and one hand to push in.
At factory it's likely done differently with a split ring less than half the ball offset thick but why bother building this.
Sticky grease will not work if the spring force is high and you do not want to glue the balls in place anyways.
I do like the zip tie idea but the head may have to be ground down on the sides for thickness.
Not seeing a hose clamp narrow enough to do the job.
Bob
 
How did you get the balls out?

My mattison hadwheels have the identical set up for the graduation wheel. You put he balls in from the ID.

And of course a dab of grease to hold in an lubricate when sliding.
 
If having four coordinated hands is not an option, I think the split collar is by far the best idea: rough it oversize in width, split it, drill a single hole to size for spring and ball, chamfer the "inside end" of the hole, re-assemble the ring, trim it to the proper width, taking advantage of the fact that, on one side you can cut into the hole up to 1/3 diameter, as long as you have enough support on the other side.
You then insert one ball at the time, rotate the ring 1/3 of a turn, and proceed with the next ball without any concern of having to plug any other hole.

Paolo

PS The outside of the ring doesn't need to be round and, if it is large enough, it could be thicker, as long as you cut the proper recesses to accommodate the pieces of the dial.
 
Has anybody checked out how Rube Goldberg would have handled this problem?

Tom


Tom,
There is no limit to complicating any single matter. Anyhow, it is very likely that I'm on the clumsy side. However, my experience in putting back into place a spring-loaded ball where the spring extends above the surface of the shaft or slide is of no fun.
A fixture as proposed here takes at most 30-40 minutes to build and I doubt you could get all three balls in place in the same time, unless you have a skillful helper. And this is without accounting with the rather high chances of having at least one of the three balls flying across the room.
Everybody measures things with his own ruler. As I've said, I'm probably a little clumsy, but I would consider the half hour building the fixture and the piece of scrap wasted in the process time and money well spent.

Paolo
 
Thanks to everybody, I have got the balls in.
Hose clamp did not work as this size is wide.
I used big cable tie. Fixed it by screw and heated later with flame to get it softer when it was time to remove it.PC140538.jpg
 
You could have done it by turning down some stainless steel and then inserting it into a vacuum chamber made by building a wood box and inserting a Hoover hose. Then as you flick on the switch you pray that the balls will suck into the hole and the outer ring will fall and move down over the balls, seating them in place. You could also use some KY Jelly and not grease as it is a great lube I have heard. I haven't used it in years as a matter a fact. Lets all get upset about how to do this and get insulted if you don't like the other guys idea. The electric tie was a simple idea....it worked and was cheap, what 25 cents and the screw maybe a nickel?

Sometimes the simple silly idea is all it takes. April fools in December.


Back
Top