What's new
What's new

Bridgeport Mill Acquisition: Total Tear Down or Not

Jacksquat

Aluminum
Joined
Oct 11, 2016
I've recently acquired a Bridgeport 2J made in 1976. It's up and running now, through the generous aid of those on this site. The machine is in good used condition. There's wear, but it doesn't appear extreme, as far as I can tell. The machine is likely full of chips and grime.

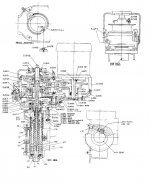
The oiling system is gummed up, so I'll clean the reservoir and try to force a solvent through the system in an attempt to clean it out. My first inclination is to disassemble the machine completely, removing the head, ram, and turret and lifting off the knee, after removing the table. I'd like to inspect and clean the entire machine.

Does this seem advisable? Would you also open the head to clean up any old grime inside? I would appreciate any advice on readying an older Bridgeport Mill for service and/or recommendations regarding related reference material. Thanks for the help!
 
First, I cannot help specifically on the BP, as I have not had one apart and do not know what collects where or the like.

HOWEVER.... In general, I find clogged lube systems to be equal to at least being shown a yellow card, if not a red card. as far as machine operation.

Either the clogged system meant that some places did not get lube, which means I'd really like to see what they are like, OR the clog was known about, and oil was slopped on outside, meaning that who knows what has accumulated in there carried in by oil, or stuck down by excess oil, and I'd really like to see what that "who knows what" actually IS.....

But, tearing down the machine is a hassle and a reasonably big job. So, I might compromise by doing a full survey first, checking for slop, sag, etc with indicators, and then using whatever disassembly is required to repair the lube system, to look in and assess the crud and dirt and wear situation.

If it is not worn badly, then the lube issue may have occurred in storage, and not in use, so things may be fine and a teardown is not at all needed. I'd not borrow trouble unless there is some condition really warranting more in depth investigation.
 
Thanks, JST. I believe the clogs occurred in storage. According to the previous owner, who seemed like an honest guy to me, the machine was in storage for 10 years. I think he had a few manual mills some of which he converted to CNC. Because of rising costs of insurance, he wanted to rid the shop of any machinery that was not in service.
 
Simple checks for oil on the ways;
Remove the way wipers and check for oil/no oil. Clean the ways for the knee and saddle. Remove the way wipers and clean again. Pump the oiler and move the saddle to the extents of travel and back. Look at four points front-back on ways, flat and dovetail, left and right side for evidence of oiling. Do the same for the knee. Typical sign of knee getting oil is found at the lower knee ways.
Move the table to an extent left-right and watch for oil at the ports.

Do not open up the head for just a look-see. The bearings are all sealed and no adjustments are possible.
If you have time on your hands by all means take it apart. Have a replacement set of Vari-disc bushings and a new drive belt(s) sourced if inspection warrants repair. But not all Bridgeports have the original black plastic bushings.

The part(s) that gets plugged are the oil metering flow valves (resistance fitting).
They get plugged by heavy waxes and debris during use. Marked on the resistance fitting is a number that indicate how much oil is expected to pass in a given time frame.
Generally, these fittings cannot be cleaned of debris and heavy waxes that plug the inlet filter. They cannot be back-flushed.
Do clean the reservoir as heavy solids accumulate in the bottom. Examine the pick up filter and clean as needed.
Clean the ways on the ram and wiping on some oil rather than removal.
 

Attachments

  • Repair Kit.jpg
    Repair Kit.jpg
    13.1 KB · Views: 132
  • 2jipb2 ~.JPG
    2jipb2 ~.JPG
    76.2 KB · Views: 763
Last edited:
A disassemble and clean of a newly purchased older machine is always advisable but conduct a comprehensive machine survey first. It's been 40 years since your 1976 mill last had attention to its inner workings. It's a good way to learn first hand all there is to know about your machine's condition. While you're at it, you can make a list of repairs and replacements for scheduling when the time/budget permits

It's about a one day job to tear down clean and reassemble a Bridgeport given hoisting equipment and a little staging and preparation. A day more to do a careful clean and minor repair.

As for your lube system, (Bijur type, right?) they have a finite life. The pump and lube line should be cleaned, and purged and all restrictors replaced. Yes, replace. Tthere is no economical way to clean pressure lube restrictors compared to new replacement.

Good time for prep, patch prime, and re-paint. Maybe a DRO. Power feed?
 
The lines should be fine.
Resistance fitting, metering valves that proportion flow to different locations. They are located in two places.
On the left side of the knee for delivery to the knee-column ways.
Junction block block located on the left underside of the saddle for everything else.
Each metering valve is numbered w/r/t flow so record the position and number of each. ex: FJB-2
Open end flare wrench is a handy tool if it is not too thick as the valves are spaced close together.

Attached below is documentation from Biljur Delimon.
The schematic of the Bridgeport does not show the line(s) for the table/saddle nuts.
Sample Schematic.jpgResistance Fittings.jpgResistance Fitting.jpgMeter Units.jpgTypes.jpg
John
 
Slide the table off and you can do a lot of cleaning, especially all the stuff that collects inside the knee. It's the single worst point for chip collection other than the T slots. I used a Kennedy rolling cart with wood on top to slide the table onto.
 
The lines should be fine.
Resistance fitting, metering valves that proportion flow to different locations. They are located in two places.
On the left side of the knee for delivery to the knee-column ways.
Junction block block located on the left underside of the saddle for everything else.
Each metering valve is numbered w/r/t flow so record the position and number of each. ex: FJB-2
Open end flare wrench is a handy tool if it is not too thick as the valves are spaced close together.

Attached below is documentation from Biljur Delimon.
The schematic of the Bridgeport does not show the line(s) for the table/saddle nuts.
View attachment 202894View attachment 202895View attachment 202896View attachment 202897View attachment 202898
John

Would you agree, John, that attempting to flush the system with a solvent, say mineral spirits, once the lubricator is cleaned is worth pursuing?
 
Last edited:
Yes and no to flushing.
The resistance fittings have an inlet filter. Anything past that is "clean"except at the exit hole. An example is the flat way on top of the saddle. Some debris will drop in to the hole. Metallic fines and black gunk.
Is the bottom of the oil reservoir for the pump clean? Debris usually enters during the fill of the reservoir.
Consider flushing the lines up to the resistance fittings. That includes the saddle junction block. A pia with all the fittings.
Compressed air is what I used and sometimes solvent. Keep a rag over the exit hole.

How far are you going with the tear down? I let the machine condition determine how far to go. For the table, saddle, and knee a full clean-up and gib adjustment was a day or two. If a gib(s) had to be replaced, reworked, and fitted then a little longer. Undersized gibs were re-cut and brought back to size with Rulan and fitted.

I had use of a couple of hydraulic lift tables for table removal plus a 'cherry picker' (engine puller) to remove the knee.
Read-outs, dro, added more time as every mill was so equipped.
John
 
Replace the fittings ($9-$14ea) and all the lines. Slide the table off and re-run new lines. Lines are cheap and so is your time.

I have an oiler that i use to force kerosene thru the lines if I'm trying to clean up the lube system, replacing the lines is good, but the passages internal to the saddle should be cleaned as well
 
Yes and no to flushing.
The resistance fittings have an inlet filter. Anything past that is "clean"except at the exit hole. An example is the flat way on top of the saddle. Some debris will drop in to the hole. Metallic fines and black gunk.
Is the bottom of the oil reservoir for the pump clean? Debris usually enters during the fill of the reservoir.
Consider flushing the lines up to the resistance fittings. That includes the saddle junction block. A pia with all the fittings.
Compressed air is what I used and sometimes solvent. Keep a rag over the exit hole.

How far are you going with the tear down? I let the machine condition determine how far to go. For the table, saddle, and knee a full clean-up and gib adjustment was a day or two. If a gib(s) had to be replaced, reworked, and fitted then a little longer. Undersized gibs were re-cut and brought back to size with Rulan and fitted.

I had use of a couple of hydraulic lift tables for table removal plus a 'cherry picker' (engine puller) to remove the knee.
Read-outs, dro, added more time as every mill was so equipped.
John

The bottom of the reservoir is filthy. The first thing I intend to do is remove it and completely clean it.

The machine seems to be in good shape. I've noticed no slop anywhere. Given the advise here, perhaps I'll leave the head, ram, and turret alone only cleaning and lubricating the ram's dovetails. I now plan to remove and clean the table and saddle and at least replace the resistance fittings. At that point, I'll decide whether I'll take the knee off completely using a cherry picker. I worry about danger to the vertical ways and DRO that could result with full removal of the knee, so I'm somewhat reticent about it. As rons seemed to suggest, perhaps I'll be able to reach down into the knee and get at most of the debris and gunk through the top. I know you don't have a lot to go on, but does that seem like a reasonable approach?
 
Last edited:
The lift by the cherry picker to get the knee off the ways is pretty high and it has to be high enough for the screw to clear the nut. I always have to use the big one and run the extension out.
Strap it where the bevel gear is and the balance point won't be too far off.
The inside of the knee is a great place for chip storage when people use air guns :nutter:
Inside the knee the parts that need to be cleaned are the bevel gears, forget the rest and your hands will thank you. Those pesky fines from endmilling hurt. Sand paper for removal.
If the knee is removed be sure to keep track of the plug for the knee clamp. It is easy to forget to install that part
at assembly.......been there done that.
Way damage.......really not a problem.
Damage to a DRO, that is a problem especially if it is an older unit. Some of the units that had glass scales had a plate to secure the reader to prevent damage during install. Without that you need a way to keep the reader and the wires secure.
DRO is only on table and saddle?

If the table is removed it is easy to check the oil delivery at the ports. Wipe things down and give it a pump. Look for simultaneous flow at all table way ports and the same volume. If any ports have a lazy flow that resistance fitting may be plugged.
If six out of eight resistance fittings are plugged the rate of flow out of the remaining two fittings will not increase. The time duration of the flow will increase until the flow pressure provided by the pump is zero.


If the knee is to be removed move it to the center of travel where the gib may be a little loose. Back off the gib screw then drop the knee a little.
Repeat until the gib is out. Lowering the knee puts an upward pressure on the gib. Using the only gib screw to extract the gib sometimes damages the screw head.
When installing the knee gib raising the knee helps to slide the gib home. Shake the knee a little to help it along. Plenty of oil on the ways and both sides of the gib.
John


Back
Top