What's new
What's new

Cleaning up a knee mill bed and ways - cosemetically

Paul G

Plastic
Joined
Apr 16, 2013
Location
USA
Hi,

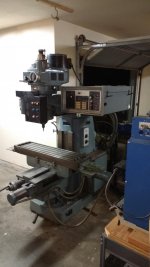
Can anyone lend some insight on how to make this knee mill happy with a fresh look to the bed. This is on my new to me fine iron Shizuoka ST-N (Japanese) that i am converting to Mach 3 low budget method, but in the meantime i think the mill would feel much better about life if it had a nice looking table. Perhaps the ways can use a nano hone (super sensitive to precisions surfaces).

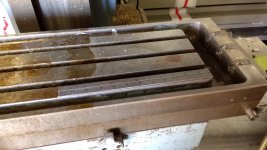
The table isn't bad condition, lots of micro skuffs and darkness, from 37 yrs of usage.

Any good methods to make it look nice and not alter the surface planarity? I see some old BP's and think - how did they make the table look that nice!

Thx,

Paul
 

Attachments

  • IMG_20171008_193617392.jpg
    IMG_20171008_193617392.jpg
    87.6 KB · Views: 699
  • IMG_20171007_151248400.jpg
    IMG_20171007_151248400.jpg
    98.2 KB · Views: 495
  • IMG_20170928_142239378.jpg
    IMG_20170928_142239378.jpg
    96 KB · Views: 515
  • IMG_20171007_151307901.jpg
    IMG_20171007_151307901.jpg
    96.5 KB · Views: 371
  • IMG_20171007_151226515.jpg
    IMG_20171007_151226515.jpg
    99.2 KB · Views: 506
And two more pictures
 

Attachments

  • IMG_20170928_144037862.jpg
    IMG_20170928_144037862.jpg
    95.7 KB · Views: 439
  • IMG_20170928_143923498.jpg
    IMG_20170928_143923498.jpg
    97.2 KB · Views: 600
All I see is a little surface rust and oil stains. Just lightly stone off any burrs and clean the oil grime. Any efforts to get the table to a mirror polish is risking to change the flatness unless your willing to re-grind or scrap it.
A better use of your time would be to change the way wipers and ensure the lubrication system is working.
 
Paul, I would leave it as it is. That's the voice of experience. :) It's just so much trouble to get it looking right, it's not worth it.

But anyway, you could use a dull fine file to pick up and flatten burrs followed by a cast iron lap with around 15 micron diamond powder. With Diesel as lube this lap will cut very aggressively and will further flatten burrs and dings. If you don't re-charge it it'll eventually produce a bright, mirror like polish. To work nicely, the lap needs to be around 20 lbs, around 200-250mm dia and have a 2" hole or recess in the center. You could refine the method by using a slightly larger dia lap with a larger ( 5-6") central hole /recess and if time is no issue you could have the table flat within a couple of microns.
 
It would depend on your budget. Giving it a Chicago Job (Cosmetically)

Use a fine 3M Scotch Bright Flap pad on a air grinder on the top of the knee.

Something to think about if you would like to do a little better job

The top of the knee is hardened and there isn't much you can do with it. Do you have a machine parts manual ? If you do check and see if it has Turcite under the saddle and on top of it. Many of those machines have Teflon wear strips glued on the unexposed surfaces. On those older machine many times the Turcite is worn and loose. Like Alex M said changing the wipers and making sure the lube pump is working would also be a smart move. Most up the time those tables are bowed from tightening the T-Nuts and peening the underside of the T-Slot.

Cleaning the top won't make it straight. An easy way to see if it is bent high in the middle you can use a precision level and level the machine table and the level sliding it on top from side to side and watch the bubble,may have to put feeler gage under the out side of the level as t moves as it will be high in the middle top. Or if you can use a Starrett steel straight flat).001" edge sitting on the edge you can slide in feeler gages on each side. Many auto machinist shops have one and you might be able to borrow it. A cast iron camel back would be better but harder to find and more expensive. If it is bent and you want to straighten it out, you could send it to A&D Machine Rebuilding In Wics. Or Alex Fors Rebuilding in Ogden Utah, Crawfords Grinding in Dallas TX and a handful of others I can give you. PM Member Cash Masters in Milwaukee could do it too. Also Steve Watkins in Houston.

It you were to pull off the table and saddle you could use a fine 3M Scotch Brite flap pad in an air grinder you and carefully polish the hardened ways. You can check the way wipers by trying to slide a .001" or .0015 feeler gage under them. Another way to just make the table top better is wrap Emery cloth around a square piece of bar stock and sand the top. It could be as wide as the area between the T-Slots. Also have you mic'ed the ways? Might be smart to help you make the decision.
If you want to you can call me and we can talk on the phone. PM me for my number. Rich
 
Last edited:
Thanks "Everyone" for the sound advice and multiple options. Rich thx for the offer on the phone call - I'm a bit under the weather today so will wait until the voice comes back.

I'll give this some thought - this really is a new and fascinating area of precision machine understanding. I will need to consider this. I think I will start with table inspection- wipers and oiler before doing anything other than soft flat file skim of the top bumps and go from there.

I don't have the manuals but will try to find some online.

This is a great learning experience. I also watched a number of hand scraping videos - that's very humbling g to watch these precision masters.

Thx

Paul
 
If it were mine I'd start with stoning the dings flush a file can work too. Followed by an abrasive pad. Hand rubbing with the pad and oil with controlled direction will give a nice finish at a low cost. Save the precision correcting techniques for after you have a better idea of the machine condition relitive to your needs. Abrasive pads can be 3m or steel wool. Experiment to get your preferd look.

Best time to do this kind of work is when you have the table off the machine.
 
Red scotchbrite and wd40, stone it with progressively finer stones from 320 to 1000 with kerosene then gray scotchbrite and wd40
 
I used a 200 or 300 grit " Norton " honing brick for rubbing down tables. I don't know if you can still get them now. Lubricate with paraffin ( kerosene ). Keep the strokes running in the same direction, lengthwise is best.

Regards Tyrone.
 
Well i recovered enought to get few hours at the mill today.

I spent somem time with a green Sbrite and marvel mystery oil (smells great!) and the bed cleaned up nicely in comparison. I'm good with that for a while.

Really interested in the bed check out. I don't have a precision level / straight edges to this need so will look around see what i can get.

In the mean time i pulled the X-Y stepper motors today (deep cleening and inspection).

The X-Y have < .0005" backlash - i can't really measure it with my metrology. This is good.

The Y axis is smooth / silent by hand turn of dial.

The X axis i can feel some rough spots in it rotionally turning the swrew with my thumb on the dial.

So would like to assess this condition first.

I know the ball screws can be an "art" to deal with and taking them apart is risky getting back together? Is it possible to inspect w/o compelete dissasembly of the bed or is there a way to flush the nut and balls with a solvent / oil. Looks like removing the springs covers is a complete dissassebly?

thx - paul
 

Attachments

  • IMG_20171108_193701279[1].jpg
    IMG_20171108_193701279[1].jpg
    90.7 KB · Views: 297
  • IMG_20171108_193559748[1].jpg
    IMG_20171108_193559748[1].jpg
    87.2 KB · Views: 364
  • IMG_20171108_193542484[1].jpg
    IMG_20171108_193542484[1].jpg
    91 KB · Views: 366
Ok I pulled the left bed side apart and found that it is a non-press fit bearing under the end cap, non-sealed open balls bearing with a fair amount of aluminum shavings in it. Pulled all caps off allowed to remove the screw coil cover and see the screw. The screw looks good visually so far. The bearing itself may have caused the rotational inconsistencies as it was a start stop process - hitting shavings. I have that soaking in solvent now - I'll proceed to the right side that is the thrust bearing.

Fun stuff - amazing machine features - you've really got to marvel at companies that design machines like this!
 

Attachments

  • IMG_20171109_114331734.jpg
    IMG_20171109_114331734.jpg
    93.2 KB · Views: 237
Last edited:
Ok down to the right.side thrust bearing adjusting nut I think. So the left side bearing was a two row ball bearing that floats a few tenths clearance. So not sure if this is what the thrust bearing will be as well.

Any tips on taking this one apart to clean and or find out if roughness is coming from this bearing which I think is probable. I would think it may be pressed in the bed housing and the screw is drawn tight to.the bearing with the nut and a shoulder on the screw? If so this should be clear what to do.

Thx
 

Attachments

  • IMG_20171109_151153065.jpg
    IMG_20171109_151153065.jpg
    94.7 KB · Views: 149
  • IMG_20171109_161517847.jpg
    IMG_20171109_161517847.jpg
    87 KB · Views: 180
  • IMG_20171109_164046369.jpg
    IMG_20171109_164046369.jpg
    94 KB · Views: 169
I would loosen the bearing thrust nut before removing the woodruf key. Under the set screw is a bronze bushing that is threaded and they can get lodged into the ball screw threads even after you have the set screw loose. Looen the set screw about a 1/4 turn and take out the Allen wrench, use a "pin" punch and put it inside the hex and tap on it with a hammer. Nothing to hard but that tap will loosen the bronze lock plug and then unscrew the set screw a full turn. Then slide a adjustable end wrench (Cresent wrench) around the shaft tight up against the key. Then if you have a hook spanner wrench put it in the nut and pull on the Crecent wrench and push on the spanner to loosen the nut. If you don't have a hook spanner. Get a 2 x 4 and put it under the Cresent wrench to hold it solid. Then slide in a dowel pin in the hole of the nut and use a cold roll punch against the pin and give it a short quick hit and it should loosen up. remove the key (It looks like a 1/2 moon shaped key and you tap on one end and it slides around in the key way until it rolls out.

Then unscrew the nut. Then go to the other end of the table and screw it out of the bearings. If you want to clean them I would put them in a tin coffee can and wash with lacquer thinner to soak. Then spin the bearings in the can and once clean squirt with way oil and turn them slowly. I usually don't use compressed air to blow out chips. Give that a try. I would guess that side the bearings are back to back. Be sure to watch for that(fat side of OD end of bearing). Take pictures as you dismantle. Those bearing are not precision and are pretty cheap if you want to replace them. Rich
 
Many times if someone doesn't have a good way to remove the table, they can use a Heavy Duty table on wheels to park next to the machine. Loosen and remove the tapered gib. slide the table out so that end is past the ball screw Then lay a round shaft or pipe and lower the knee down so the table underside dovetails are resting on the pipe.

Then lower the table down say 1/4" and slowly pull the table onto the table. Be sure it is long and heavy duty. I saw something like this technique on You Tube, removing Bridgeport tables. Or rent a heavy duty engine host and put in some hardened eye bolts on Tee nuts. Put a flat 1/2x 3" steel plate between the plates so they don't slide together. Also use flat washers or round spacers so the eye bolt tightens on the top of the T-slot and not jamming into the bottom. If you need a better description you can PM and we can exchange phone numbers. Rich
 
Thx Rich.

Pulled down to this point. When relaxing the thrust bearing nut the gravel rotation goes away and sounds quiet now but can still hear balls in at least one of the thrust bearings.

The outer bearing is floating but can't grab it to pull it out. The inner may be pressed to screw and/or housing. Didn't want to load it too much. Should I just pull the housing off with a bearing puller and only torque to moderate loads. I had read a forum that you really don't want to force tight bearings off due to moving the metal. But don't really see any other way this is coming apart.

Then if I remove the ball screw completely will the balls fall out of the nut? Is it not too difficult to get them installed correctly again if they do come out?

Thx,

Paul
 

Attachments

  • IMG_20171110_102836171.jpg
    IMG_20171110_102836171.jpg
    89.1 KB · Views: 159
  • IMG_20171110_111006393.jpg
    IMG_20171110_111006393.jpg
    88.1 KB · Views: 151
  • IMG_20171110_113404785.jpg
    IMG_20171110_113404785.jpg
    98.6 KB · Views: 245
Don't turn the screw out of the nut. I meant you should turn the screw the other direction. You could lock the table. and turning the screw the other way you will remove the screw from the bearings and housing.

The ball will fly and bounce every where if you unscrew it out of the nut. I would wrap the ball screw several times with electrical tape on both sides of the ball screw nut so the screw can't turn past the tape. If you tape it approx 24" out on both sides you can squirt the screw with oil and if the seals on the nut are working, they will squeegie off the oil as it moves thru the nut. If that doesn't happens time to send the nut out to have it cleaned and adjusted.

If it can be saved they put larger balls in it so they track on and unworn area.
 
Last edited:
Thx Rich for clarifying - I should have read a bit closer.

Anyway your suggestion worked perfectly I failed to think about the screw that can handle I would imagine at least a few hundred pound load.

I pulled that apart and sure enough is the perpetrated has been found. The outer thrust bearing surfaces are pretty well spalled - explains the "gravel". The inner thrust is not spalled but should be replaced as well. The outer radial floating bearing came out easily. The inner one - not so sure about but I may just clean it lube it and leave it if it is pressed on but I bet it is small clearance sliding fit just a bit stuck.

Not sure what size thrust bearings these are - Nachi's though - with no markings I can make out. I'll measure them and probably give Accurate bearing a call.

Tomorrow I'll cleanup and lube the screw run it back and forth and support the end as it runs out - with a well taped ends. Then I suppose inspect the bed oiling system the ways have liberal oil on the X dovetails. Does the screw OR NUT get oiled by the "one-shot"?

These machines are a marvel!
 

Attachments

  • IMG_20171110_195921967.jpg
    IMG_20171110_195921967.jpg
    89.6 KB · Views: 149
  • IMG_20171110_200110458.jpg
    IMG_20171110_200110458.jpg
    81.9 KB · Views: 120
  • IMG_20171110_203910767.jpg
    IMG_20171110_203910767.jpg
    95.7 KB · Views: 129
  • IMG_20171110_205012517.jpg
    IMG_20171110_205012517.jpg
    84.9 KB · Views: 132
  • IMG_20171110_205112663.jpg
    IMG_20171110_205112663.jpg
    96.7 KB · Views: 131
I'm glad I could have helped. Hard to say about the lube, I have seen them with a lube tube and sealed. Take the table off, clean it and look. Be careful it's to heavy to try to lift it off alone. Get a crane or the rolling table. Rich
 
Last edited:
Here's why I love Evaporust/rust chelants. Max mfg. co (from San Jose, CA) disc sander table came out of an evaporust soak tonight. Nothing except a hot tank or a serious electrolysis setup gets iron this fresh without ruining your machined surfaces. This took about zero work, except for dunking it in evaporust, waiting around, rinsing it off with HOT water and a piece of steel wool (hot so it dries fast and doesn't surface rust), and a quick Boeshield spritz (after it was FULLY dry) to keep it rust free:

max_sander_before.jpgmax_table_after_evaporust.jpg

Evaporust is water based, so if you don't mind waiting a little bit longer, then just dilute it until you have enough liquid to soak your table. This one was done in about 2:1 water to evaporust. Or forget soaking it and just paintbrush some on every 10 minutes or so as you walk by while you're at the shop (to prevent it from evaporating, in which case it ceases to work).

For the table dings, I would use a medium grit brand new (not used and warped) Norton stone. You can feel raised dings go under the stone. A few smooth, uniform passes and raised dings will be gone. The stone will load up as you do the table, so you have to decide whether you want to do it try or with water/oil. Also, as I give this advice, know that while I've taken my fair share of rust off of machines, I'm no expert on scraping or precision rebuilding like some here -- what I'm telling you is what I gleaned from listening to the experts on here, bothering Forrest Addy for advice, and trying it on my own machines. I'd keep the sandpaper and grinders away from it unless you're very confident. The first rule of restoring is "don't make it worse".
 
Second rule of restoring - " Don't break anything ".

Third rule of restoring - " Don't lose anything ".

I agree with Rich regarding cleaning bearings with compressed air. It may look like fun to spin the bearings up to really high speeds while you hold them in your fingers but resist that temptation. It doesn't do them any good and nice and slow is best.

Regards Tyrone.


Back
Top