What's new
What's new

Could use some advice before I permanently screw up my bearings

UberPrutser

Aluminum
Joined
Mar 17, 2016
I'm fixing up an old lathe and last week I did some testing.
I adjusting the pre-load on the bearings and started the lathe at 400rpm.
I monitored the temp on the outside of the headstock and after about a half hour it up to about 32C (90F)
After the warm up I noticed that it was a bit harder to get the spindle running. But it wasn't binding it just felt a bit of. I did some testing and it turned out pretty ok for an old machine like this.
When cooled down again I noticed that the drag on the spindle wasn't the same for a full rotation.
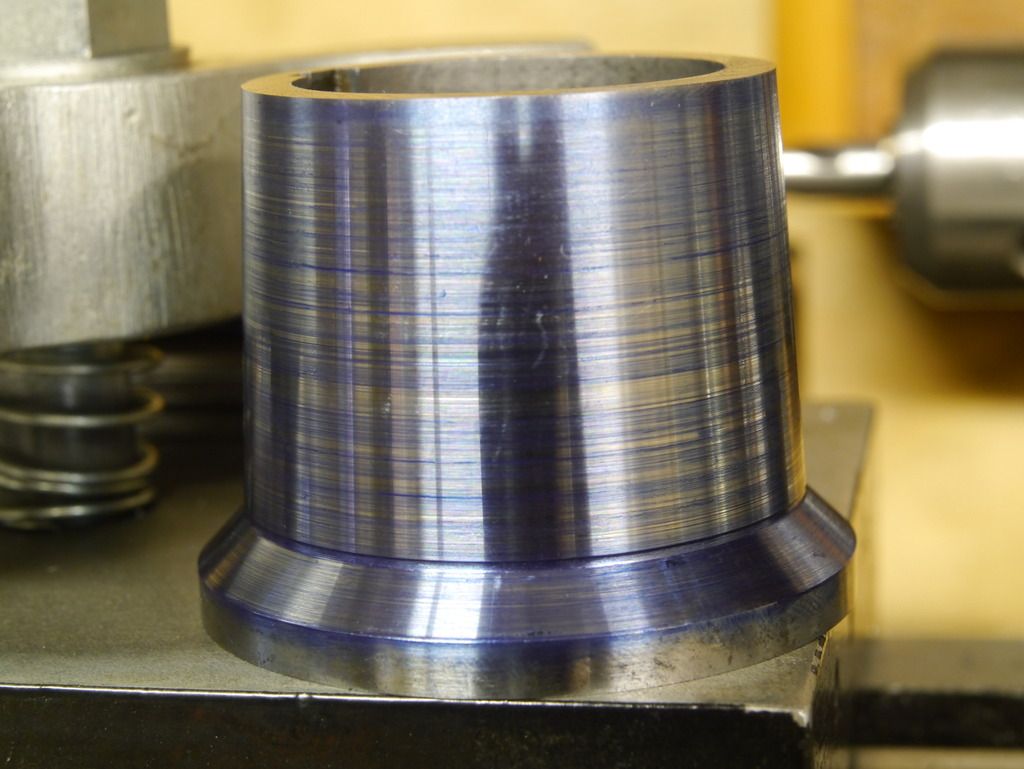
So I took the spindle apart and did some (novice warning) permanent marker high spot testing :)
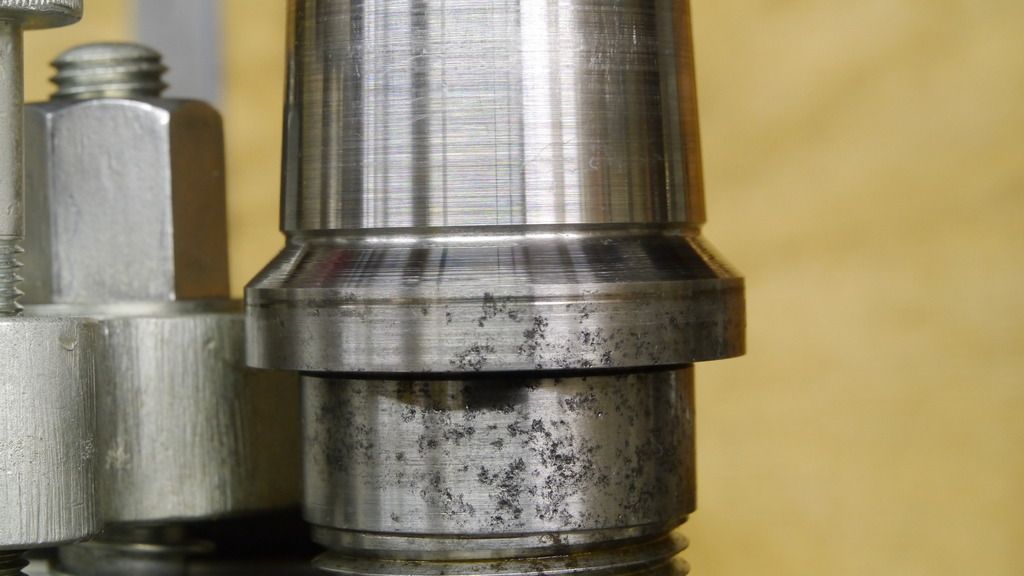
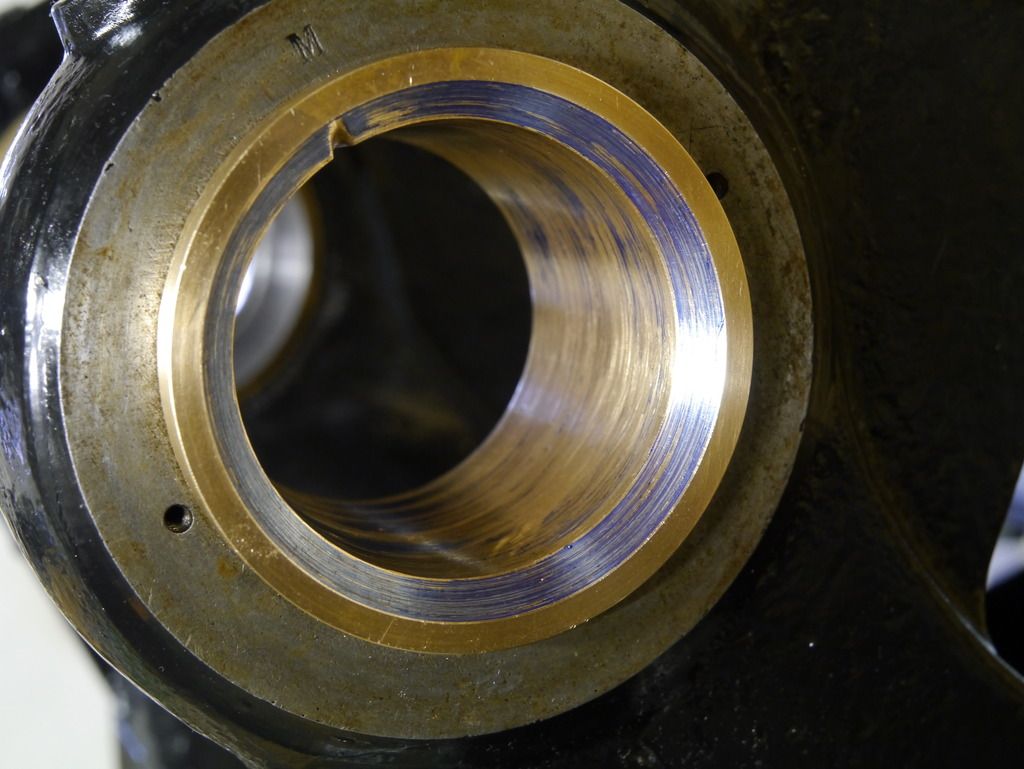
This told me that the front bearing is only running on the front 45 degree trust tapered part of the bearing. And the rear is only running on a small part of the normal taper and doesn't make contact with the trust part of the bearing. The rear (bearing sleeve) is also almost impossible to turn when using the permanent maker.

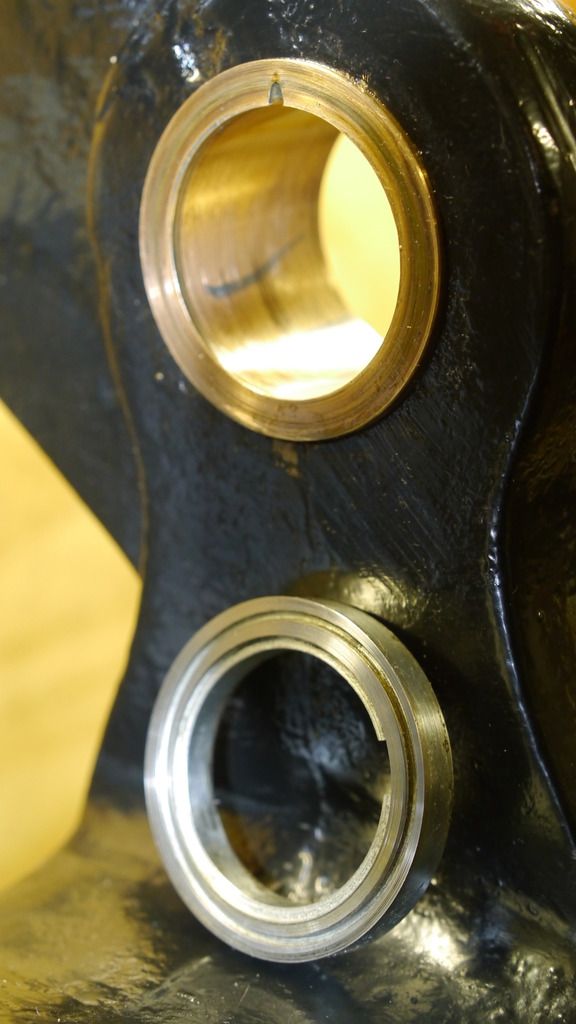
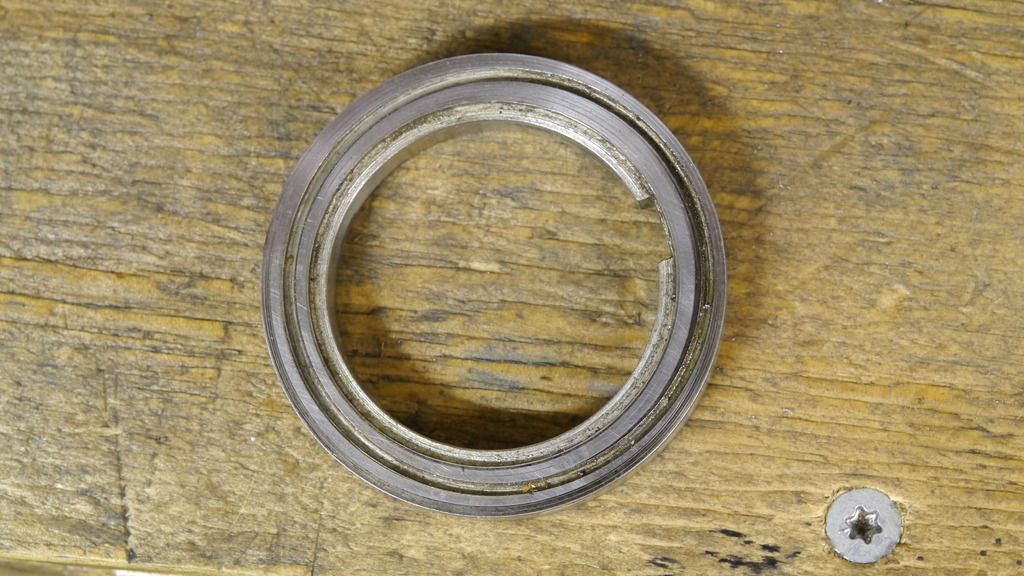
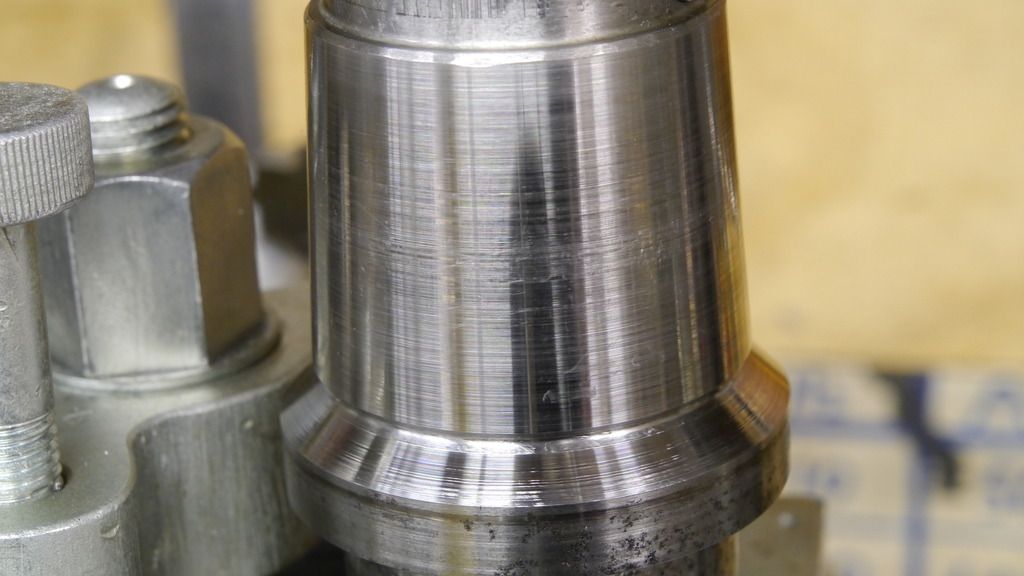
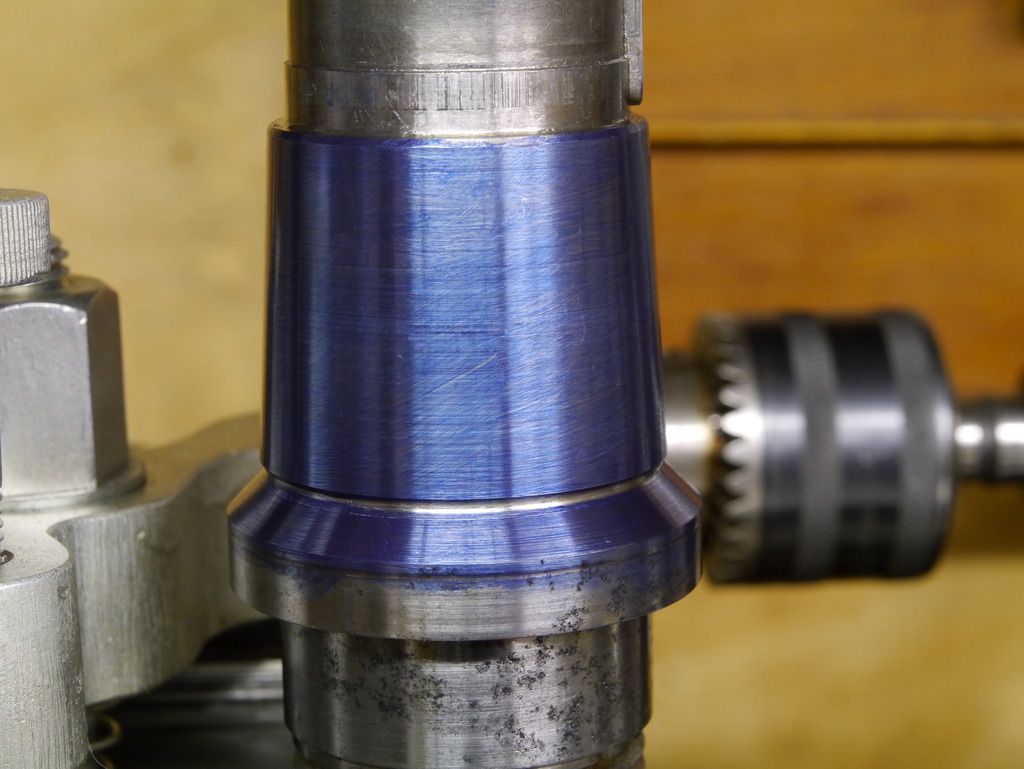
Here are some pictures of my permanent marker high spot test.

P1100544_zpsx5xaafqr.jpg

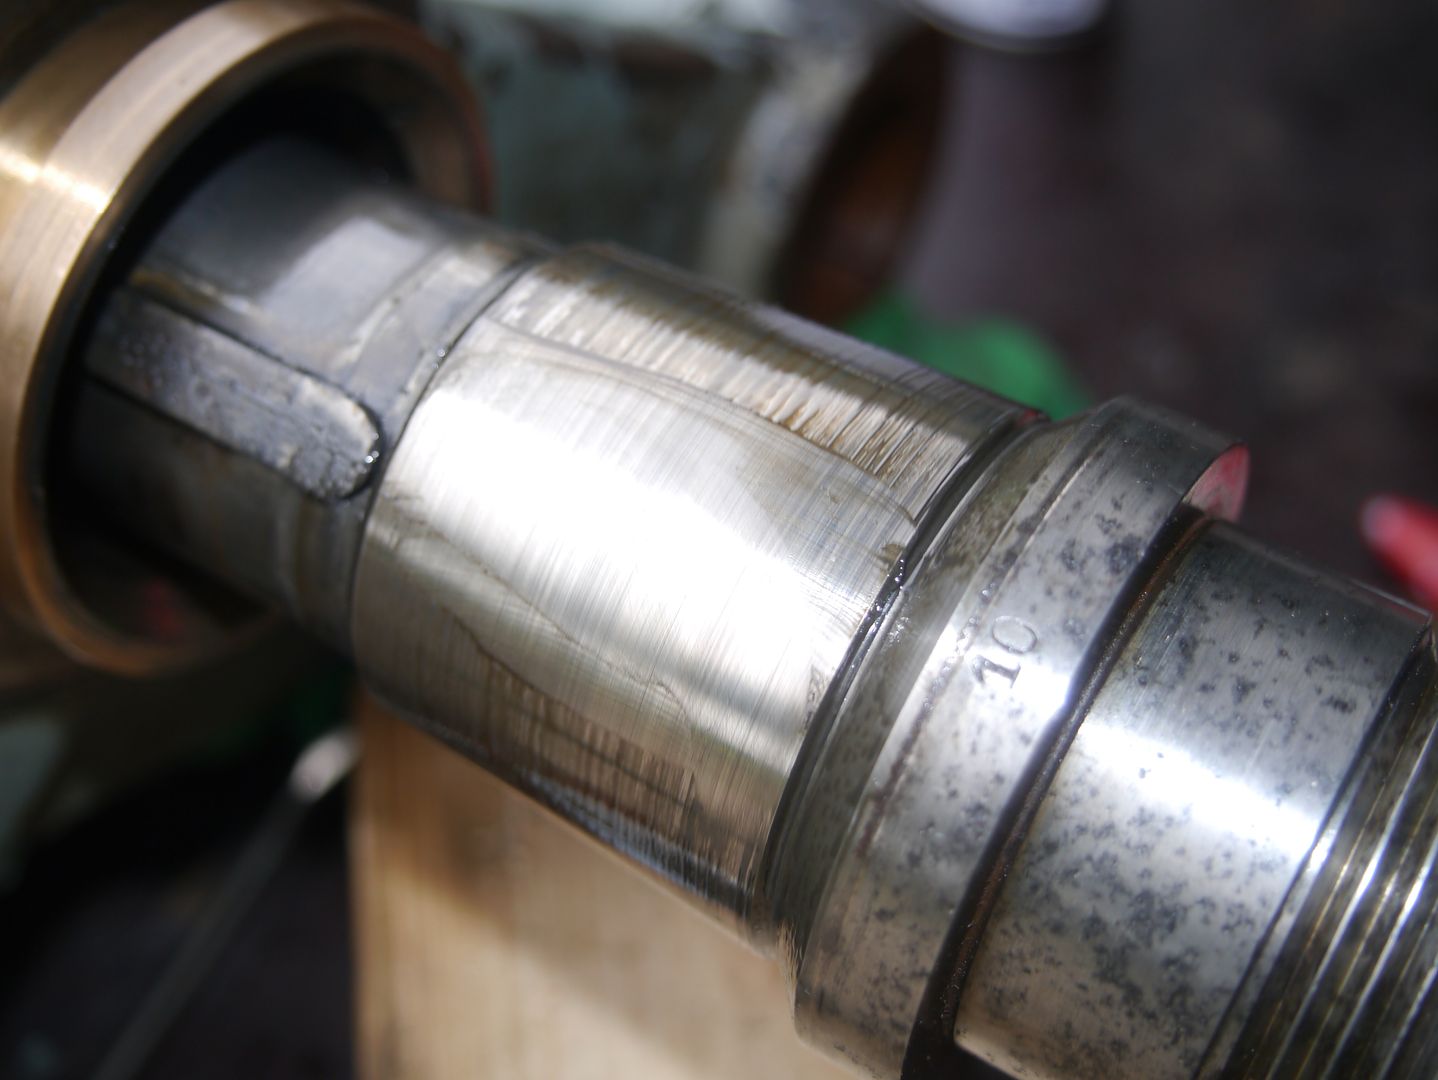
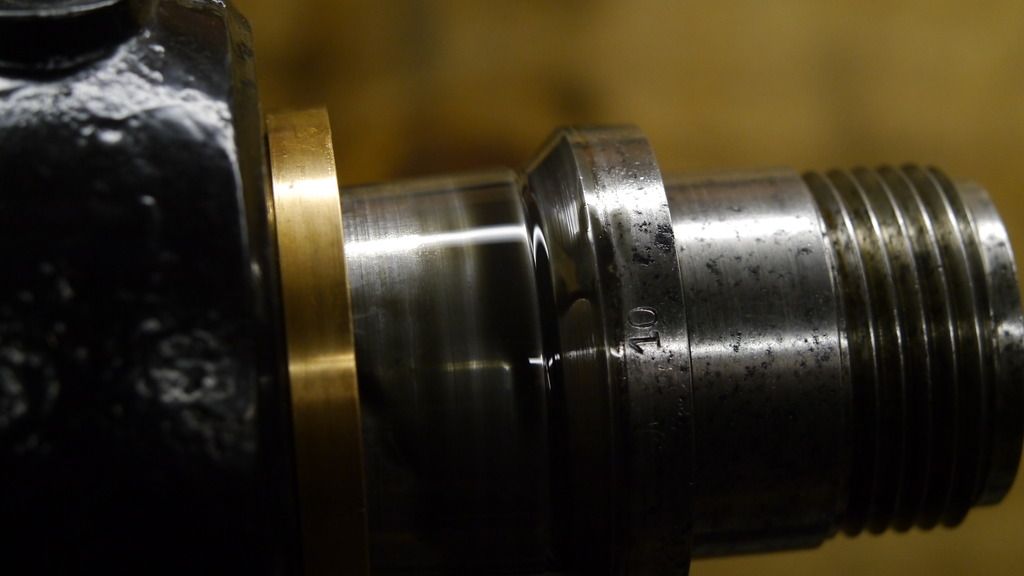
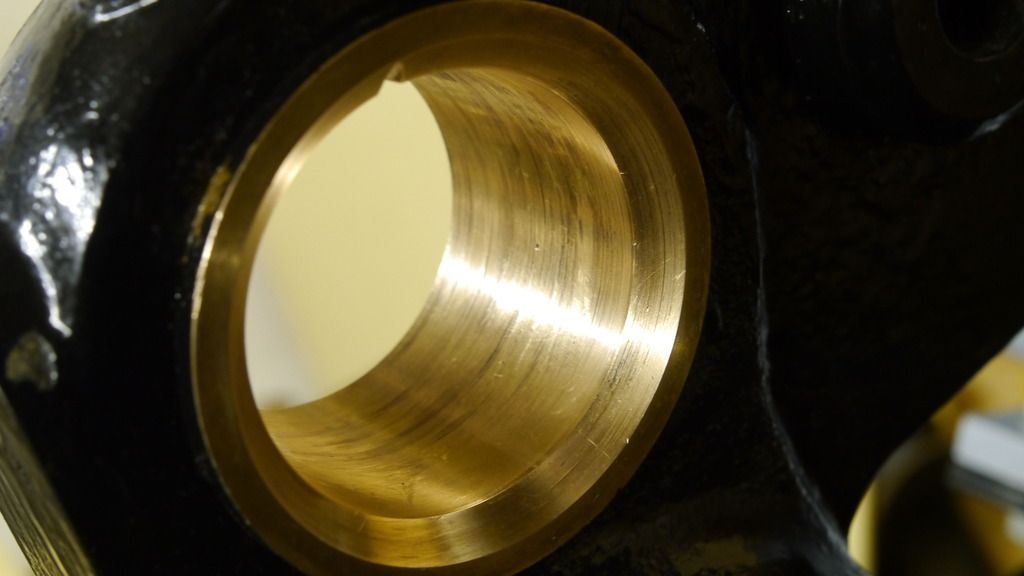
Front bearing. Only running on the 45 degree taper.

P1100539_zpsusqakagn.jpg

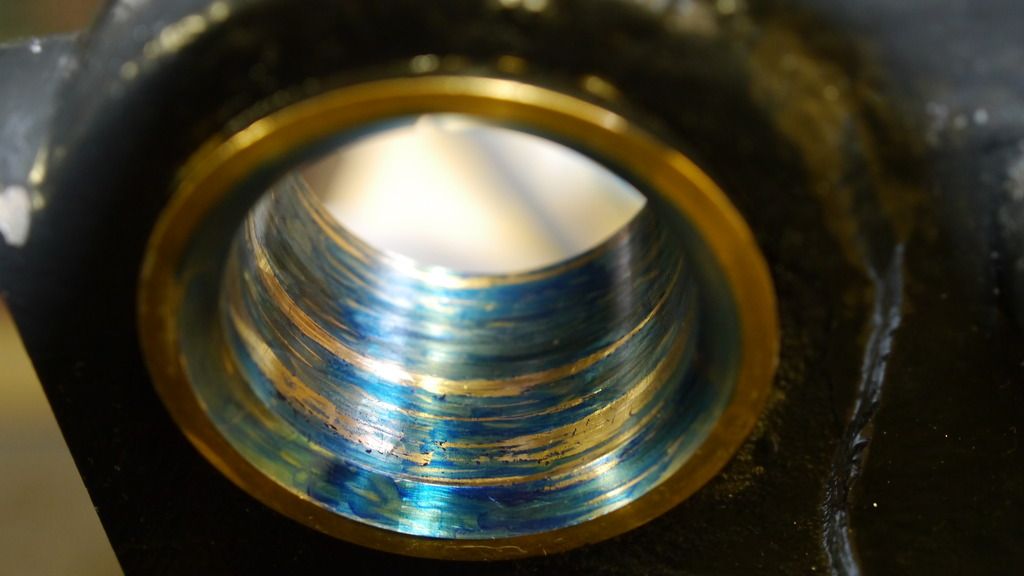
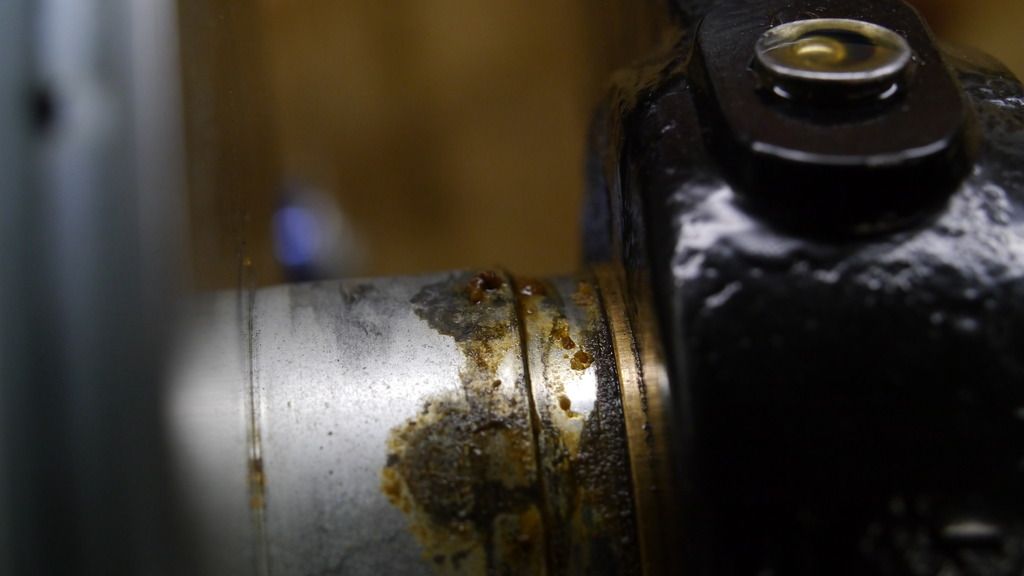
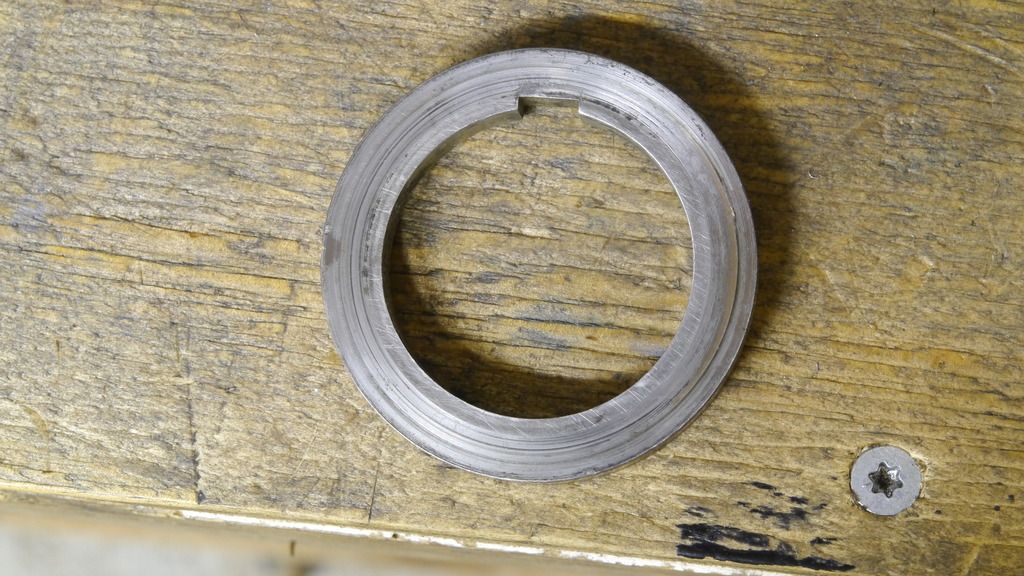
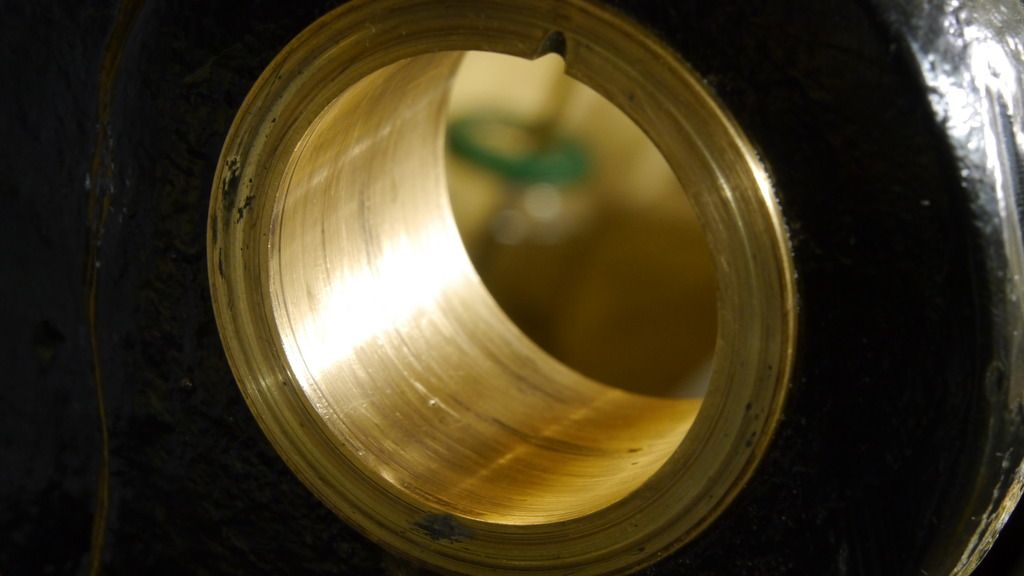
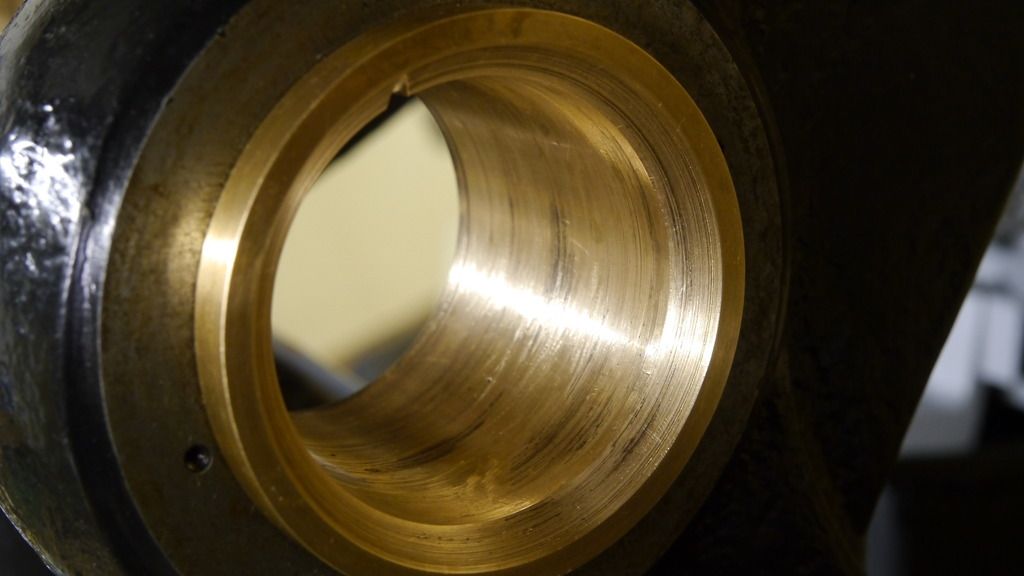
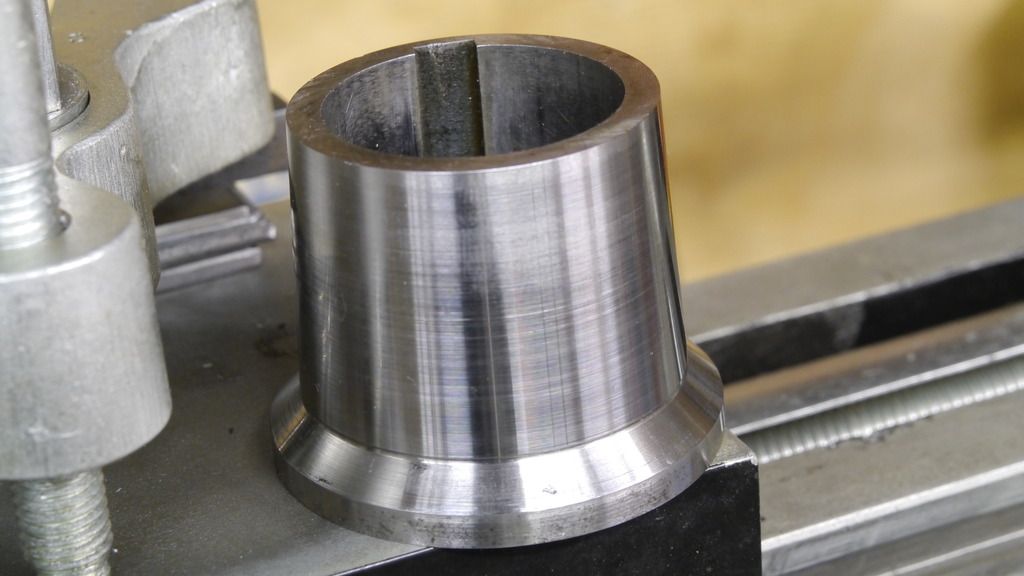
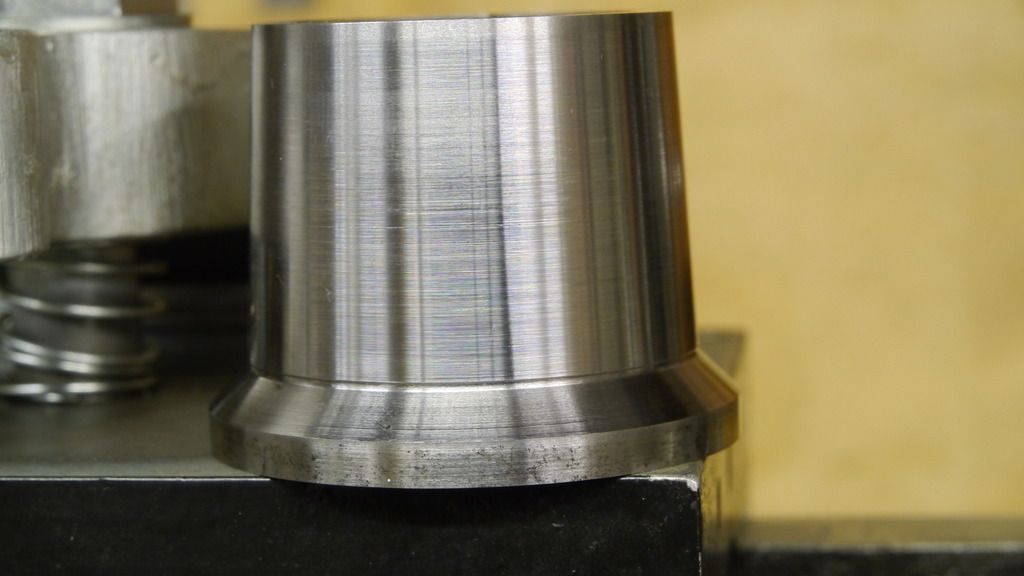
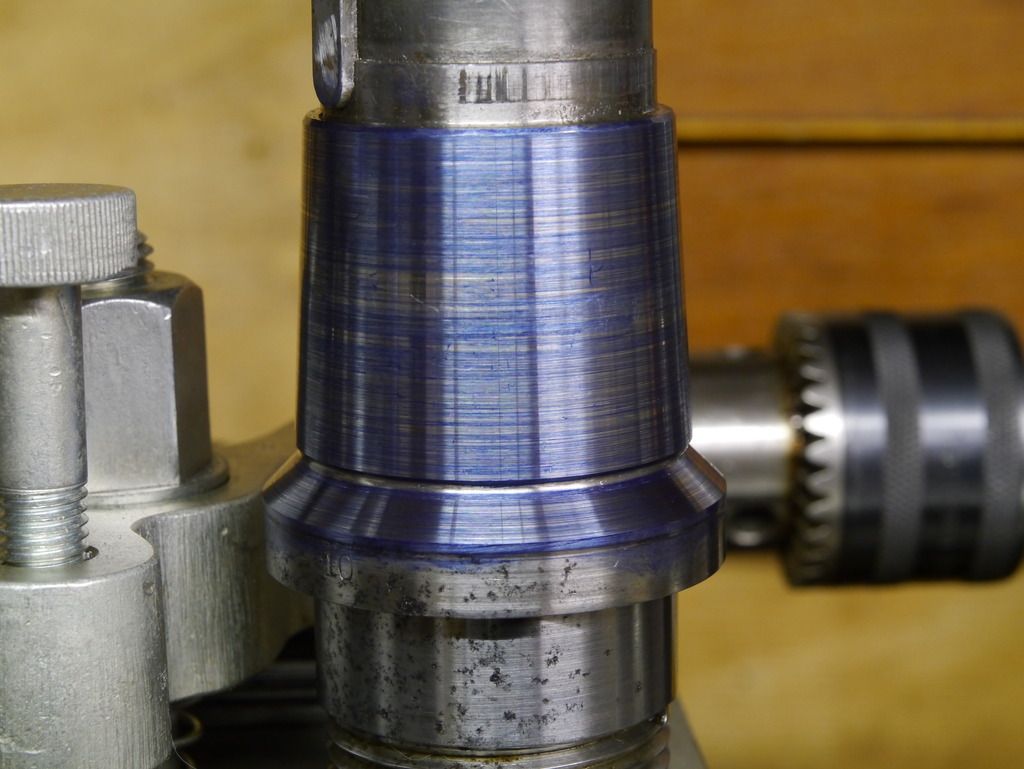
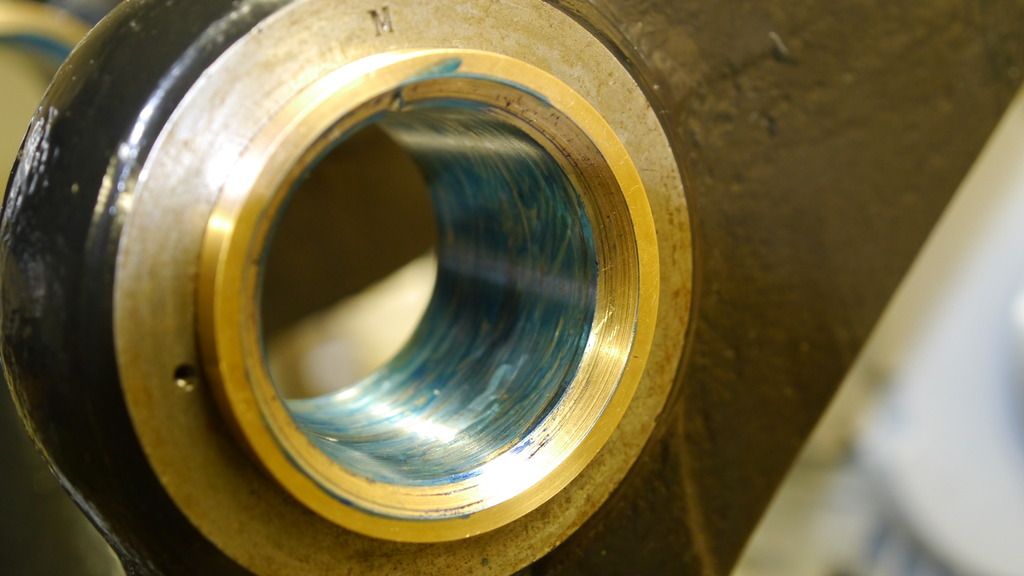
Rear bearing. Only running a bit on the normal part of the bearing. Notice the permanent maker flaking. It might have caused the extreme drag on the bearing sleeve.

Now I'm planning to make a scraper from an old HSS hacksaw blade and remove a bit of the front bearings 45 trust taper and some of the rear bearings normal taper. But I'm scared that I'll mess things up. I only have one shot at doing this right. Any advice would be appreciated.

I have some video about assembling the headstock and testing the lathe. I gives a better look at the spindle design and the bearings. It also shows the warm-up procedure I did.

Headstock assembly: Reassembling an old lathe - Part 3/3 - The Headstock - YouTube
Warm-up and test cut: The old lathe takes its first cut after restoration - YouTube
 
That's a nice little lathe. Here are some suggestions for you. I have a DR appointment in an hour so I can only write a little now.
First buy some paste bearing bluing then wipe off the magic marker. If you have a precision set of V-Blocks I would check the run out of the spindle and mark the High spots (TIR) on the tapers.
I would google spoon and pull scraper. Then slide it back into the bushings dry and measure lift and side clearances. Make a detailed chart /sketch. This is with the nut adjusted to where it is now. You should also mark the nut by scribing a line in the nut and spindle so you know where it is exactly. Check the end play. I would chuck up a flat end shaft into your tail-stock and use that to press the head-stock spindle evenly. Play with this using a .0001" or .0005" (sorry I work in inches) But get you can bend it a little and average out the lost motion or push / read / release / watch to bend or it moving back a little / then push evenly from opposite end or far left end and average out the slop. Now loosen the nut and use a feeler gage .0015" or .002" so you can slip it between nut and bearing race. Oh that reminds me that bearing race needs to be flat and parallel .0001" .0002" at most. You may have to have it ground. But after you move the nut so you can slip in the feeler gage, check the spindle movement in the 3 directions again. From memory on spindles similar to yours, the front steep angle to the slight taper is approx. 1 to 3, but using the feeler gage you can calculate that ratio. My alarm is sounding, I need to prepare for my appointment. I will talk about scraping next time. Good day. Rich
 
Last edited:
Assume you did your testing with no load on the spindle? How do you think cutting forces will affect what you've seen on the bearing patterns? If the temps are reasonable and you are getting good cutting results and no chatter I'd suggest leaving the bearings alone. That tight spot will likely work itself out in short order.
 
Do use the blue and not the marker. Marker actually has some thickness and with that (quite standard) combination of tapers, it could cause a wrong answer. of course, oil also has some thickness.

Yes, the spindle is supposed to touch BOTH tapers at the same time, or actually, to have oil clearance to both at once. The 45 deg taper should not be the only one touching.

The idea is that the spindle should be supported on the shallow taper, with the 45 deg taper stopping the spindle from getting jammed in the shallow taper (which would be "self--holding, like a morese taper). The rear bearing is supposed to keep the spindle aligned, and to keep it from moving forward away from the 45 deg taper. It should not have to resist thrust from the front, it just prevents any tendency of the spindle to slide out the front.

If he 45 degree taper is doing the supporting of the spindle, then crosswise cutting forces will tend to jam the spindle. The spindle MUST be supported on the long shallow taper, with the 45 degree for thrust.

If, as it seems, the 45 deg is doing the work, then the tight spot will not "work itself out". You need to use the thin "Hi-spot blue" to check this and see how everything is really fitting. The marker is too thick to do a proper job.

It appears that you need to prove to yourself that the main (shallow) taper is not worn oval (bottom might be worn more). if the shallow taper is worn oval, then the 45 degree thrust area will be carrying the spindle when it is snugged up to running clearance.

How does the spindle look? Pictures?

It can be troublesome to get the spindle to have all 3 conditions satisfied at one time..... 1) Fits the main shallow taper, 2) fits the thrust taper, AND 3) is perfectly aligned with the bed.

Be VERY careful scraping the front taper. If you go too far, or leave high spots, the spindle may end up becoming "seized", and you will then need to scrape the shallow part of the bearing as well. Everything must end up perfect at one time.

Many US pattern watchmaker's lathes have this exact type taper, but the bearings and spindles are both hardened steel. Those bearings were ground to shape. I do not know how the bronze bearings were formed to shape on your machine.
 
I am not sure if this would work for your lathe but I had lower value watchmaker's lathe that had the bronze bearing that had been run dry at some point in its life. I was able to use very fine lapping compound to clean both surfaces up and improve the fit of the two bearing surfaces. It took some time but it worked great. Once finished I cleaned the parts in ultrasonic.

That said your bearings look pretty rough and may need more love than what worked for.

.
 
Thanks for all the replies.

So I can choose from doing nothing to an all out spindle regrind plus re-scraped bearings.
For now I'm basically doing nothing till I get some Dykem hi-spot blue. But the only Dutch reseller I could find is out. And on Amazon.de, were I have an account, they want 45 Euro for a tube. That's almost what I paid for the lathe!!
A spindle rebuild is not going to happen since I don't want to spent the money on this machine. Besides, I already have a usable lathe of Eastern origin :)This is just a fun project, but I would like to improve what I can.

BTW. I did make one change before I put the spindle back together. I turned around the ring that rides against the back of the front bronze bearing.I also scraped a bit of the rear surface of the bronze bearing using a boxcutter knife blade. Now a flat surface is running against the bearing instead of a grooved surface. See Image below. I didn't notice any change. Both front and rear bearings still have tight spots.

P1100552_zpsq4uidmgm.jpg


@JST. Here is a picture of the front spindle journal. The 45 degree trust taper is the most worn part of the spindle. It really catches your nails. The rear thrust taper is in comparison lightly worn. I did stone the surface of the spindle with a hard Arkansas stone file before putting it back together.

P1100306_zpsksoatr5s.jpg

Excuse the pic quality. I should have taken some new pics of the spindle.
 
I have bought some Stuarts off Ebay and it works as good as Dykem and only 4.50 E.
Stuart Engineers Micrometer Blue Marking 38 gram Tin. | eBay

Tyrone I think told me about it.

When scraping many make the mistake of not scraping deep low spots and thinking 100 % contact is what you want (wrong)! You have a Bronze bearing. Think of a ball bearing. On a bronze bearing the high spots that are like the balls on a ball bearing and the low spots hold the oil or the gaps in a ball bearing.

Your super flat no low spot scraping gives you to much contact, stick slip and no places for the oil to go. When it gets hot it grows and gets worse. You want a 40 to 60% high spots so the spindle runs in a oil film. An oil groove distributes the oil so it can flow into the low scraped spots. Low spots should be scraped .0002" minimum deep. Your wood box knife would be lucky to cut .00002" deep. That's why it gets so tight. Those scratches you originally had were from lack of oil and the bronze started to pull up small bronze material and started to score. We see that a lot on flat, Vee and Dovetail ways too.

That's why I suggested you buy a spoon scraper or at least look at one so you could make it. If you are afraid to scrape it you could "improve on the original" design, but I know some people want to keep it original.. but if you cut an X threw the oil hole it would help distribute the oil. I would also use spindle oil if your going to want a tight fit. if you insist on using way oil leave it looser as that thicker oil will cause the spindle to heat up.

If I was there I would scrape the bearing with a spoon scraper.

You will have to remember the front 45 will move the spindle faster, that's why I suggested measuring the ratio, so scraping the steeper angle will make the spindle fall deeper into the slighter angle. That's why you will need to scrape it deeper or bigger ID so the 45 hits better.

After looking at the picture of the spindle again. Just to the left of the number 10 there is a line. Is that a ring by chance? If it is you could make a new ring or shim under it so the spindle doesn't fall in to deep. May make a to big a job for you, so unless your a really good machinist, forget that idea.

You can Check out this from an old expert who used to write on here. Scraping in a Myford MG12-M cylindrical grinder / part 7 (the end) - YouTube Have fun Rich
 
I watched your videos, at least the parts I thought would be relevant to this issue. Aside cringing at your leaving the dial indicator on the shaft while the spindle was running under power, I have some concerns with your cleaning up the side of the bearings and the washers, without any reference for perpendicularity to the spindle axis.
I strongly second Richard's advise of getting a spoon scraper, and I suggest you to get or make a regular scraper as well.
Once you have the proper bluing paste and you get familiar on how to use it, you can assess at least qualitatively how much out of round and out of perpendicular you are with the various surfaces.
Regarding scraping, I have two comments. First, practice on some piece of scrap bronze (both flat and cylindrical) before you start on that lathe. Second, be aware that either you despise doing it or, more likely, it becomes very addictive and it's hard to decide that something is good enough and it's time to stop and move on to the next project.

Paolo

PS Even if you paid only almost nothing for this lathe, it doesn't mean that it's a piece of junk and it's not worth your time fixing it: especially if you can adapt some collets to that spindle, it could become a handy, rather accurate second operation lathe.
 
I would try some of this on the 45 degree taper. You might be able to take enough off the taper to get the main taper into contact.
Timesaver Lapping Compound Yellow Label and Green Label Compounds, non imbedding lapping compound, manufactured by Micro Surface

I forgot about Timesavers. That's a good product, but you need to lap the long taper bigger as it moves slower then the 45 then the 45. Also would still need to scrape oil pockets into the lapped surfaces. I was also going to say the motor is noisy isn't it? I might try to put a sound proof box over it. lol Rich
 
Thanks for all the help so far.

Here's an update.

There's something of with the HBM way oil I've been using so far.
I looks like it's separating into a wax and a water thin fluid.
There's a wax build-up were the bearing leaks and a few drop of very thin fluid came out when I took the spindle apart.

P1100576_zpskgctue5o.jpg


Reversing the ring that rides against the back of the front bearing turned out a bad idea.
It doesn't get enough oil and the cast iron ring got scored. This is probably why that groove was cut into the other side of the cast iron ring. Hopefully this was the result of the bad oil because otherwise I have no idea what I can do about this problem.

P1100600_zpsl9n4lgzm.jpg

The amount of damage surprises me for such a short running time. (maybe an hour)
The ring was nice and flat like the inner 2mm of the surface that doesn't come in contact with the bronze bearing.

P1100604_zpsm0v008su.jpg

The other side of the ring that originally was riding against the backside of the front bearing.

P1100577_zpshskby6ua.jpg

The oil turned dark, probably from the ring grindings.

P1100596_zpsihxnfv3r.jpg

The rear of the front bearing. Notice the black deposits. I assume this also metal from the ring grindings.

Tomorrow I'm going to clean things up, stone the ring and put the spindle back together using ISO 46 hydraulic oil. Hopefully with some better results.

I took some better photographs of the spindle and bearings to further illustrate this topic.

P1100591_zpsaun13q3l.jpg


P1100587_zpsrjy0uwn0.jpg


P1100585_zpslnod92aj.jpg


P1100584_zpswgcnidtr.jpg


P1100583_zpsd93diw2y.jpg


P1100582_zpsvbwsab3u.jpg


@Peter from Holland. Turns out I already have some prussian blue from Talens. Mines van Gogh, not Rembrandt, does it matter? It is the super fine type. What is the best way of applying this paint? Do I need to thin the oil? Do I paint the bearing insides or the spindle. Do I need a paintbrush or go finger painting like in Kindergarten? It's probably going to be a big mess whatever I do, but any advice would be appreciated.
 
Rembrant makes a huge difference
Apply with a shammy_(zeem) Or like I do with the mouse of my hand
I do not work in the best conditions mostly So if I use the mouse of my hand I feel the precense of any dirt
Yes you get dirty hand

Peter
 
OT, but curious

Peter,

You use an term apparently translated from Dutch that I'm curious about. I understand from context that you use your hand for both spreading blue and checking for grit, chips or whatever on the surface plate. The "mouse of my hand" doesn't come across exactly in English which has it's own peculiarities and irrationalities. The pad adjacent to the wrist is commonly called the "heel" of the hand and the similar pad across from the thumb is just the "edge" unless someone knows a term more specific. Can you clarify the Dutch "mouse of the hand" for me? I kind of like that and it presents some other possibilities. There could be other animals lurking around there that I don't know about.

Rembrant makes a huge difference
Apply with a shammy_(zeem) Or like I do with the mouse of my hand
I do not work in the best conditions mostly So if I use the mouse of my hand I feel the precense of any dirt
Yes you get dirty hand

Peter
 
Thank you. That's sensible. I don't know that there's actually an English equivalent name for that part of the hand so Dutch is way ahead of us.

Give us another couple hundred years of development or perhaps less with some slang and euphemism creativity and maybe we can find a word too. In the meantime I'll keep mouse in mind.


The mouse is Dutch indeed and I thought I looked it up earlier and was the same in Englisch
I mean the beafy part between thum and wrist

Peter
 
The steel bearings look fine. Clean everything of oil and put a fine coat of blue on your spindle with your fingers, very thin. Slide the back steel bearing in then the spindle, carefully, give a turn remove and check. Probably been mentioned but forum member Nick (meuller nick) has a good vid on YT on scraping spindle bearings.

If it was me I'd break up the surface on the bronze with a spoon scraper before printing. Getting the back bearing in before twisting is essential.
 
Yesterday I did some finger-painting and light scraping using my pocket knife.
I had some success but it's still far from perfect.
The spindle seems to run a bit smoother and the deflection on the spindle nose has improved considerably. Run-out is still the same.
The thinner ISO 46 oil is leaking a lot. Especially on the back of the front bearing and the front of the back bearings.

P1100623_zpsfedqxbh2.jpg

P1100624_zpsaz1mf30p.jpg

P1100621_zpsc9mjhnxa.jpg

Front bearing. After scraping a bit of the thrust taper, there is now some contact on the shallow taper.
P1100617_zpsuikzgw2s.jpg

P1100615_zpszxhrlhdr.jpg

Rear bearing. Notice the low spot on the thrust taper.
 
Last edited:
What is supposed to seal them? Looks like it's designed for the oil to just run right through.

Only lathe I had with plain spindle bearings had "hula-hoops" inside to bring up oil and cavities on both sides of bearings for drainback.
 
What is supposed to seal them? Looks like it's designed for the oil to just run right through.

Only lathe I had with plain spindle bearings had "hula-hoops" inside to bring up oil and cavities on both sides of bearings for drainback.
It's 'constant loss' so yes the oil goes right through. And you get a nice stripe down your shirt after 2- 3 hours.


Back
Top