What's new
What's new

thickness of blue

dian

Titanium
Joined
Feb 22, 2010
Location
ch
comment: every time i take out these instruments, something unexpected happens.


i cleaned the two jorgensen gage blocks with alcohol and wrung them together. i got - 2.75 mu.


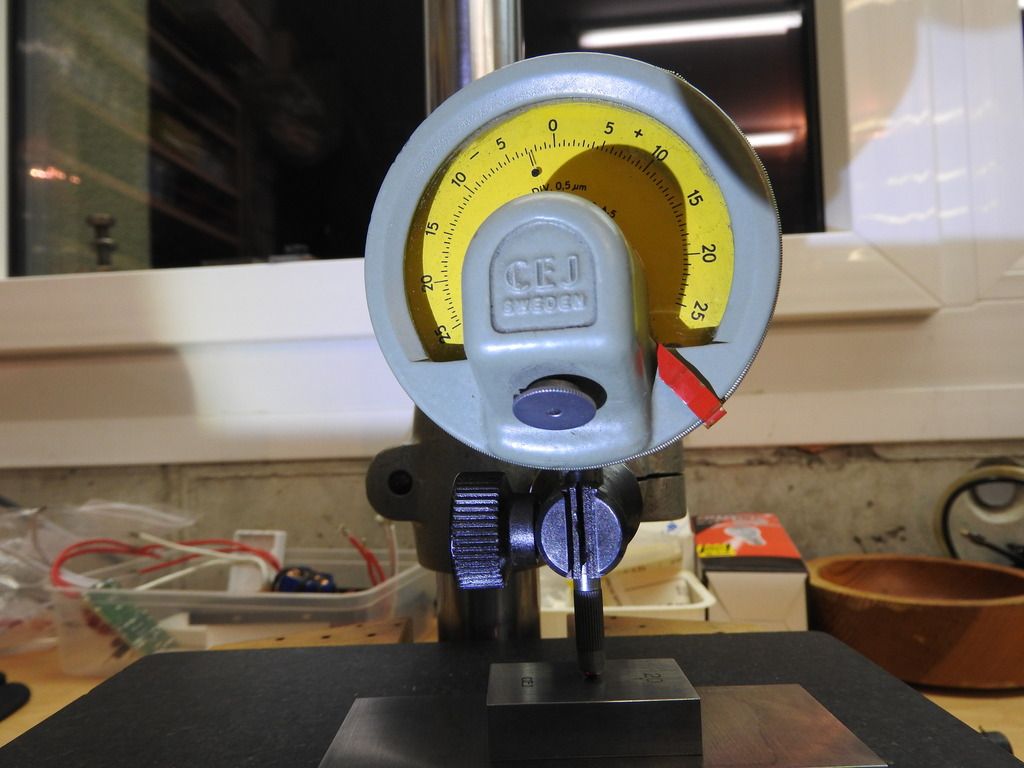
i then put a haze of blue on the small block: -1.6 mu.


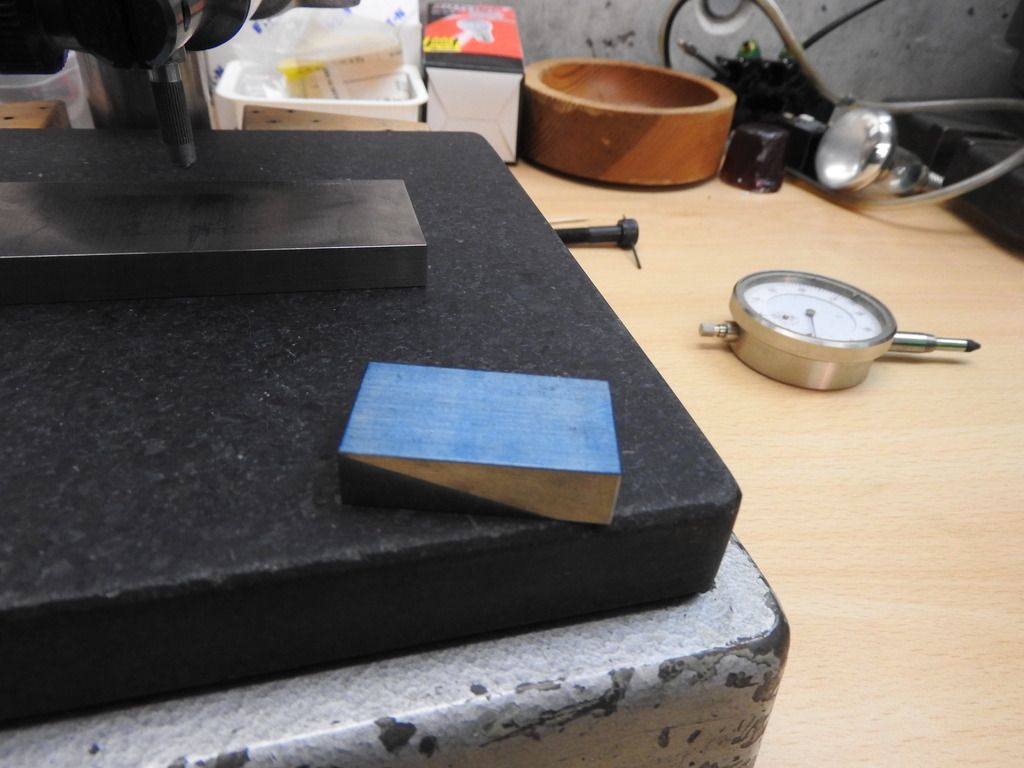
some more blue (obviously the block doesnt blue up well) yielded +1.3 mu. a lot (too much) blue resulted in +6.0 mu, but afted wringing i got -4.0. afted whiping it of, the instrument surprisingly settled to -2.75 again. so my conclusion is that the thickness of blue is 2-2.5 mu.

every time i waited for about 5 min, before taking the measument. i saw shrinking of around 0.2 mu. in the morning i found -3.4 mu on the scale.

btw, after cleaning with alcohol it showed -4.1 mu (starting from -3.4). a very light coating with charcoal lighter yielded -4.1 and a thicker coat -4.8 mu. whet wetted completely i got -5.1 mu.

would anybody care to repeat my experiment to confirm the results?
 
the wide surface on those blocks is ground flat, but I don't think they are flat enough to reliably use them to measure a micron or three the way you are attempting to. simply moving them around or rotating them relative to each other would cause as much or more variation as you have already measured.

the polished and flat end to end surface should reliably read within 1 micron, as that is 25 millionths of an inch. 1 micron at 20mm is within the realm of grade B gauge blocks if i'm not mistaken.
 
would anybody care to repeat my experiment to confirm the results?
I'd be fairly certain that no one could be bothered.

i got - 2.75 mu.
From this? Your splitting hairs on your reading. What happened to that 10:1 thing?
3%20390_zpse7mhtipm.jpg


Tell us again about your climate controlled Inspection lab? With this 0.75 micron finding. How are you redefining metrology

Surely this is the basis of your confusion?
i cleaned the two jorgensen gage blocks with alcohol and wrung them together. i got - 2.75 mu.
Surely your gizmo is a comparator. Uncle Joe's blocks are gospel, Yet some how you declare they are minus 2.75 micron undersized. Wouldn't you set your comparator to zero, against Uncle Joe's blocks?
 
I thought the experiment very good.
I also think the results are very revealing.

My conclusion, fwiw, is that the error band is about 2-5 um, depending on what and how you measure.

Others have measured the thickness(es) of "blue" before, and I seem to recall they are about 0.01 - 0.02 mm, up to 0.04 mm, on some type(s) of marking.
Video on YouTube, abom ? maybe ??
They used a less sensitive instrument.

I am very interested in the results, myself.
I would like baselines, for a start.

Some ideas:
If you measure a gageblock alone, what is the error ban on say 10 measurements, non-disturbed, at different parts of the same gage block ?
Ie if You don´t move anything except block, and either put it back in same place, or try different places.
How reliable is this in terms of repetition and resolution ?

If you stack the blocks, are the results comparable to a single block without layout fluid ?

The above 2 setups, would I think,indicate what are the expected variations from
1. the instrument, setup, and
2. errors if any, from the blocks themselves, singly and in a stack.

You might well know or have the expected repeatability (and maybe accuracy) already - but we just don´t know.

The videos on Youtube I looked at used I think 2 types of fluid and a sharpie / magic marker.
There was siginifacnt variation on thicknesses od 1-2-4 of 0.01, or 10-40 um.
 
"simply moving them around or rotating them relative to each other would cause as much or more variation as you have already measured."

well, it didnt. the readings were stable to 0.05 mu as far as i could tell and besides they went exactly in the middle for measurement every time (you cant see the marks i made on the plate). i forgot to mention, in the case where the blocks "shrunk" from too much blue, i took the readings 3 times with the same result.

hanermo, you are thinking of the guy measuring different colours of sharpies? if i recollect correctly, he was missing a zero somwhere.
 
Others have measured the thickness(es) of "blue" before, and I seem to recall they are about 0.01 - 0.02 mm, up to 0.04 mm, on some type(s) of marking
They used a less sensitive instrument.
Less sensitive instrument might be your cock. You couldn't possibly pretend 0.01 - 0.04 mm is a marking
 
It's kind of like playing with a good optical flat. Standing too close, dust, breathing and room air currents start to become visible. I've had similar issues with a sensitive autocollimator where zero isn't perfectly stable. Good rules of thumb include, nothing is perfectly flat, nothing has zero tempco and everything is made of rubber. I doubt bluing is made with ultra-filtered materials either.
 
Too many variables/unknowns to be repeatable, and of limited usefulness.

Its kind of like asking how thick an oz of butter is. First you have to spread it.
You tend to get lumps at 0 degrees, it stays put at 70, and at 140 its running all over.

We (hopefully) are not scraping at those different temperatures- but we are using a variety of different products, some oil based, some water based, and sometimes thinned.

Dian, How were you going to use the thickness measurement result?
 
...

Dian, How were you going to use the thickness measurement result?

Obviously I have no idea what the OP had in mind, but it would seem that if one had a calibration on the thickness, and it might not have to be that tight a range, then one could get a reasonable measure of flatness. If a set of points all contact and transfer blue in a similar way, they obviously all must be in one plane within the thickness of the blue.

More accurately, they all must be conforming to the reference surface within the thickness of the blue.

Extending that, then if you have two reference surfaces, and when printed against one another they give a good even distribution of blue, then they conform as above. If one then prints them against one another at an angle to the previous print, and they again print in a similar manner, one can say that they are both likely to be flat within the thickness of the blue. ( With a suitable shift of position, it becomes more likely, as you tend to prevent errors from having "perfect mating potato chips")

If one knows the thickness of the blue, applied in a certain way, then one can put a number to the result.

This is not expected to be a "measurement", but more like the "calibration" one can get of how much is scraped off per pass when doing a "standard" scraping pass. A "micron" or micrometre, is about 0.4 of a "tenth", so it is possible that it could be a fairly useful estimating tool, depending on how many microns the blue thickness turns out to be.

Since it is a relative measurement, with vs without blue, it seems credible that reasonably careful technique could get a decent measurement of the blue without necessarily having to be in a carefully controlled environment. If doors are not opened, etc, and the measurements are completed in a shortish time, temperature should just drop out. The warming of a large granite slab due to spreading blue would seem to be negligible, especially if you wait a bit for the temperature to equalize.

The granite itself will act as a heat sink to keep the measuring block etc at a constant temp if you leave the indicator setup in contact with the granite flat. Good enough to get an estimating tool at the temperature in question.

I'd bet it works decently with Dykem Hispot. I would not ever even bother to try with the Canode, which always seems to be far coarser in behaviour.
 
just like jst points out. if i know the thickness of blue and make an assumption about its uniformity, like +/- 50% maybe, i can make a judgement on the magnitude of deviation from the master if something "prints well". my result makes me believe this deviation to be about 2 mu or smaller, which is consistent with what i was thinking before. in the thread about the se i was trying to quantify just that and this result supports my feeling that the se might be true within 5 mu.

the shop was at 20°c, so i cant see any temp. related effects on the blue.

im surprised nobody commented on the blocks wringing tighter with increasing amounts of oil/blue. that would be another topic, probably.
 
I can see how this experiment would be interested for engineers and hobbyists who are complicating a simple craft with useless info. I saw this back in the 1990's in Taiwan when I was teaching at PMC, a Research Institute where I taught scraping and rebuilding. They (Engineers) were trying to document all aspects of scraping to include in their library collection of facts. I had added the results on PM way back when and some one else posted those results about a year ago on here and forgetting to mention where he found them. Again we are discussing something that should be left to Nist or some Research Institute to discuss or spend a lot of time thinking about.

When we put a transparent layer of ink on machine tools and scraping straight-edges I do recall .00004" was the figure we came up with under normal temps and operating conditions after the rub when the applied layer was applied right. But it is irrelevant when you are rebuilding or scraping in a machine. As dian points out when he points out "prints well" . That is the important part here. In the laboratory one can measure thickness of bluing and worry about the results with Canode, Dykem, etc. But for the experienced rebuilder / scraper we could care less what thickness is as Phil points out in his elegant way, lol.

Most who know and what I teach is we "read" the color of the blue, this is done by rubbing the 2 parts together several times, most beginner scraper rub one or 2 times and scrape and they say things like "I
can only get 10 PPI and nothing better."

I teach rub at least 10 times and the more precision and the more points you want, rub more . As the parts are rubbed together they polish the high spots and the lower one stay the same color of the bluing; the 2nd highest turns black or grey; the highest get shinny like a mirror. When we are scraping super precision machine to 40 PPI we have to only scrape the shinning high spots to get all of the one shinny or they are on the same plain. Also the experienced scraper "reads" both sides of the bluing, the side you blued up and the side of the machine or SE you rubbed blue on. On the side you applied the blue on, will also polish off bluing where it is highest and you can read both sides to make your job go faster.

This is one of the "tricks of the trade" that makes scraping easy to do. Rich

Pic: example of shinny on the bottom of a Myford tailstock and transparent in on a ground swivel plate (table) and headstock ways. If you look carefully at the pictures you can see the different colors of the blue and where it is hitting harder. The last (red ink roller) picture you can see where the table is showing where the blue is rubbing off.

2014-03-06_15-09-21_788.jpg2014-02-27_10-55-15_291.jpg2014-03-06_17-19-37_155.jpg
 

Attachments

  • 2014-03-06_15-06-52_927.jpg
    2014-03-06_15-06-52_927.jpg
    85.5 KB · Views: 462
Last edited:
Here's from a thing I wrote years ago. It's intended to accommodate the detail oriented so don't roast me about excessive refinements. The last half is non-germane to the topic. I left it in in case someone might be interested.

................. ........... ........... .............. ....................... .

One can with care and a little math pre-determine film thickness by deliberate control of the blue to be spread:

These remarks were written for Dykem oil based paste Prussian blue but work about the same for the water based Canode products if allowance is made for their somewhat greater film viscosity and opacity.

Starting from a clean plate, use a hard rubber printer's roller (breyer) to spread the blue. Calculate the area of the surface plate and multiply by 20 millionths (0.5 micron). For example: 18"x 24" = 432 sq inches x 0.000020" = 0.0086 cu inch. A nurdle (official term for a blob of any kind of paste or gel issued from a tube) of Prussian blue if stretched a bit as it's squeezed from the tube is 1/8' dia (3 mm). If your eye needs a little help, use a short length of 1/8 wire or a drill shank for visual comparison. 1/8" dia = 0.016 sq inch. 0.0086 cu inch / 0.016 sq inch = 0.54" 14 mm)

Therefore a 1/8" dia nurdle of Prussian blue a bit more than 1/2" long uniformly spread over an 18" x 24" plate will result in a 0.000020" thick film of blue not counting the area of the clean roller.

Metricoids: there's about 40 millionths of an inch to a micron or 0.001 mm.

When spreading the blue, roll briskly lifting the breyer at the end of each stroke so it spins to randomize the ink spots it lays down. I prefer a rubber printer's roller (NOT a foam one) as it is non-absorbent and its small area has little effect on the film thickness when you consider the much larger plate area. If blue spreading is executed briskly and efficiently it takes about 40 seconds to prepare a bare plate for taking prints on work subject to precision scraping.

This, by the way, imparts a strong but transparent Prussian blue color through which the texture of the plate is clearly visible (less so with Canode which is more opaque). If you keep this color in mind, you can refresh the blue several times before the thickness starts to drift. BTW, 20 millionths thickness is best suited for finishing; it's too thin for initial scraping prints. Use 40 - 60 millionths (1 - 1.5 micron) for general rough scraping. That means double or triple the length of the nurdle.

Crumbs and debris happen. In normal use the scraping reference attracts dust from the air, hair, lint, scraping swarf etc no matter how careful you are. It should be cleaned and re-coated every few hours - YMMV. Do not brush or use compressed air to clear swarf from a scraping work area. These methods mostly scatter it. Use a shop vac: this sucks the swarf in and sequesters it forever.

Do not use a dauber, whatever its material or design. It takes up varying amounts of blue making rough quantifying the film thickness almost impossible. I know people swear on their Grandpa's sacred bones hat that a dauber is the only way to go but I think it's painfully slow and labor intensive. Also I never found a dauber material that didn't shed debris.

Do not use your fingers to spread blue except on small surfaces. The vigorous rubbing necessary puts heat in the plate and the circular motion is hell on your finger joints.

OK,vocabulary: we got blue - I call it a "transfer medium." It transfers from the reference plate to the high spots on the work. I call the contrasting color thinly applied to the work to make high spot indications more visible a "contrast medium".

For a contrast medium, I prefer red lead (old school but toxic as hell. It leaves dark grey indications) or Canode yellow (leaves olive indications.) It can be thinned when applied but what to thin it with that doesn't involve evaporative heat transfer? I've never found a good way using thinners. I roll the contrast medium out very thin from a transfer plate and remove the excess with a clean roller wiping the roller with a clean towel in between rolls to remove the excess. After a couple go-arounds you find just how much contrast medium to apply.

Alcohol has been suggested as a "hazing"agent used with a clean (un-blued) flatness reference. When alcohol evaporates it carries away a significant amount of heat; contracting the face it wets. While the haze it leaves behind is easily visualized in grazing light and very thin, it comes at the price of having to wait a few hours for thermal equilibrium to wend its slow way through-out the mass of the workpiece before a reliable print can be taken.

Instead I recommend a fast rub with the heel of your hand to leave a thin coat of skin grease. If done with a rapid wiping, motion problems from heat input are reduced to nearly zero, and the skin grease haze seen in grazing light is as visible as the alcohol haze. Us older farts may have dry hands deficient in skin grease. If that's the case, use the inside of your forearm being careful of shedding arm hair.

When you look at the printed surface in grazing light you see the haze dulling the flash and sparkle of the scraped surface. Scattered in the haze are little bright pinpoints indicating bearing. Tracking down and scraping these points is a truly heroic task requiring immense patience and persistence; the process is called "pinpointing" (surprise). The result of pinpointing when carried to its logical conclusion with excruciating temperature control is a scraped surface whose bearing points are in conformance to its master reference surface within small millionths.

I encourage any advanced scraping beginner to go through this ordeal at least once as a rite of passage. Having done it once, there is seldom a need to do it again unless you are re-scraping precision gaging equipment like the bed of a Pratt and Whitney Super Mike. Pinpoint scraping references and high-end machine tools may not improve perceivable accuracy or longevitys. The time and work required for pinpoint scraping results in significant waste if employed on general purpose machine tools
 
Last edited:
Eh, it's all very well to dismiss the idea as " just for "hobbyists, not for practical people".

But effectively you do the same thing, although as usual, you call it something different. Forrest already has an estimate of the thickness. He, at least, knows roughly what a given appearance of the marking means in flatness terms.

And it makes a big difference what is being scraped. A 20 foot machine slide, and a surface plate, are two different things, scraped to very different limits. The idea is much more applicable to folks making or refurbishing surface plates and straightedges.

Everyone knows that thick blue will give what an inexperienced person might think is a good print as far as PPI, and can just about do it on a rough casting that is anything but flat. To get a better, more precise print, you have to have way thinner blue as you move to better and better flatness.

And, eventually, you may end up using "alcohol haze" as the marking medium, or something such as Forrest mentions.

ALL THAT IS DOING IS THE SAME IDEA AS DIAN SUGGESTS, The difference is that for the experienced person, there is knowledge already of what general level of precision is represented by a certain amount of marking medium and technique of application, as Forrest mentions.

Dian is simply looking to measure it for his own case. Nothing too stupid about that, really, although it may not be "necessary".

Not necessary because there is only so much you can do anyhow. When you get the blue thin enough, and are getting "bullseyes", the blue is no longer really acting as anything but a way to point out the bullseyes, which are most of what you are interested in. Next step is the alcohol, etc. You know it's thin, and you are getting very flat, you just can't really do much better because nothing will show it suitably for scraping.

Maybe there is use in it because if you do different things to different limits, you want to know where to stop. If you have 40 years experience, you already know. Dian presumably does not, and is looking to find out, maybe a bit more precisely than necessary..... There are other ways.

One can also scrape something, and then run over it with an indicator on a surface gage base, set up similar to a "repeat-o-meter", but without the block. Then the indicator will run over the peaks and valleys, so the highest indications are the peaks, and you can see what sort of variation is present. That might be much simpler, and a lot less susceptible to temperature errors. It's also a direct measurement, not an indirect indication. If you pay attention to the blue, you can "calibrate yourself" that way. If you DO use a block, you average several peaks, and can see what sort of variation there is between areas of whatever size of block you choose to use.

This brings up a side issue that I have noticed:

I see nice pictures of a high PPI on a reference surface, such as a freshly scraped straightedge. Nice views of the blue. Shows up well in the picture.

And every time I see one of those, I think "I can't even get the blue to show up at all in a pic when I get a surface to be like that, How much blue did he put on, and how does that affect the PPI and flatness indication?". Because I end up with a real haze and bullseyes, which does not show up worth a hoot. If I had as much blue on it as it looks like, I'd probably just get a smear.

Are those pics typically done with an excess just so as to show up for the pic? Or is it special lighting to get the blue to show up?
 
Last edited:
I measure the amount of blue by smearing. When it smears I have too much. When it stops smearing I have enough. I have never understood this alcohol and super thin use of blue.

Might be suitable for working in a temperature controlled room for use on machines that operate in a temperature controlled room. But I think people have a good grip of it if they think going to that extreme in the normal workshop is worth it. Unless they are just doing it for giggles to suit themselves.

I seem to get good results with my method of more is better (to a point). In fact it was the single most valuable lesson I picked up at Phil's scraping class. Do not go stingy with the blue. Which was something I used to do based on reading these forums prior to October 2011. Since I went full on smurf results and speed improved noticeably.
 
Lets make this perfectly clear, I have absolutely no issue with dian or anyone else measuring the blue thickness. it's something many people wonder about in the beginning of their scraping career and it is wonderful he started this thread, but in scraping the proper way it has no bearing here.

I know I still rub the "old gang" who used to be considered the scraping experts the wrong way, but for years they got away with teaching their self taught methods and were wrong. After they watched someone else scrape or reading a book just doesn't cut it when someone like the real Journeymen on here write and there students who now know who is full if BS and who are not.

You know many people read this thread and never say a word...I want to be sure what is written is right in my opinion and my 50+ years as scraping for a professional and not bad info spread by someone who has maybe scraped 6 machines in there lifetime, his Bridgeport that took 2 years to finish, his Chinese mill, his Vise, his wood lathe, a straight-edge that took him weeks, etc. On this and a couple of other forums the "old timer guru's" write and because they know a bit more then others who read and believe them and it's taken as fact.

I have made, scraped and sold straightedges, have scraped 8" G&L boring machines, 54" bullards, 50' long planer and lathe beds. I have scraped 10 to 600 ton punch presses, I have scraperd Moore Jig bores, Studer and Drake grinders, and as you can see I scraped Myfords along with Bridgeports, etc. I am a renowned scraping expert around the world, so I guess what I write is pretty much the facts of scraping life. I still will be learning till the day I die, but I know BS when I see and read it.

You scrape everything the same way with less PPI for the conventional machine that are less accurate and anyone who says different is full of BS. Anyone reading this, a standard for PPI and POP is 20 /50%. Accuracy for the big conventional machine is .0002"/12" and Jig Bore - Straightedge is .00005/12".

As far as using Alcohol as a highlighter, that is in the BIAX manual that I have included inside my work booklets for over 35 years and the Biax/Dapra booklet was written in the 60's. Plus its in the Conneley book I believe or vs/vera. So it's no secret recipe for scraping.

Biax Scraper Literature - 1991

I am not condemning anyone for wanting to know the thickness of the bueing, but for professional scrapers rebuilding and building machines we have our preferences and have learned through our Journeymen teachers and a lifetime of scraping the appearance of the marking medium, be it Dykem, Canode, permatex, red lead, black lamp, etc. etc. is what counts.

Scraping small 8" swing lathes to a 200" swing is scraped the very same way as far as PPI (points per inch) and POP (% of points) The blade width and scraper stroke length would be different, but nothing else. Rich
 
Lets make this perfectly clear, I have absolutely no issue with dian or anyone else measuring the blue thickness. it's something many people wonder about in the beginning of their scraping career and it is wonderful he started this thread, but in scraping the proper way it has no bearing here.

I know I still rub the "old gang" who used to be considered the scraping experts the wrong way, but for years they got away with teaching their self taught methods and were wrong. After they watched someone else scrape or reading a book just doesn't cut it when someone like the real Journeymen on here write and there students who now know who is full if BS and who are not.

Richard is right :)....one should not over think this....I have been doing that on many things, but you want at least 3 tenths of depth, and to get only the highs hit you need blue that is thinner than 3 tenths. The highs will sink into the film any way, and the real highs will push the blue out all the way and make direct contact with the plate. I also find that blue that is too thin will give you false readings, just as much as blue that is too thick. At the last class Paulo and i were at times looking for that "encouragement" so we slapped on a bit more blue here and there. The thickness of the blue you want will depend on where you want to be, if you are trying to get an even 10 PPI coverage on an SE or a surface plate, you may need more blue, if you want to go from 20 PPI to 40 you may need a very thin layer of blue. Listen to Richard, the guy who knows, he is telling you to read the spots, the gradation of blue, and adjust the blue as you need it, put away the 1 micron gage, you cannot put an even coat of 2 micron thick anyway. If your spots are too faint and not even, put on more blue, if you get blue in the valleys wipe some off, or maybe you are not scraping deep enough. If your part is not hinging right you have more to worry about then the thickness of the blue. The beauty of this stuff is that you do not need laser interferometry and ultra-precise temperature controlled environments to achieve 0.00005 straightness over 12". Remeber not to park on the grass, and the other for rules Richard made us repeat randomly.

dee
;-D
 
Not arguing, 'cause I think we agree.

But here's PPI and there's PPI. There's coverage % and there's coverage %.

If someone puts on too much, a lot of sorta kinda high stuff gets blued that maybe isn't really a high spot, so the poor guy might see 15 or 20 PPI, only those spots aren't all at the same level the way they should be to be "real". For a lubed bearing, maybe he gets away with it because there is a bunch of oil in there, but the real high spots will wear off sooner and make a bigger change sooner. And that might not be enough to smear, or fill0in, at least that's what I have seen.

So PPI isn't all of it, it has to be "real" PPI. And so you gotta know what a certain amount of blue does, as you read it off the part you are scraping, just to know that you are getting "real" indications. I usually figure that toward the end of the task on a surface if I am getting bullseyes, that I am getting "real" prints, not too much, not too little, so I can believe the PPI.

That was kinda what I was asking about the pics of blued surfaces. A lot of them that were for straightedges etc seemed to show up in the pic a lot better than I typically see for mine, and I wondered if most were done with extra just to get something that showed up, or if those were legit prints.

Not too sure about being fooled by too little blue.... I mostly see too little as just not showing enough of what's going on, so I don't scrape at all, I clean it, add blue, and go again. What kind of false readings did you have in mind? When it's that thin, it usually is not too even either, so maybe that's what you mean..... missing areas.

I'm not any kind of expert at it other than probably doing most of what can be done wrong at one time or another because nobody told me not to. I'm kinda expert at screwing up, but I learn from it. That's how I learned not to do some things.
 
I completely agree that, for scraping purposes, it is not necessary to know precisely how thick is the layer of blue. Surveying the piece with a tenth indicator would provide much more valuable information.
That said, this question is one of the most frequently asked by the visitors when I do scraping demonstrations at the Machine Shop Museum (I generally resort to somehow general answers, like "between 20 and 60 millionths").
For the speculative minds among us, looking for any excuse to play around with our most sensitive instruments, I suggest a simple test: scrape a reasonably small cast iron block to a decent bearing. If the opposite face is parallel, even better, but this is not strictly necessary for what we need to do.
Blue your block and put it under the comparator trying to touch it as little as possible in order not to disturb the thermal equilibrium. Now, with the indicator, you can measure the difference in height between a top, shiny spot and the adjacent spots with different types of bluing. Repeat it in a few places and calculate the average. I think it is safe to assume that a narrow-enough tip would displace most of the bluing.
True, this way you haven't measured the true thickness of the blue on the master, but you obtained a slightly more meaningful piece of information: what is the "numeric value" of the various types of blue, given that "density" (= ~thickness) of blue on the master.

Lastly, two things. First, I completely agree with RC99 and Dee: especially if you have still holes and you don't know how deep the areas that don't blue are, a little bit more blue on the master helps speeding up the work.
Second, especially thanks to Richard's class, I came to realize that my struggles in properly calibrating the thickness of blue during the finishing passes was mostly due to too shallow scraping marks. One should strive to keep the same depth of cut even during the finishing passes.

Paolo


Back
Top