What's new
What's new

Life expectancy of micrometer

drgnrider

Aluminum
Joined
Jul 10, 2012
Location
NCK, USA
Anyone know about what the typical life expectancy of a decent micrometer is (Starrett 436, Mitutoyo 103, etc.)?

I know everyone will have opinions on their personal one(s) they have had for ages, but what I am looking for are the ones that EVERYONE in the shop uses, (newbie, experienced, “Mr. Not mine, don’t care about it”, etc.).

Have some that are getting worn, (guessing circa-1970's... like the rest of our IMTE), and senior management apparently doesn't understand why all of a sudden we need to shell out $2K for a new 0-12" set. Apparently my opinion regarding their condition or that four of 12 are over their DIN-863 limits don't count. What is being heavily relied upon is that my retired predecessor "ensured all IMTE he calibrated passed calibration" (DON'T ask for records, none exist). Unfortunately, I'm not that type of person, my reputation means more than that... my "awaiting repair" pile is growing rather quickly.
 
Looked after, they should last virtually forever. It is not difficult to repair and reset micrometers, any competent metrology lab should be able to do it, I have always done my own, and you may find that your old gear re certified is quite a lot better than new stuff, not everything Starret is made in the USA any more, and you may find that not all Mitto is made in japan! It is a matter of strip, clean and adjust the threads, check the faces with a glass for any damage (the one reason to replace them really) reassemble and check with standards certified by whatever standards body is relevant to you.
 
You might give management a price comparison of new instruments, vs. re-manufacturing the old ones (and you can split that of the cost for YOU to do it vs. the cost to have it professionally done).
 
I've seen 100 year old micrometers fully capable of meeting their new specs. I've also seen one year old mics, quality brands, used and abused in a grind shop to the point they needed to be pitched in a year or two.
 
Maybe I've lead a sheltered life, or perhaps only worked in tight-spec shops, but ...
I've never seen a shop where "everybody" used the same instruments.

In all of my experience, each machinist owned his own measuring tools.

The first real "machinist" tool I bought when I entered the apprentice program in 1964 was a used British Moore & Wright 0-1" micrometer.

I still have it and use it, and it still meets cal after the 50 years I've owned it. I have no idea how old it actually is.
My cal reference is gage blocks and my 50 microinch Mitutoyo digital mics (several thereof).

- Leigh
 
Leigh-

A lot of shops do not let you bring in your own equipment because they don't want you to use equipment thats not calibrated. Plus that avoids theft issues between employees.
 
I have a set of 1 inch Craftsman mics , with 10th resolution marks , my dad bought them new in the early 60s , still work great ! I remember taking them to school about the 3rd grade , show and tell , showed them teachers and kids how to measure a hair , bout .0024 ( if I remember correctly ) . Dang I should have studied English or something. I probably wouldn't be in here working over time , I would be selling insurance , and be on the golf course this afternoon!
 
Looked after, they should last virtually forever. It is not difficult to repair and reset micrometers, any competent metrology lab should be able to do it, I have always done my own, and you may find that your old gear re certified is quite a lot better than new stuff, not everything Starret is made in the USA any more, and you may find that not all Mitto is made in japan! It is a matter of strip, clean and adjust the threads, check the faces with a glass for any damage (the one reason to replace them really) reassemble and check with standards certified by whatever standards body is relevant to you.


Unfortunately, these have not been looked after. Have a number of "Mr. Not mine, don’t care about it” using these. I had to soak two of our OD Mics for over a week to get the sleeve to rotate, and many more for a few days... after all this I still broke five wrenches trying to turn the sleeves. I then stripped and cleaned them. Tried to tighten the threads but that didn't make any difference. To top it all off, it looks like someone used a pair of pliers on one of the sleeves and crushed the threads; got the spindle out to clean it and clean-up the sleeve, now the spindle will only go in a few threads before it stops.

I don't have have a way to fully check ends as the optical flats that are here are pretty deeply gouged, I am trying to order some new ones (been using these to practice with as I have never used these before... not going well...taking suggestions ;)). Have used a cheap x20 pocket microscope; shows every face, carbide and not, to be scratched, chipped, and/or grooved.
 
A lot of shops do not let you bring in your own equipment because they don't want you to use equipment thats not calibrated. Plus that avoids theft issues between employees.
OK. I can believe that. It makes sense. I've never worked in such a shop.

All of my experience is with shops that issue tools to individual workers, who treat such as their own property.

However, these are all calibrated and stickered by the company cal lab or an outside lab.

- Leigh
 
I don't have have a way to fully check ends as the optical flats that are here are pretty deeply gouged.
Mitutoyo makes a special calibration set for micrometers. It optionally includes a precision optical flat.

This flat is quite different from standard catalog optical flats in that the faces of this one are quite accurately parallel.

That's not true of standard optical flats, in which the imprecise face is only reasonably parallel to the optically flat face.

- Leigh
 
You might give management a price comparison of new instruments, vs. re-manufacturing the old ones (and you can split that of the cost for YOU to do it vs. the cost to have it professionally done).


Wouldn't mind if I knew what parts needed to be replaced, knew the Mics were repairable, and knew I could do so without damaging them.


Maybe I've lead a sheltered life, or perhaps only worked in tight-spec shops, but ...
I've never seen a shop where "everybody" used the same instruments.

In all of my experience, each machinist owned his own measuring tools.

Leigh-

A lot of shops do not let you bring in your own equipment because they don't want you to use equipment thats not calibrated. Plus that avoids theft issues between employees.

All of my experience is with shops that issue tools to individual workers, who treat such as their own property.

However, these are all calibrated and stickered by the company cal lab or an outside lab.

- Leigh


Our shop is a combination of about all of this. Employees have certain tools they are to provide to do their job: 12” calipers, 0-1” indicator, OD mics to 3”, other tools the company does not have: last word, co-ax, etc. The company also has some for central issue: OD mics to 72", indicators up to 3" travel, calipers up to 80", etc., that very few people actually attempt to not mistreat. All of these tools, employee tools included, are supposed to be calibrated locally (by me) or I have sent out. Some of the employees’ don't maintain their own tools so I don’t expect them to treat the company tools any better.

Many of the company’s tools are predominantly used when someone knows they are going to the 48” wet grinder or will be working in lots of coolant since they don’t want to mess up the tools they had to paid for. Then they don’t bother to rinse them off before turning them back in… the coolant & dust dries; tool gets issued back out; repeat, but don't rinse.

Theft has not been a problem as toolboxes are kept locked when not in the shop.


Mitutoyo makes a special calibration set for micrometers. It optionally includes a precision optical flat.

This flat is quite different from standard catalog optical flats in that the faces of this one are quite accurately parallel.

That's not true of standard optical flats, in which the imprecise face is only reasonably parallel to the optically flat face.

- Leigh


Hmmm… I will need to look into this. Thanks. :)

-----------------------------------------------------
 
I have a set of 1 inch Craftsman mics , with 10th resolution marks , my dad bought them new in the early 60s , still work great ! I remember taking them to school about the 3rd grade , show and tell , showed them teachers and kids how to measure a hair , bout .0024 ( if I remember correctly ) . Dang I should have studied English or something. I probably wouldn't be in here working over time , I would be selling insurance , and be on the golf course this afternoon!

So you could have proven to your 3rd grade teacher than an RCH IS smaller than a BCH
 
Mitutoyo makes a special calibration set for micrometers. It optionally includes a precision optical flat.
This flat is quite different from standard catalog optical flats in that the faces of this one are quite accurately parallel.
That's not true of standard optical flats, in which the imprecise face is only reasonably parallel to the optically flat face.
Hmmm… I will need to look into this. Thanks. :)
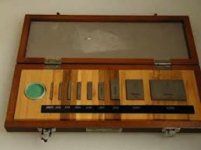
This is quite a nice set, Mitutoyo Gauge Block Set No. 516-931, Code No. BE1-9-3

It has blocks of 0.1, 0.2, 0.3, 0.5, 1.0, and 2.0" length, so you can make stacks up to 4".
The set also has blocks of 0.125" and 0.250" for checking at different spindle angles.

One nice thing is that calibration at Starrett Webber is cheap because there are so few blocks. :D

Mitutoyo Microm cal set 516-931 c2x.jpg

- Leigh
 
How often it is used and the shop environment would vary the number greatly. 1-50 years.
Some last longer, we use a brand that gives a good tradeoff for the pricetag.
Using it every 10 minutes all day long is a whole lot different than using it 5-10 times a day.

In a 24/7 carbide tooling shop as the main mic at the machines two years would be really stretching it and three would most certainly be a recipe for disaster..
This even though the majority of measuring is done with the LVDTs and optical gauges so you get a warning that the mic is funky.
We are kind of picky about our gauges and we give these used up but nice mics to employes to take home and use for lessor tolerance work.

Weird to some here, but I see mics, dtis, calipers and such as "disposable tooling" and have put many, many into the dumpster.
We just eat them up and toss them. Like Doritos, they will make more.

Many will pitch how much in endmills and inserts, yet hold onto a mic forever like it is some kind of keepsake.
Yes I have 40 year+ mics at home in the tool box. I also know they aren't so good but will id a bolt for me.
I've never understood how people get so attached to these things.
Bob
 
Because they represent milestones in one's life.

They bring back memories of the world as it existed at that point in time.

- Leigh

And for me, even collecting odd micrometers and calipers are a living memory of how someone thought, how it was designed and the people who made it. I may never meet them, know their faces or their names, but I have their work. I can hold it in my hands, I can see the quality and care taken to create it, and I can appreciate it.

Tools are memories of milestones in manufacturing, and to a lesser extent, perhaps some of the stepping stones in the journey of humankind.

Maybe I'm a little too sentimental for being 31, though.
 
When I worked for a machine dealer we would go to factories and there would be piles of worn out measuring equipment. They would scrap it all because they didnt want it getting back into the system. Mic that are used a few times a day could last forever but guys that run parts all day and check parts all day they wear out tools. I picked up a bunch of worn out starret mics and we called them precision c clamps.
 
...we called them precision c clamps.
Funny shit. I remembered a guy back at the local community college who liked to mess with the old crotchety tool crib guy. He would go up to the window and ask for one of those little C clamp thingies. What C clamp thingies? You know, the special ones with the little numbers on the side so you know exactly how much pressure you are using to clamp up a part. :fight:
 
I've never understood how people get so attached to these things.
Bob

Because they represent milestones in one's life.

They bring back memories of the world as it existed at that point in time.

- Leigh

The ones I got from my grandfather who used them in his trade for 40 years, or the ones I personally bought for my use as my expertise grew... hold some form of sentimental value!
The ones that the company acquires for everyone's use... have no sentimental value!

Now a collector who collects for collecting's sake.......... :scratchchin:
 
Looked after, they should last virtually forever. It is not difficult to repair and reset micrometers, any competent metrology lab should be able to do it, I have always done my own, and you may find that your old gear re certified is quite a lot better than new stuff, not everything Starret is made in the USA any more, and you may find that not all Mitto is made in japan! It is a matter of strip, clean and adjust the threads, check the faces with a glass for any damage (the one reason to replace them really) reassemble and check with standards certified by whatever standards body is relevant to you.
You're right. They can last almost forever if treated w/ respect. I've reconditioned many old timers. Disassemble, clean the threads, readjust spindle clearance, oil, lap the measuring surfaces, and their ready for another generation of use. Sometimes the old Starretts have a problem with the adjusting sleeve seizing up because of dried old oil. These can be soaked in penetrating oil and loosened using a three jaw chuck, after wrapping the sleeve w/ copper shim stock. It's amazing how much life there is in these old tools! Biggest problem is repairing the lock or ratchet stop if some previous owner/user messed it up. Parts are hard to find.


Back
Top